Adding Firebase to your Flutter App

Table of Contents
Adding Firebase to your Flutter App
Introduction
Firebase is a Backend-as-a-Service – BaaS – that started as a YC11 startup and grew up into a next-generation app-development platform on Google Cloud Platform.
Firebase frees developers to focus on crafting fantastic user experiences. You don’t need to manage servers. You don’t need to write APIs. Firebase is your server, your API and your datastore, all written so generically that you can modify it to suit most needs. Yeah, you’ll occasionally need to use other bits of the Google Cloud for your advanced applications. Firebase can’t be everything to everybody. But it gets pretty close.
Top Features of Firebase
- **Build apps fast, without managing infrastructure
** Firebase gives you functionality like analytics, databases, messaging and crash reporting so you can move quickly and focus on your users. - **Backed by Google, trusted by top apps
** Firebase is built on Google infrastructure and scales automatically, for even the largest apps. - **One platform, with products that work better together
** Firebase products work great individually but share data and insights, so they work even better together.
What you’ll build?
In this tutorial, you’ll build a mobile app featuring Firebase integration using the Flutter SDK. Your app will:
- Have fully setup Firebase
- Ready to work with Auth & Databases
- Have endpoints for Admob & Analytics
This tutorial focuses on adding Firebase to a Flutter app. Non-relevant concepts and code blocks are glossed over and are provided for you to simply copy and paste.
Github | @ShivamGoyal1899
ShivamGoyal1899 - Overview
AI Researcher | Sophomore. ShivamGoyal1899 has 44 repositories available. Follow their code on GitHub. github.com
Setting up Flutter on your machine
The detailed steps to install Flutter on your personal computer & getting started with Flutter is available at the following blog
**How to install Flutter and create a simple Flutter app **
Learn what is Flutter and how to set it up on Windows and Mac systems and get started with Flutter apps medium.com
Create a Firebase project
After setting up & creating a simple Flutter app, navigate to Firebase Official website here:
Firebase
_Firebase is Google ’s mobile platform that helps you quickly develop high-quality apps and grow your business._firebase.google.com
- Click on Get started.

Click on Get started
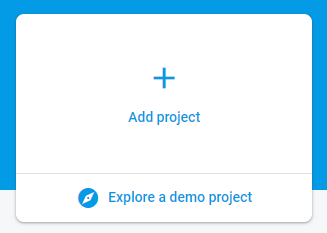
- Create a new project by tapping on the Add project box.
- Enter the Project name & select Analytics location.
Analytics location represents the country/region of your organization and sets the currency for revenue reporting.

- Tap on Create project. Following this, Firebase will set up a new project for you. This will take just a minute.


- After the project is created successfully, Firebase will show a prompt saying
**Your new project is ready.**** ** Click on Continue to complete the flow. - After the project is created successfully, Firebase will show a prompt saying
**Your new project is ready.**** ** Click on Continue to complete the flow.

Configure your app to use Firebase
Configure an Android app
- In the Add an app to get started section, click on **Android **Icon to add an Android app to Firebase.

- On the next screen, enter your Android package name & App nickname and click on Register App. Your package name is generally the
**applicationId**in your app-level**build.gradle**file. If specified, the app nickname will be used throughout the Firebase console to represent this app. Nicknames aren’t visible to users.

- Download the
**google-services.json**file & place it in your project’s**app**root directory. Make sure the config file is not appended with additional characters, like**(2)**.

The Google services plugin for Gradle loads the
**google-services.json**file you just downloaded. Modify your build.gradle files to use the plugin.Project-level build.gradle (
/build.gradle): buildscript { dependencies { // Add this line **classpath ‘com.google.gms:google-services:4.2.0’ ** } }
App-level build.gradle (
/ /build.gradle): dependencies { // Add this line **implementation ‘com.google.firebase:firebase-core:17.0.0’ **} … // Add to the bottom of the file apply plugin: ‘com.google.gms.google-services’
Back in the Firebase console-setup workflow, click Next to skip the remaining steps.
Run
**flutter packages get**.
Configure an iOS app
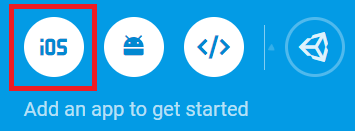
- In the Add an app to get started section, click on **iOS **Icon to add an iOS app to Firebase.
- On the next screen, enter your **iOS bundle ID **& App nickname and click on Register App. You can find your Bundle Identifier in the General tab for your app’s primary target in Xcode. If specified, the app nickname will be used throughout the Firebase console to represent this app. Nicknames aren’t visible to users.

- Download the
**GoogleService-Info.plist**file & move the**GoogleService-Info.plist**file you just downloaded into the root of your Xcode project and add it to all targets. Make sure the config file is not appended with additional characters, like**(2)**.

- Back in the Firebase console-setup workflow, click Next to skip the remaining steps.
- Run
**flutter packages get**.
Add FlutterFire plugins 🔥
Flutter uses plugins to provide access to a wide range of platform-specific services, such as Firebase APIs. Plugins include platform-specific code to access services and APIs on each platform.
**Firebase **is accessed through a number of different libraries, one for each Firebase product (for example, database, authentication, analytics, or storage). Flutter provides a set of Firebase plugins, which is collectively called FlutterFire.
Since Flutter is a multi-platform SDK, each FlutterFire plugin is applicable for both iOS and Android. So, if you add any FlutterFire plugin to your Flutter app, it will be used by both the iOS and Android versions of your Firebase app.
Available FlutterFire plugins
- cloud_firestore
- cloud_functions
- firebase_admob
- firebase_analytics
- firebase_auth
- firebase_core
- firebase_crashlytics
- firebase_database
- firebase_dynamin_links
- firebase_messaging
- firebase_ml_vision
- firebase_performance
- firebase_remote_config
- firebase_storage
Steps to add FlutterFire plugins to your app
From the root directory of your Flutter app, open your
**pubspec.yaml**file.Add the FlutterFire plugin for the Firebase Core SDK. All Flutter apps, both iOS and Android versions, require the
**firebase_core**plugin.dependencies : flutter : sdk : flutter firebase_core : ^0.2.5 # add dependency for Firebase Core
Add additional FlutterFire plugins to use specific Firebase products.
Run
**flutter packages get**.
Running the application
- Connect your Emulator or physical Android device to test the application.
- Click on Build & Run.
- And Boooom 🧨, you’re all set! Your Flutter app is registered and configured to use Firebase.

Flutter Full App with Firebase | Enappd
Flutter Full App - Complete starter for Flutter - Enappd | Ionic, React Native, Firebase themes …
_Get the latest and amazing Flutter Full App. It is loaded with a large number of options, layouts, and functionalities …_store.enappd.com
Enappd Store | Premium App Starters
Enappd | Ionic, React Native, Firebase themes, templates and starters
_Get the full source code for Ionic, React Native, Firebase mobile app templates and starters. Use free templates and …_store.enappd.com