The JavaScript RAG : Building Chat with Next.js & Supabase
Introduction
In this project, we are building a RAG (Retrieval-Augmented Generation) pipeline from first principles using a JavaScript stack. This approach is designed to be friendly for web developers. The data flow demonstrates the fundamentals of LLMs, vector databases, embedding retrieval, and the RAG system. By the end of this blog, you will understand the purpose of each component and how to swap them out to customize your own RAG system.
We will use custom CSS to give the project a polished look without interfering with the data flow. This project is easily deployable on Vercel cloud or any other cloud which supports NextJS builds. Note that using the LLM (OpenAI) requires an API key, which is not free - you can use any other LLM/embedding in place of it.
How Retrieval-Augmented Generation (RAG) Works
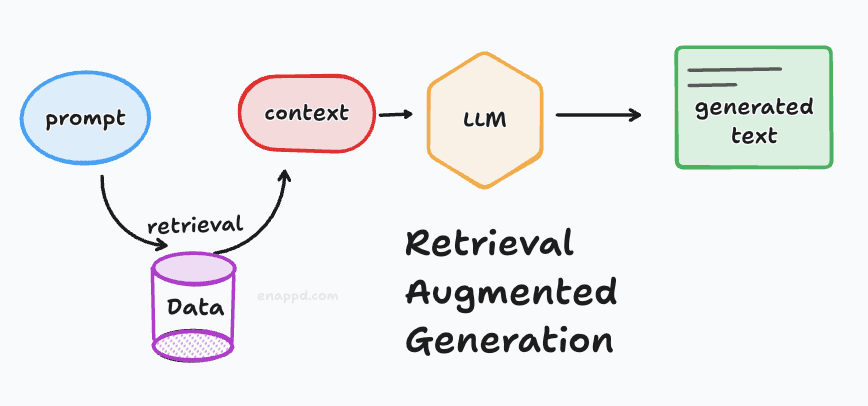
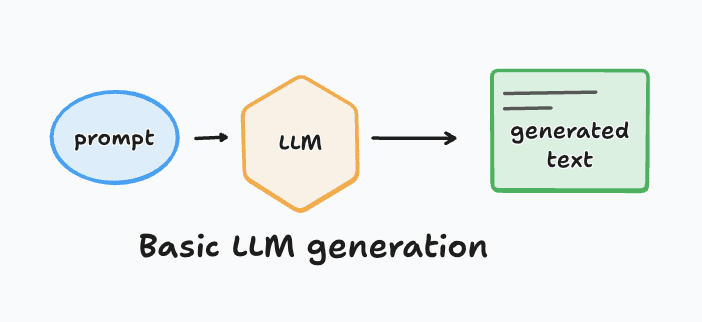
At a basic level, we know how a standard LLM works: a prompt is fed into the model, and it generates an output.
RAG is an improvement over this basic flow. It provides extra context to the LLM by retrieving relevant information based on your prompt -usually from a private or specific database -and appending it to the model’s instructions.
To build such a system, there are two critical pipelines:
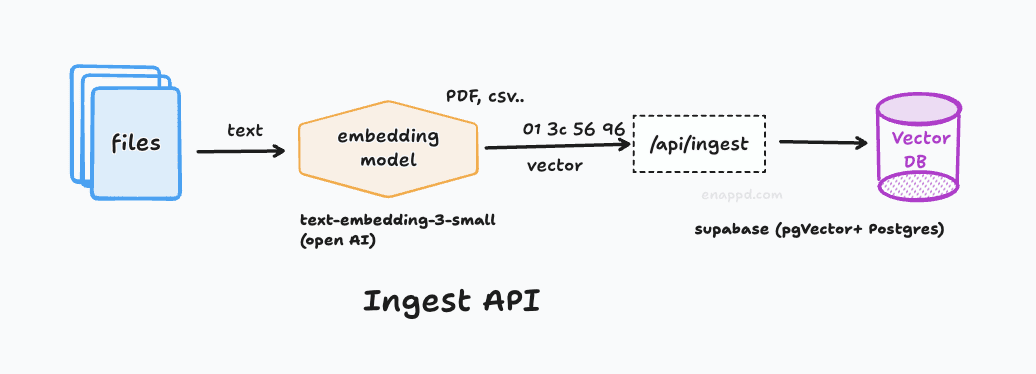
1. Data Ingestion
This pipeline ensures your data (like documents or PDFs) can be uploaded and persisted over time.
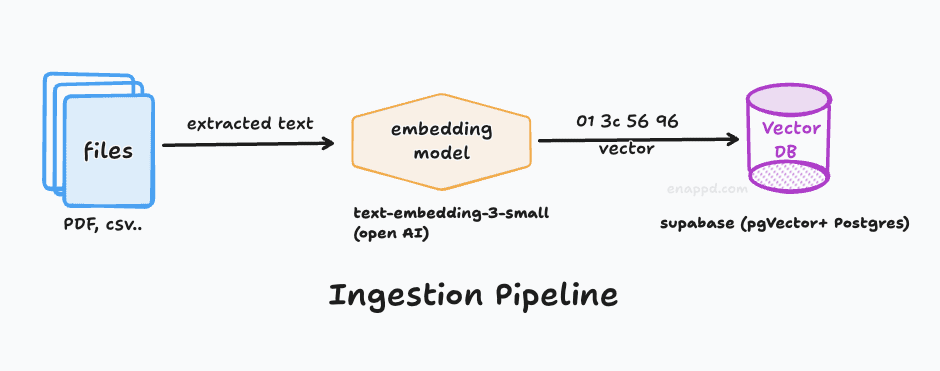
Vector Databases: Unlike traditional databases, LLMs don’t search based on exact keyword matching. Instead, they search based on semantic similarity / vector similarity. Here we have used Supabase (Postgres + PgVector)
Embeddings: To achieve this, we convert text into numerical vectors called embeddings or vectors. For example, while the words “cat” and “dog” are textually different, their embeddings are mathematically similar because they share many contextual traits.
The Embedding Model: When using OpenAI, you don’t just need the LLM; you also need an embedding model to convert your text into a format compatible with the vector database. like text-embedding-3-small from openAI
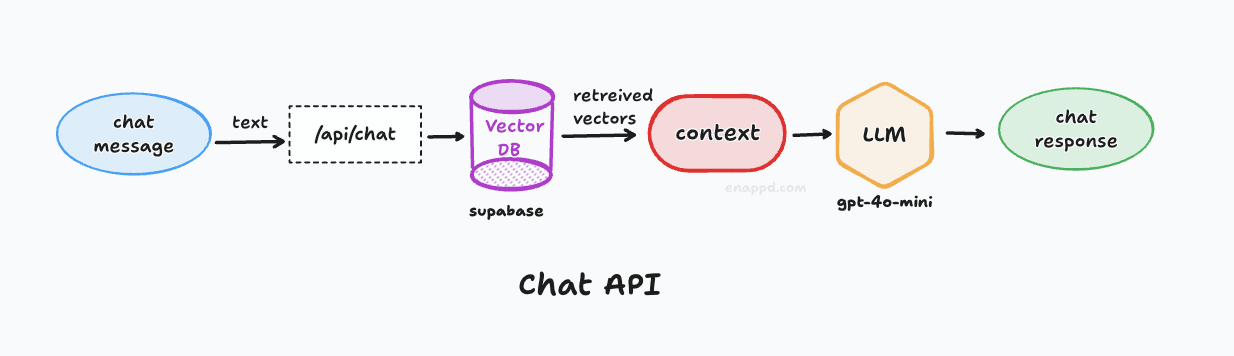
2. Retrieval and Context Generation
This pipeline is essentially the reverse flow from the vector database.

The Process: Instead of sending your raw prompt directly to the LLM, the system first sends it to the vector database.
Contextual Chunks: The database finds similar “chunks” of data. We then combine these chunks to create a context that is fed into the LLM along with your original query.
The Result: The LLM uses this specific context to provide a much more relevant and accurate response. In our implementation, we will use the simplest method: appending all retrieved chunks together as a single block of context.
Orchestration : To connect the embedding model, the vector database, and the LLM into a single pipeline, we need an orchestrator.
We will use LangChain, which is one of the most established tools for this purpose. While newer alternatives exist, LangChain is widely documented and remains a great starting point for learning.
Our Development Roadmap:
Setup Next.js: Set up the application framework.
Setup Supabase: Configure this as our Vector Database.
Setup LangChain
Implement the orchestration logic for the two critical pipelines described above.
React Interface: Build the final UI to interact with our RAG system.
The Architecture
Everything lives in a single Next.js repo, deployed as Serverless Functions.
The Stack
- App Engine: Next.js 14+ (App Router).
- Database & Vector Store: Supabase Online(PostgreSQL +
pgvector). - Orchestration: LangChain.js from npm
- AI SDK: Vercel AI SDK (for UI streaming).
- File Storage: Supabase Storage (for keeping raw uploaded files).
Complete Source code available on Github : RAG Chat
1. NEXT JS based application
Environment
Create a .env.local file in the root of the project (rag-chat/).
Currently, no variables are required for the landing page. But we will fill in the variables later on as required
Installation
The project was initialized with the following command:
npx create-next-app@latest rag-chat --typescript --eslint --no-tailwind --src-dir --app --import-alias "@/*" --use-npm --no-git
To install dependencies (if not already done):
npm install
After this we have designed a simple CSS to show the interface. You can use any code similar to it - via AI agents, or You can use our code.
Development
To run the development server:
npm run dev
The output should look like standard NextJS home page. We will add some CSS, HTML etc. which you can get from the repo.
2. Database Setup: Supabase and LangChain
Creating Supabase Project
Next, go to the Supabase dashboard and create a new project under your organization. If you are new to Supabase, you may need to create an organization first.
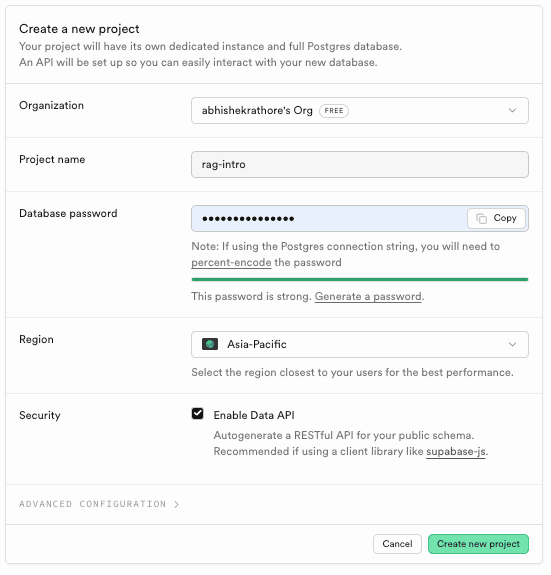
Set a project name and a strong database password (keep this safe). You can keep the default region settings.
Environment Variables
Add the following to your .env.local file to your NextJS root,
SUPABASE_URL=your_supabase_project_url

SUPABASE_SERVICE_ROLE_KEY=your_supabase_service_role_key

OPENAI_API_KEY=your_openai_api_key
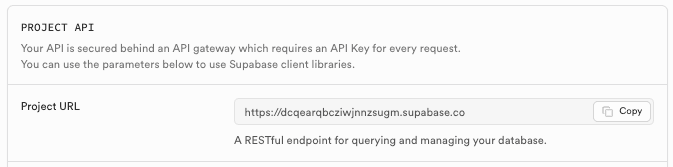
You can find the Supabase URL under the home of project.
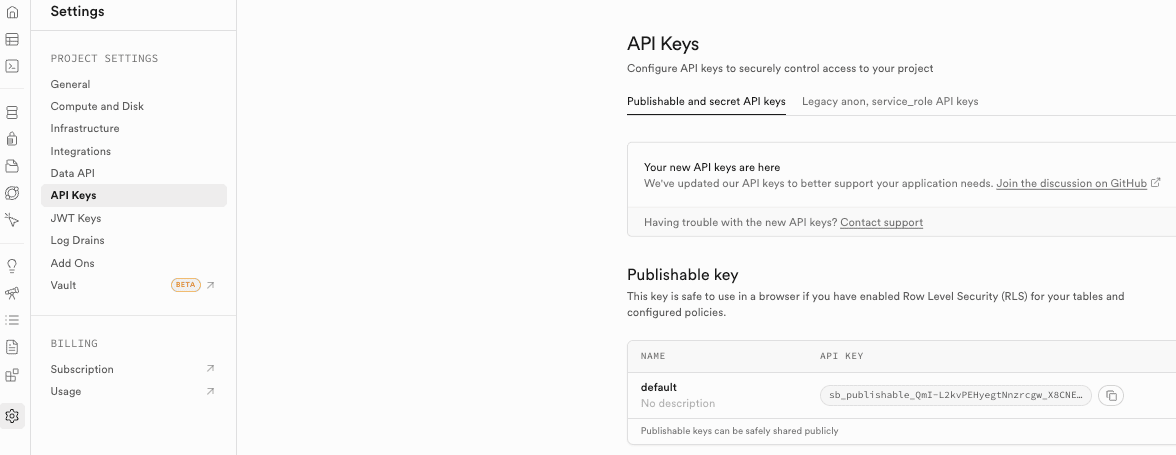
For the supabase service role key you have to go to project settings > API keys > Service role API key tab.
Since we are building a RAG app, you will need an OpenAI API key. Other LLMs can be used, but this project uses the Supabase OpenAI integration for easier setup.
The OpenAI API key can be obtained from their platform. Note that paid credits are usually required.
Database Configuration
Run the following SQL in your Supabase SQL Editor:
-- Enable the pgvector extension to work with embedding vectors

create extension if not exists vector;

-- Create a table to store your documents

create table documents (
id bigserial primary key,
content text, -- corresponds to Document.pageContent
metadata jsonb, -- corresponds to Document.metadata
embedding vector(1536) -- 1536 works for OpenAI embeddings
);


-- Create a function to search for documents

create or replace function match_documents (
  query_embedding vector(1536),
  match_threshold float DEFAULT 0.1, -- crucial to change this
  match_count int DEFAULT 10,
  filter jsonb DEFAULT '{}'
)
returns table (
  id bigint,
  content text,
  metadata jsonb,
  similarity float
)
language plpgsql
stable
as $$
begin
  return query
  select
    documents.id,
    documents.content,
    documents.metadata,
    1 - (documents.embedding <=> query_embedding) as similarity
  from documents
  where 1 - (documents.embedding <=> query_embedding) > match_threshold
  and documents.metadata @> filter
  order by similarity desc
  limit match_count;
end;
$$;
It should return => Success. Now rows returned
Lets understand this code :
The SQL code defines how we store and search for AI-generated “embeddings” (mathematical representations of text) in your database.
The documents Table
create table documents (
 id bigserial primary key,
 content text,
 metadata jsonb,
 embedding vector(1536)
);
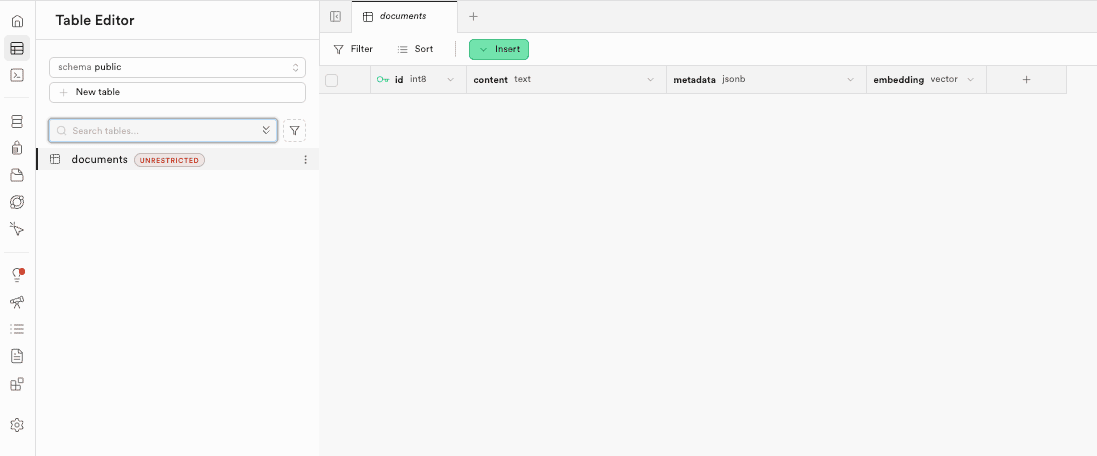
content: Stores the actual raw text from user files (e.g., a paragraph from a PDF).metadata: A JSON object storing extra details like{"filename": "report.pdf", "page": 1}. This allows us to filter search results later.embedding: A special column type provided bypgvector. It stores an array of 1,536 floating-point numbers. This vector represents the meaning of the content. 1,536 is the specific dimension size used by OpenAI’stext-embedding-3-smallmodel.
supabase-documents-table.png]]
The match_documents Function
Its heavy 😅 but everything makes sense if you read it. Skip if you don’t want to know how SQL query of vector similarity works
create or replace function match_documents (...)

This is a Remote Procedure Call (RPC)/ User Defined functions that runs inside Postgres. It performs the actual “Semantic Search”. It takes a user’s question (converted to a vector) and compares it against every row in the documents table.
match_documents(...params list...) : this is function name which has some params for query_embedding - what content to match, match_count - how many docs to return, match_threshold - what is matching threshold score, filter- additional filters
returns table(....) : this is Return Type Specification defining which columns it will return in result.
plupgsql : Procedural Language/PostgreSQL
stable : can’t modify DB
as $$... $$ : real implementation function which does all the matching work, some thing to notice :
<=>Operator: This is the “Cosine Distance” operator. It calculates how “far apart” two vectors are, your input query vector and stored document vectors.Low distance = Highly similar meaning.
High distance = Different meaning.
1 - (...): We convert “distance” to “similarity” (where 1.0 is a perfect match).where ... > match_threshold: some criteria of similarity levels;
[!Why Database function] Running this inside the database is much faster than fetching all rows to the server and calculating it there. Thats why we have this remote call.
LangChain Installation
We will install dependencies requires for LangChain, the OpenAI langchain connector, and the Supabase connector.
Dependencies installed via NPM:
npm install @langchain/community @langchain/openai @supabase/supabase-js langchain
Here is our code to connect everything :
export const getVectorStore = async () => {
  const privateClient = createClient(
    process.env.SUPABASE_URL!,
    process.env.SUPABASE_SERVICE_ROLE_KEY!
  );

  return SupabaseVectorStore.fromExistingIndex(
    new OpenAIEmbeddings({
      modelName: "text-embedding-3-small",
    }),
    {
      client: privateClient,
      tableName: "documents",
      queryName: "match_documents",
    }
  );
};
The file src/lib/supabase-vector-store.ts is the bridge between our application and the database. Code
Why privateClient?
const privateClient = createClient(
  process.env.SUPABASE_URL!,
  process.env.SUPABASE_SERVICE_ROLE_KEY!,
);
We use the Service Role Key here, which gives this client “Admin” privileges (bypassing Row Level Security).
Security: This is safe because this file runs only on the server (in API routes). This key is never sent to the user’s browser.
Purpose: This allows our app to write embeddings to the database without requiring a specific user to be logged in.
The Factory Function
export const getVectorStore = async () => { ... }
This function sets up the LangChain SupabaseVectorStore class with our specific configuration:
new OpenAIEmbeddings(): Tells LangChain to use OpenAI to generate vectors for any new text we add.client: privateClient: Uses our admin connection to talk to Supabase.tableName: "documents": Tells LangChain which table to write to.queryName: "match_documents": Tells LangChain which SQL function to call when we want to search. This we already created beforehand in Supabase
Except VectorStore functionality all special classes you will see are from Langchain - for text manipulation, open AI embedding, document extraction etc
[!Isn’t service role key a security risk ?] Regarding the
SUPABASE_SERVICE_ROLE_KEYits for backend use only (it bypasses Row Level Security). In our architecture,src/lib/supabase-vector-store.tsruns exclusively on the server (imported by API routes). Next.js prevents variables from leaking to the client browser. So, your key is safe.
3. The Ingestion API for Docs (PDF, CSV, TXT)
Here we want to create a new API endpoint which will get the uploaded documents from Our Interface. We will use standard practice to create next.js API route
Endpoint: /api/ingest
- Method:
POST - Body:
FormDatawith a keyfile. - Supported Types: PDF (
application/pdf), CSV (text/csv).
We will need an addition plugin pdf-parse for langchain to parse PDF properly, and d3-dsv for CSV parsing :
npm install pdf-parse d3-dsv
The Process
So we will create api/ingest/route.ts file which has these components :
File loading: Standard HTML form handling to receive the file and convert it into a Blob.
Loader Routing: We check
file.type.
- If
application/pdf, we usePDFLoader(LangChain). - If
text/csv, we useCSVLoader(LangChain) - Why? Different file formats need specific parsing logic to extract clean text.
const formData = await req.formData();
    const file = formData.get("file") as File;

    if (!file) {
      return NextResponse.json({ error: "No file found" }, { status: 400 });
    }

    // 1. Convert File object to Blob for LangChain loaders
    console.log("Received file type:", file.type);
    const blob = new Blob([await file.arrayBuffer()], { type: file.type });
    let docs = [];

    // 2. Router Logic based on MIME type
    const isPdf = file.type === "application/pdf" || (file.type === "application/octet-stream" && file.name.endsWith(".pdf"));
    const isCsv = file.type === "text/csv" || file.type === "application/vnd.ms-excel" || (file.type === "application/octet-stream" && (file.name.endsWith(".csv") || file.name.endsWith(".txt")));

    if (isPdf) {
      const loader = new PDFLoader(blob, { splitPages: false });
      docs = await loader.load();
    } else if (isCsv) {
      const loader = new CSVLoader(blob);
      docs = await loader.load();
    } else {
      // Fallback or error for unsupported types
       return NextResponse.json({ error: `Unsupported file type: ${file.type}` }, { status: 400 });
    }
- Text Splitting (
RecursiveCharacterTextSplitter):
- AI models have a “Context Window” (limit on how much text they can read at once).
- We split long documents into smaller chunks (1000 characters).
- Overlap (200 chars): We keep some text from the previous chunk in the next one. This ensures we don’t cut a sentence in half and lose context.
const splitter = new RecursiveCharacterTextSplitter({
  chunkSize: 1000,
  chunkOverlap: 200,
});
const splitDocs = await splitter.splitDocuments(docs);
- Metadata Injection:
- We tag every chunk with
fileName. - This is crucial for later phase of UI, where we might want to “Chat with this specific PDF”.
const sanitizedFilename = file.name.replace(/[^a-zA-Z0-9.-]/g, "_");

const docsWithMetadata = splitDocs.map((doc: Document) => {
      doc.metadata = {
          ...doc.metadata,
          fileName: sanitizedFilename,
          uploadedAt: new Date().toISOString()
      };
      return doc;
    });
- Vector Storage:
vectorStore.addDocuments(...)does two things:a. Sends text to OpenAI -> Gets numbers (Vector). b. Saves Text + Metadata + Vector to Supabase.
const vectorStore = await getVectorStore();
await vectorStore.addDocuments(docsWithMetadata);

return NextResponse.json({ ok: true, count: docsWithMetadata.length });
Testing our server with API
You have to make sure :
- Supabase keys are added in
.env.local - Open AI key is added
- Open AI project has enabled the required
modelsandembeddings
# Create a dummy CSV file
echo "name,description\nApple,A red fruit\nBanana,A yellow fruit" > test.csv

# Send to API
curl -X POST -F "file=@test.csv" http://localhost:3000/api/ingest
This should result in a 200 OK message.

Note :
- please make sure server is running properly before this CURL test.
- You may face many kind of errors at level of Code (incorrect installations), Keys not found in environment, OPEN AI models not enabled etc. DEBUG these before moving forward
So we are done with the process of storage
Data => Embeddings => API => Vector Database
Now this is only storage now lets check other part which is retrieval of this data and using that with LLM to give meaning full results.
4. The Retrieval API
Endpoint: /api/chat
- Method:
POST - Body: JSON
{ messages: [{ role: "user", content: "..." }], data: { docId: "optional.pdf" } } - Response: Streaming text.
The Logic Flow
- Receive Query: User sends “What is the summary of report.pdf?”.
export async function POST(req: Request) {
  const { messages, data } = await req.json();
  const currentMessage = messages[messages.length - 1].content;
- Vector Search:
- We convert the question into a vector.
- We ask Supabase: “Give me the 4 text chunks most similar to this question”.
const vectorStore = await getVectorStore();

const filter = data?.docId ? { fileName: data.docId } : undefined;
const resultsWithScore = await vectorStore.similaritySearchWithScore(
  currentMessage,
  4,
  filter,
);
- Optional Filter: If the user selected a specific file in the UI, we only search chunks with that
fileName.
- Context Construction:
- We take those 4 chunks and paste them into a big text block.
const context = resultsWithScore.map(([doc, _]: [Document, number]) => doc.pageContent).join("\n\n");
- Prompt Engineering:
We tell the AI: “Answer the question based ONLY on this context.”
This prevents “Hallucinations” (making things up) because the AI is forced to use our data.
const { stream, handlers } = LangChainStream();

const model = new ChatOpenAI({
  modelName: 'gpt-4o-mini',
  streaming: true,
  callbacks: [handlers],
});

const prompt = PromptTemplate.fromTemplate(`
    Answer the user's question based ONLY on the following context:
    {context}

    Question: {question}
  `);
- Streaming Response:
- Instead of waiting for the full answer, we stream it word-by-word to the client. This makes the app feel instant and responsive.
// 3. Create Chain
prompt.pipe(model).invoke({
  context,
  question: currentMessage,
});

// 4. Return Stream
return new StreamingTextResponse(stream);
Testing Chat (via Curl)
# Basic chat test

curl -X POST http://localhost:3000/api/chat \
-H "Content-Type: application/json" \
-d '{
"messages": [{"role": "user", "content": "What describe apple?"}]
}'

# A red fruit
This should return something - if not check documents table, also change your similarity matching logic to have low threshold in database match_documents function. Lower value more matches
match_threshold float DEFAULT 0.1,
5: The Complex Chat UI
Source code you can get from the REPO.
The frontend is a React-based interface powered by the Vercel AI SDK (ai). It manages the chat state, file uploads, and streaming responses in real-time.
Components
ChatInterface: The main container. Code- Handles File Selection -> calls
/api/ingest. - Handles Chat Input -> calls
/api/chat. - Displays Loading States & Error Messages.
- Handles File Selection -> calls
MessageBubble: A pure presentational component for rendering “User” vs “AI” text bubbles. Code
The useChat Hook
We use the Vercel AI SDK hook useChat. This abstract away 90% of the complexity:
State Management: It automatically keeps an array of
messages( User: “Hi”, AI: “Hello”…).Streaming: It handles reading the
ReadableStreamfrom our API and re-rendering the component every time a new word arrives.Form Handling: It provides
handleInputChangeandhandleSubmitso we don’t have to write manual event listeners.
File Upload Logic
Since useChat is primarily for text, we built a custom “Side Car” logic for files:
React State:
const [file, setFile]tracks the currently active document.Ingestion Request: When you pick a file, we immediately
POSTit to/api/ingest.Coupling: When
handleSubmitis triggered, we intercept it. We verify if afileexists. If yes, we attach its name (docId) to the request body.
- This tells the API: “Only search nicely in this specific document.”
Data flow Logic
- Doc ID Tracking: When a file is uploaded, its filename is stored in React state.
- Context Awareness: On every message submit, if a file is active, its
docIdis sent in the request body (data: { docId: ... }). - Streaming: The response body is read as a stream, updating the UI token-by-token.
Testing
Start App:
npm run devUpload: Click the generic ‘paperclip’ or file icon. Select
test.csvortest.pdf.
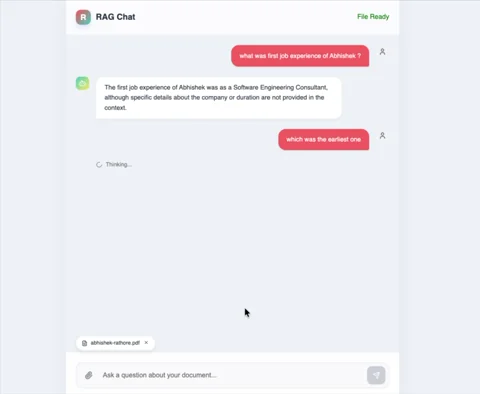
- Expected: “File Ready” green badge appears.
- Chat: Type “What is in this file?”.
Expected: AI responds with information specific to your file.
Debug: Check terminal logs for
Scorevalues if you suspect retrieval issues.