Understand MCP with Next.js: Making a GitHub Repo Detective
Project Goal
The Problem:
As developers, we are collectors. We accumulate hundreds of “Zombie Repos” , projects we started, forgot, and abandoned. Trying to remember if that cool side project was named taxi-app-v2 or react-native-taxi-experiment is a nightmare, especially since standard GitHub search demands exact keywords. We have faced the same kind of issues in our Enappd projects, many are obsolete and not in use. But there is a lot of discrepancy among naming of these projects, and it’s hard to make any system, which works.
The Solution: Meet RepoRanger, a Chat Interface that acts as your personal “Repository Detective.” Unlike a standard CLI that just executes what you type, RepoRanger investigates intent.
- Input: “Show me the last commit on that taxi app I built.”
- AI Reasoning: “I don’t know exactly which repo that is yet. I will first search for ’taxi’ and ‘react native’ to find candidates, ask the user to confirm if there are duplicates, and only then fetch the commit history.”

What is MCP? (The “USB” of AI)
Before we dive into the code, let’s briefly talk thing we will learn in this guide : the Model Context Protocol (MCP).
If you have ever built an AI application, you know the pain of integration. Want your AI to read a PDF? You write a specific function for that. Want it to check your calendar? You write a completely different API wrapper for Google Calendar. Want it to search GitHub? Yet another custom integration.
It’s like the old days of every phone/laptop has different kind of charger port.
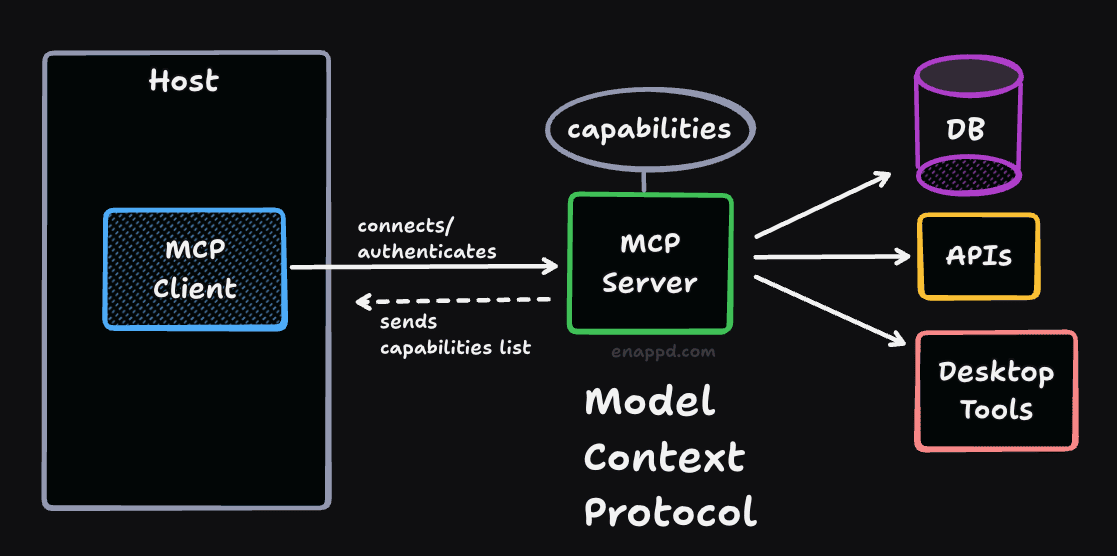
So that’s why the much clichéd line has come into existence -MCP is the USB-C for Artificial Intelligence. It is a standard way to connect AI models to data and tools. Instead of writing custom API glue code for every service, you just “plug in” an MCP Server, and your AI instantly gains those capabilities.
So we have three main components of any MCP application:
- Host: This is where your application lives. It is the main interface. It can be a web interface, an app, or whatever.
- MCP Client: This is the code or library used to connect to the MCP server, which actually does the heavy lifting.
- MCP Server: This is the core where the capabilities of any MCP service live - these capabilities are like functions/tools, which you can call from the client. These functions actually run on a separate server, or call a separate API, or checks database. But you don’t have to worry about any of this because the MCP server will handle calling all those functions. Capabilities are like tools which the MCP server provides you, along with how to call them, just like in a API programming language where you are given a function and told which parameters to pass. That’s it.
The 3 Main Characters
In this blog post, you will see 3 distinct roles playing together.
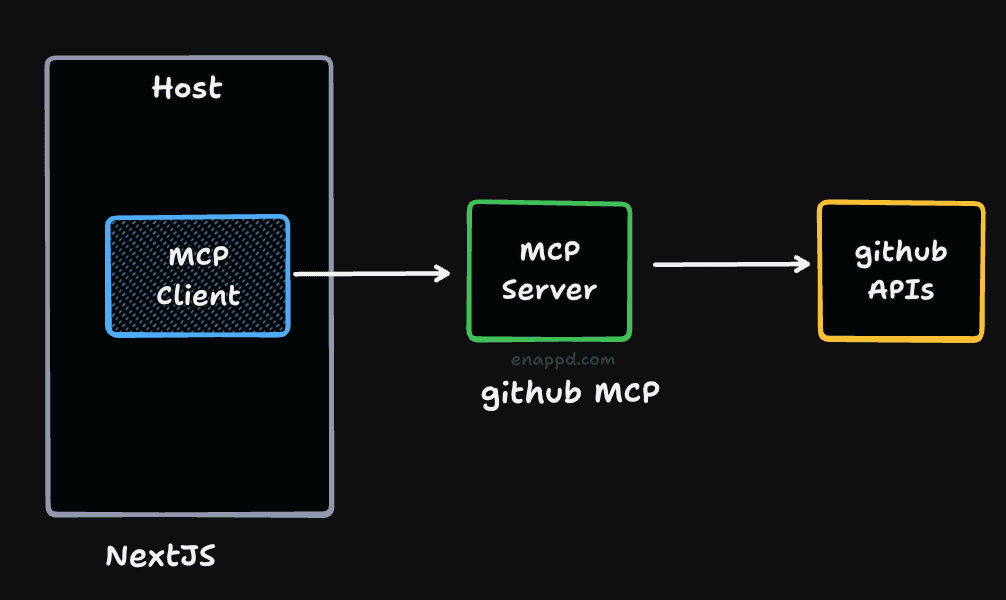
1. The Host (Next.js)
The Host is the application where your AI is accessible from like a chat interface. In our case, this is our Next.js application using the Vercel AI SDK. The Host is responsible for the user interface and managing the conversation.
2. The Client (The Connector)
The Client is the software component inside your Host that speaks the MCP language. It is responsible for establishing a secure connection to the Server.
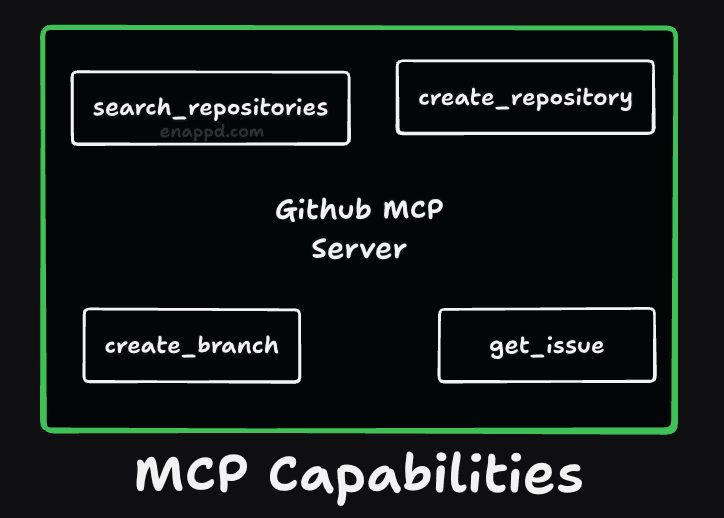
3. The Server (GitHub)
The Server is a standalone program that actually knows how to do the work. It exposes Tools (functions like search_repositories) and Resources (data like file contents) to the Client.
- In this project: We aren’t writing a server from scratch! We are using the official
@modelcontextprotocol/server-github. This server already knows how to talk to the GitHub API, so we don’t have to.
Tech Stack:
To build this agent, we are using a stack designed for intelligent orchestration:
- Framework: Next.js 14+ (App Router) – The body that hosts our application.
- Protocol: MCP (Model Context Protocol) – The universal connector that lets our AI talk to external systems.
- Server: Official GitHub MCP Server (
@modelcontextprotocol/server-github) – The tool provider that knows how to speak “GitHub.” - AI SDK: Vercel AI SDK (Core + React) – The manager that handles streaming and chat state.
- LLM: OpenAI (GPT-4o-mini) – The brain behind the operation. This you need to enable as its paid service.
Phase 1: The Foundation (Setup & Configuration)
Goal
Our first mission is to initialize the Next.js project and secure the environment. We need to set up the stage so our AI can communicate safely with the outside world.
Prerequisites & Setup
We start by creating a fresh Next.js application using the App Router and Tailwind CSS. Then, we install the specific packages that make up our “Agentic” capabilities.
# Scaffold the project
npx create-next-app@latest reporanger --typescript --tailwind --eslint

# Install AI and MCP dependencies
npm install ai @ai-sdk/openai @modelcontextprotocol/sdk zod
Security is paramount here. We configure our .env.local to store sensitive keys.
# .env.local
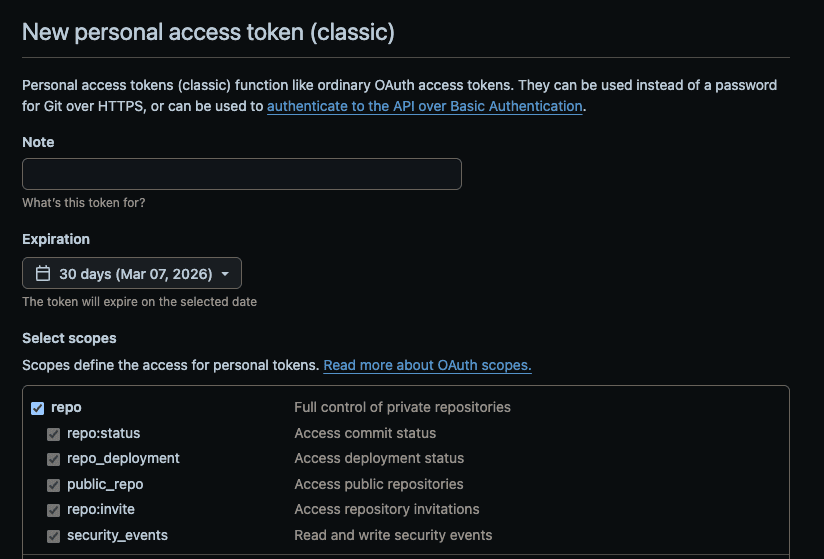
GITHUB_PERSONAL_ACCESS_TOKEN=... # Authenticates the MCP server
OPENAI_API_KEY=... # Powers the Brain
You can get Github personal access token from Github Settings
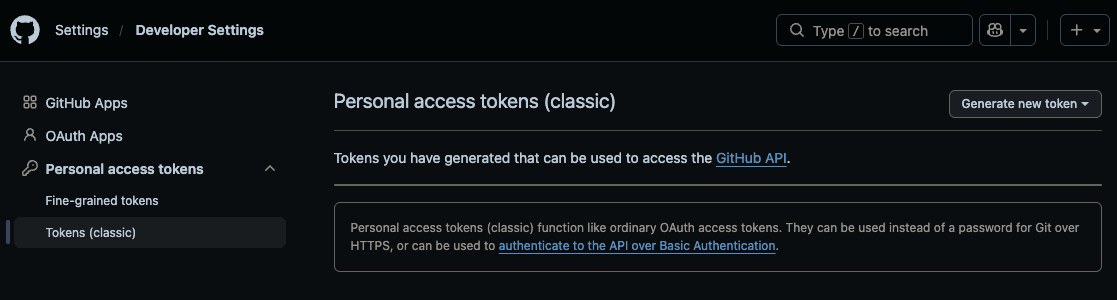
Also check all the scopes which you need - these are level of permission you have on the Github account via the token.
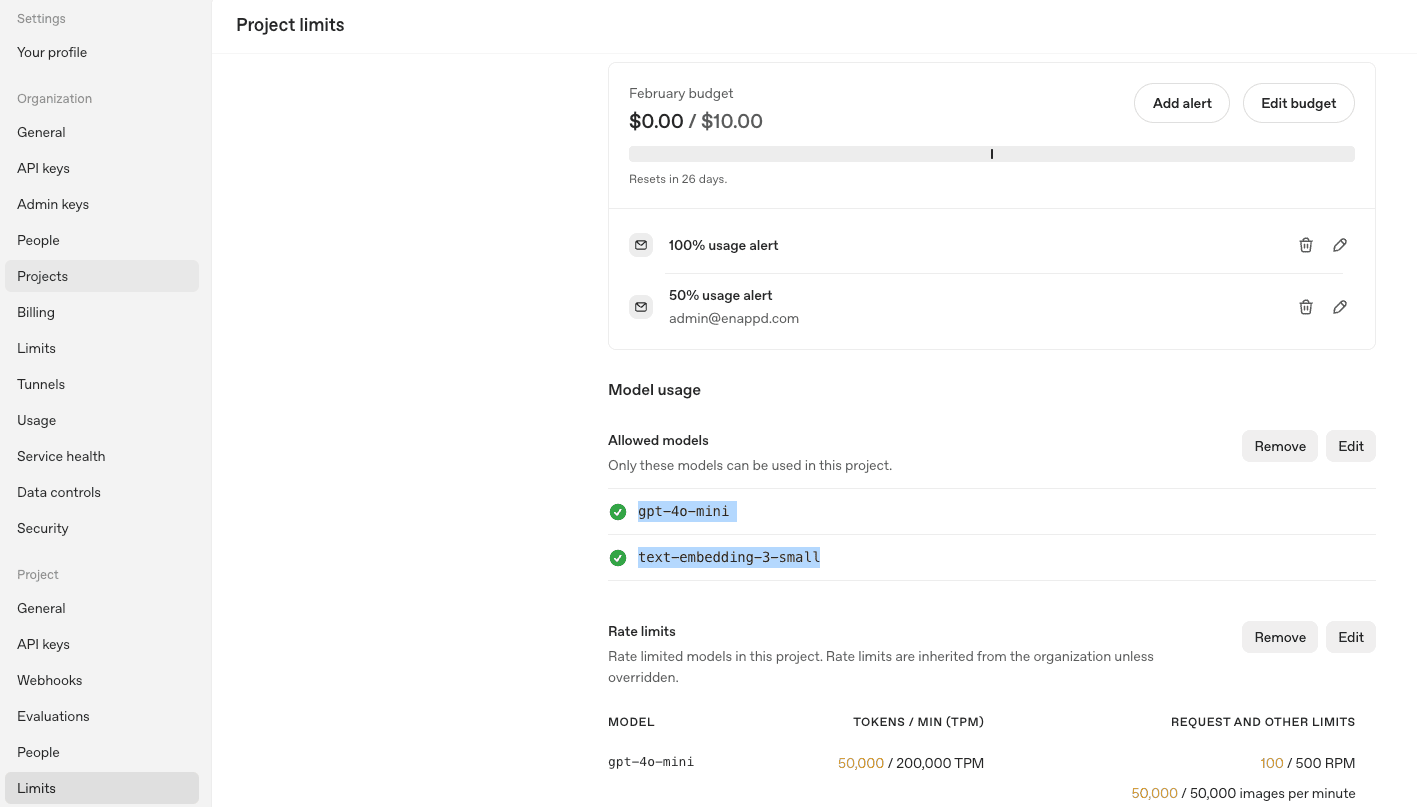
The OpenAI API key can be obtained from their platform. Note that paid credits are usually required. I have just enabled gpt-4o-mini for this project.
Key Concepts
- Next.js App Router: This acts as our “Host Application.” We chose it specifically because it allows us to run the MCP client securely on the server-side (keeping your API tokens safe from the browser) while still giving users a snappy, reactive UI.
- MCP (Model Context Protocol): This this will help us use Github API without even installing any Github library. We will just call the GitHub MCP server - which will give us some capabilities specially searching repositories.
- Vercel AI SDK: this is the orchestrator which combines all these things together. It manages the chat history, tool round-trips, and streams the AI’s response text to the frontend. We can do without this special SDK but then a lot of code has to be written just to make those functionalities work.
Why Next.js?
We need a robust backend to handle the persistent connection to the MCP server. A standard client-side React app cannot easily spawn a local process (Stdio) or securely hold your GitHub Personal Access Token. Next.js provides API routes and Server Actions, which are the perfect secure environments to “host” our MCP client logic.
Phase 2: The MCP Bridge - connecting to Github tools
Goal
Now we need to spawn the official GitHub MCP server and create a bridge (transport layer) so our LLM can use GitHub’s tools.
The Code Walkthrough: lib/mcp.ts
We are implementing a Singleton MCP Client. This is a crucial pattern in Next.js. Without it, every time a user sends a message, we might accidentally spawn a fresh instance of the GitHub server, eventually crashing our machine with too many processes.
1. The Transport Layer
We use StdioClientTransport to run the official GitHub MCP server directly via npx. This is the beauty of MCP: we don’t need to write GitHub API calls. We just launch the server, and it handles the rest.
const transport = new StdioClientTransport({
  command: 'npx',
  args: ['-y', '@modelcontextprotocol/server-github'],
  env: {
    ...process.env,
    // Critical: Pass the token to the spawned process
    GITHUB_PERSONAL_ACCESS_TOKEN: process.env.GITHUB_PERSONAL_ACCESS_TOKEN!,
  },
});
2. The Singleton Pattern
Since Next.js “hot-reloads” during development, we need to ensure our connection survives those reloads. We attach the client to the global scope so it persists, preventing “zombie” processes.
declare global {
  var mcpClient: Client | undefined;
}

export async function getMcpClient() {
  if (global.mcpClient) return global.mcpClient;

  // ... (connection logic)

  await client.connect(transport);
  if (process.env.NODE_ENV === 'development') {
    global.mcpClient = client;
  }
  return client;
}
Tool Discovery
Before we move on further to UI code , I wanted to confirm whether this GitHub access token is working or not - and to test the MCP server capabilities. I have written a route in NextJS. This route file is not part of the main project implementation. Just for the testing I have created this route and tested my MCP.
This is the main part of the code where you get the MCP client which you created above and call listTools function - which return capabilities.
const client = await getMcpClient();
const result = await client.listTools();

// Return full tool details to inspect schemas
return NextResponse.json({
  status: 'Connected',
  tools_found: result.tools.length,
  tools: result.tools,
});
Because above code was written in a API route - it is callable via a URL. It should give you a response on browser when you open this particular URL route
http://localhost:3000/api/test-mcp
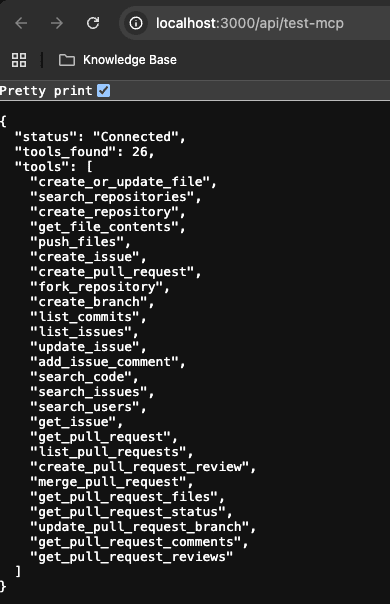
So of tools which we will use in project are :
search_repositories(The Detective’s magnifying glass)get_file_contents(Reading the evidence)list_commits(Checking the history)open_pull_request(Taking action)
The Magic of npx
Did you notice we didn’t install the GitHub MCP server in our package.json? We instructed the SDK to run npx -y @modelcontextprotocol/server-github.
This highlights a core philosophy of MCP: Tools as Processes. Our application doesn’t need to know how to authenticate with GitHub’s REST API or how to parse JSON responses. It simply “pipes” instructions to this black-box server that already knows exactly what to do.
Phase 3: System Prompting & Routing
Goal
An AI with tools but no instructions is dangerous. We need to teach the AI to investigate before answering. We want to prevent it from guessing repository names or hallucinating files that don’t exist.
[!NOTE] This prompting is so crucial that to make this code work - I have to change this many times to get that right otherwise the AI was working, but it was working too much. Sometimes it was returning the same repository multiple times. So depending on which model you are using, it can be dangerous unless you’re prompt is very strict. I have also used an older model, which is GPT-4o-mini, which is not that intelligent. So when you have more advanced models, your app will perfectly but more advanced models mean more cost generally.
System Prompt Engineering
The System Prompt is the “Operating System” for our agent. We don’t just tell it “You are helpful.” We define a strict algorithm in natural language:
- Search First: If the user is vague (e.g., “my taxi app”), do not guess. Search.
- Clarify: If the search returns too many results, stop and ask the user.
- Fetch: Only read files once the target is confirmed.
The Code Walkthrough: api/chat/route.ts
We use the Vercel AI SDK’s streamText function to connect our LLM (GPT-4o-mini) with the MCP tools we discovered in previous phase
1. The “Detective” System Prompt
const result = await streamText({
  model: openai('gpt-4o-mini'),

  messages,
  system: `You are a GitHub Detective (RepoRanger).
      Your goal is to help the user find information about their repositories.

      CRITICAL RULES:
      1. Tools return raw JSON strings. You MUST parse this JSON to understand the results.
      2. If you have search results, DO NOT try to search again. Instead, summarize the findings.
      3. Asking "Which repo?" or listing the options is the correct next step.
      4. Only use 'list_commits' or 'get_file_contents' AFTER the user confirms a specific repository.

      Example Flow:
      - User: "Find my taxi app"
      - You: Call 'search_repositories("taxi")'
      - Tool Output: '{"items": [{"name": "taxi-v1", ...}]}'
      - You (Correct): "I found these repositories: 1. taxi-v1..." (Stop and wait for user)
      `,
  tools: toolsToUse,
});
2. Wrapping MCP Tools for the AI SDK
We can’t just pass client.listTools() directly to the Vercel SDK yet. We need to map them. This gives us a powerful opportunity to intercept and modify calls before they hit the real server.
tools: {
  search_repositories: tool({
    description: 'Search for GitHub repositories. Use this first.',
    parameters: z.object({
      query: z.string().describe('The search query'),
    }),
    execute: async (args: any) => {
      // ...
      return mcpClient.callTool({
        name: 'search_repositories',
        arguments: args,
      });
    },
  }),
  // ... maps for list_commits, get_file_contents
}
⚠️ Real-World Issue: The “Global Search” Error
During implementation, we hit a major snag that you might encounter too.
Error: When we asked the agent “Find my taxi app,” it returned successful results - but they were random popular repositories from other people on GitHub .
The GitHub MCP server’s search_repositories tool wraps the standard GitHub Search API. By default, searching taxi searches all of GitHub, not just your account.
Fix: We implemented “Middleware” logic inside our tool definition to restrict the search scope.
execute: async (args: any) => {
  // Hack: Force the search to be scoped to our user
  // In a real app, you'd fetch the authenticated user dynamically
  const query = args.query.includes('user:')
    ? args.query
    : `${args.query} user:EnappdLLC`; // <--- RESTRICTION ADDED

  const result = await mcpClient.callTool({
    name: 'search_repositories',
    arguments: { ...args, query },
  });
  return result.content;
},
MCP tools are powerful but “raw.” Your host application often needs to act as a governance layer, modifying tool inputs (like appending user:YourName) to ensure safety and correctness before passing them to the actual server. You should know all this AI and other tools are still evolving, so there will be breaking things in your code and you should always have some kind of testing validation kind of loop
Verifying the Detective
Before we build the frontend, let’s prove our “Detective” logic works by hitting the API directly. We want to see if the AI chooses to use the search tool instead of hallucinating an answer.
Run this curl command in your terminal:
curl -X POST http://localhost:3000/api/chat \
  -H "Content-Type: application/json" \
  -d '{"messages": [{"role": "user", "content": "Find my taxi app"}]}'
What to look for in the response:
You won’t get a plain text answer. Instead, you’ll see a Tool Call in the stream. Look for toolName": "search_repositories".
{
  "toolCallId": "call_...",
  "toolName": "search_repositories",
  "args": { "query": "taxi app" }
}
Exact response is this :
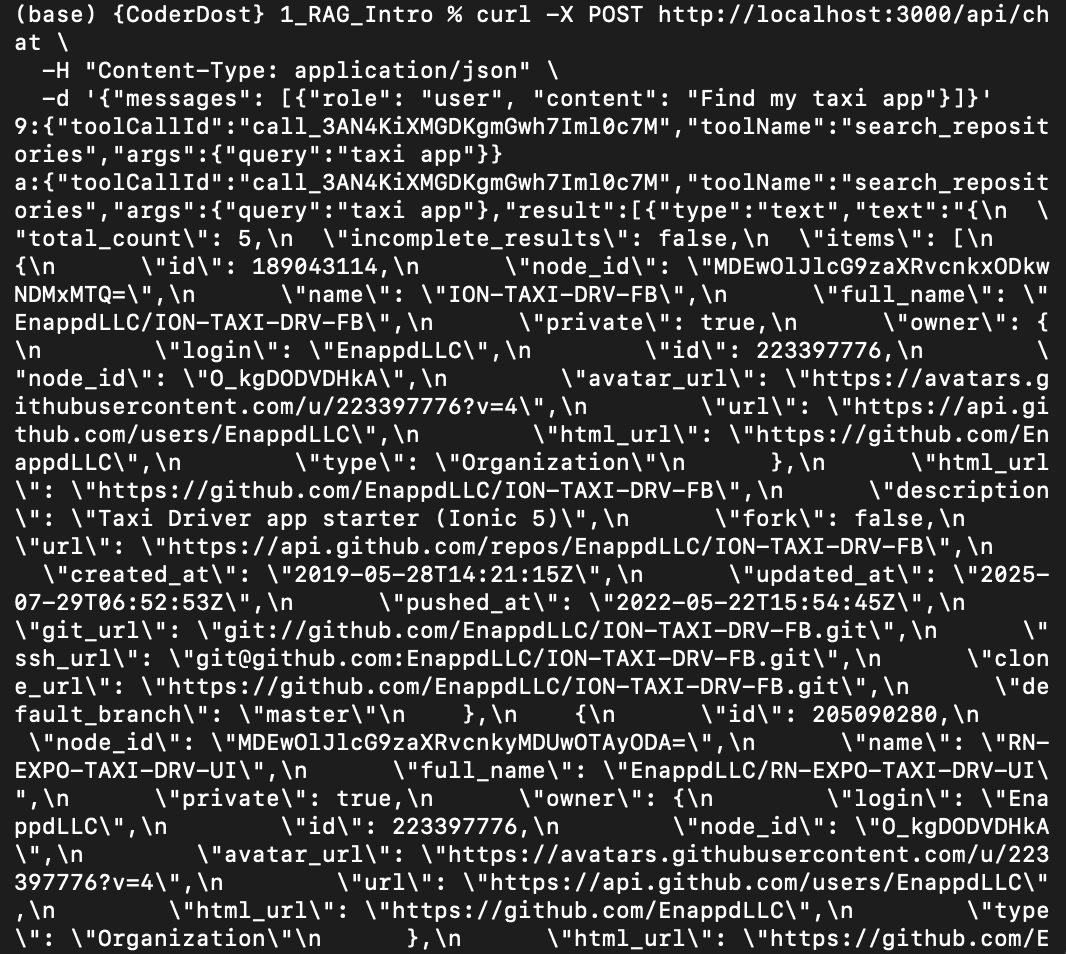
IThis confirms our System Prompt is working: The AI realized it didn’t know the answer, so it reached for the search_repositories tool.
Phase 4 : Hooking up the UI components
Goal
We don’t want a boring text chat. When the AI uses a tool, we want to see it. If it finds repositories, we want clickable cards, not a bulleted list of JSON.

The Challenge: Rendering “Invisible” Events
In a standard chat app, you just render message.content. But here, the interesting stuff happens in the toolInvocations property of the message object. The Vercel AI SDK hides this complexity, but we need to expose it.
The Code Walkthrough: app/page.tsx
We built a custom component to intercept and render these tool states.
1. The renderToolInvocation Function
This function checks the toolName and state to decide what to show. In page.tsx, we handle this dynamically to show a spinner while working and a rich component when done.
const renderToolInvocation = (toolInvocation: any) => {
  const toolName = toolInvocation.toolName;
  const isCompleted = toolInvocation.state === 'result';
  const result = toolInvocation.result;

  // Default: Generic Terminal Icon
  let icon = <Terminal className="w-4 h-4" />;
  let content = null;

  // "Search" Tool Specifics
  if (toolName === 'search_repositories') {
    icon = <Search className="w-4 h-4" />;

    // If the tool is done and has data, parse and render the cards
    if (isCompleted && result) {
      // The result might need parsing depending on the SDK version
      const parsed = JSON.parse(
        typeof result === 'string' ? result : JSON.stringify(result),
      );

      if (parsed.items) {
        content = (
          <div className="flex flex-col gap-2 mt-2">
            {parsed.items.slice(0, 5).map((repo: any) => (
              <div key={repo.id} className="repo-card">
                <a href={repo.html_url} className="text-blue-300">
                  {repo.full_name}
                </a>
                {/* ... rendered details ... */}
              </div>
            ))}
            <div className="text-xs text-slate-400">
              Found {parsed.total_count} repositories.
            </div>
          </div>
        );
      }
    }
  }

  // Render: Loading Spinner OR Tool Icon
  return (
    <div key={toolInvocation.toolCallId} className="tool-badge">
      <div className="flex items-center gap-2">
        {/* Dynamic Icon: Show Spinner if not complete, else show the specific icon */}
        <span className="icon-container">
          {isCompleted ? icon : <Loader2 className="animate-spin" />}
        </span>
        <span>{toolName}</span>
      </div>
      {/* content is null until the tool happens */}
      {content}
    </div>
  );
};
This approach gives us:
- Immediate Feedback: The user sees the spinner (
Loader2) the moment the tool starts. - Contextual Icons: We switch to a
<Search />icon for searches, or<GitCommit />for commits. - Rich Content: The
contentvariable holds our custom UI (like the list of repository cards), which is inserted into the chat stream once the data arrives.
2. Integrating with the Chat Loop
Inside our main render loop, we render these invocations as part of the message bubble.
{
  messages.map((m) => (
    <div key={m.id} className="message-container">
      {/* 1. RENDER TOOLS */}
      <div className="tools-container">
        {m.toolInvocations?.map((toolInvocation) =>
          renderToolInvocation(toolInvocation),
        )}
      </div>

      {/* 2. RENDER TEXT RESPONSE */}
      {m.content && (
        <div className="prose">
          <Markdown>{m.content}</Markdown>
        </div>
      )}
    </div>
  ));
}
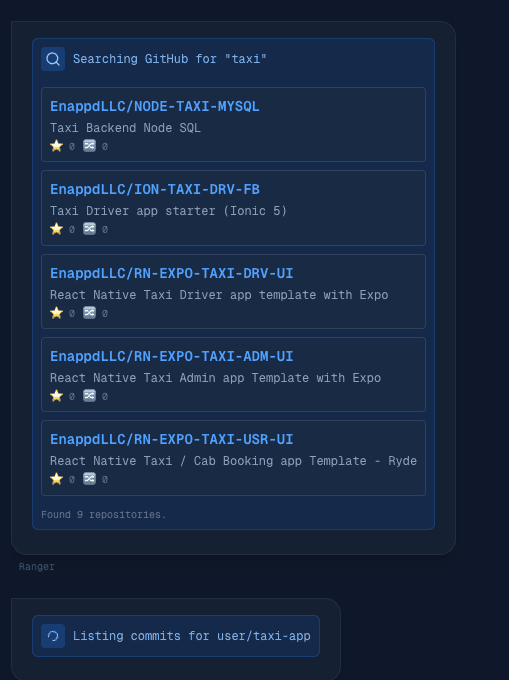
Final Result
This is what makes RepoRanger feel special.
- You ask: “Find my taxi app”
- Immediately, a “Searching GitHub…” badge appears (Visual Feedback).
- Then, a Grid of Repositories pops into view (Rich UI).
Here is a shorter, punchier version that gets straight to the point.
Minor Glitch in App
After our first test (“Find my taxi app”), we hit a classic Agentic AI problem: The AI didn’t know when to stop.
- Infinite Loops: It would search, ignore the results, and search again.
- Guessing Games: If it found 10 repos, it wouldn’t ask “Which one?"—it would just pick one at random and start doing some tool calls.
Hidden Tool Results
We tried to stop this by checking if the last message was a tool result. But in the Vercel AI SDK, tool results aren’t always their own message. They are often hidden inside an assistant message under toolInvocations.
Our initial code looked for a message that didn’t exist, so the AI kept looping.
Fix
We implemented a “One Step at a Time” policy. The logic is simple: If the AI just used a tool, we take its tools away for the next turn.
1. Finding the Hidden Signal
We updated our code to look deep inside the message object to confirm if a tool actually finished its job.
const isToolResult =
  lastMessage?.role === 'tool' ||
  (lastMessage?.role === 'assistant' &&
    lastMessage?.toolInvocations?.some((inv) => inv.state === 'result'));
2. The “Empty Toolbox” Trick
If we detect a tool result, we pass an empty object {} as the available tools.
// STRICT MODE: If the last message was a tool result, disable ALL tools.
const toolsToUse = isToolResult ? {} : availableTools;

// Inject a System Note to remind the model it has data
if (isToolResult) {
  messages.push({
    role: 'system',
    content: 'SYSTEM INSTRUCTION: The search is COMPLETE... Summarize now.',
  });
}
Why this works: Since the AI has no tools left to call (no “search”, no “list_commits”), it has no choice but to stop acting and start talking. It reads the data it just found and summarizes it for the user.
Result
- User: “Find my taxi app.”
- AI: Searches -> Returns Data.
- System: Takes away tools.
- AI: (Forced to talk) “I found 9 repositories. Here they are…”