Complete guide on sending Push using Firebase Cloud Messaging Console

Complete guide on sending Push using Firebase Cloud Messaging Console
This post is concerned with the usage of Firebase Cloud Messaging console to send various types of push notification. We will also explore all the features of Cloud Messaging console available with Firebase.
Why send Push using Firebase?
If you don’t know much about Firebase … you need to catch up with latest tech news. Firebase is the hot stuff in the market today to create quick mobile app back-ends, with a ton of built-in and ready-to-integrate features.
The most used feature of Firebase is as a back-end. But along with this back-end, some of the other popular features are
- Push notifications
- Cloud functions
- Analytics
- Ad-mob
- Crashlytics
- In-app messages
- Remote config
- Social Logins
- …… and more
One might wonder why to integrate Push notifications in an app. Push notification is the **single biggest feature **to keep your users engaged with your app. People are obsessed with notifications. People keep checking their phones regularly so they don’t miss any notification. If your app sends regular (and interesting) push, your users will be happy, and you’ll see much less app uninstalls than you’ll see without push notifications.
There are many push notification integration services available in the market. But Firebase being a Google product, is essentially THE service to use for reliable push notifications. It is the better version of GCM (Google Cloud messaging) and essentially a default for all kinds of apps.
Firebase Push Messaging Console
Once push notifications are integrated in an app, sending them can have multiple ways
- Trigger notifications manually
- Trigger notifications using a CRON job
- Trigger notifications using a Cloud function, based on user actions
Manual triggering is often used for a large number of apps. This avoids writing complex logic to send notifications to users, and allows easy testing as well. For this purpose, Firebase provides a Messaging console, which you can use to send all kinds of push messages, filter target users, schedule messages and much more.
Let’s have a deeper look at the options available in Firebase Push Messaging console. Needless to say, your app should have Firebase integration to avail these features 😄. We’ll go through following topics
- Notification history
- Notification reports
- Creating new Notifications
- Creating a notification experiment
1. Notification History

Firebase Cloud messaging console
Cloud messaging console is shown in the above screenshot. It contains two tabs – Notifications and Reports
Inside the Notification tab, you can see a list of previously sent messages, their start/send time, send count and open count. This is very useful information for someone who regularly sends notifications to users.
2. Notification Reports
If you regularly send notifications, and in huge quantities, you would like to have a more graphical interface to look at the data. Notification reports provide you just that

Firebase Notification reports
You can see a global overview of your messages and how they were received/opened by users. You can also filter these results by date, and export the data as CSV.
Filter report data
You can filter report data based on platforms or apps you have in your Firebase project, to get a more clear idea of things

Filter messaging reports with platform or apps
3. Create Notifications
Clicking New notification in the Notifications tab, opens up a form where you can compose your notifications.

Compose notification form
The compose form has 5 sections, we’ll go through each of them
- Notification
- Target
- Scheduling
- Conversion Events
- Additional options
3A. NOTIFICATION SECTION

Notification section in Compose form
- Notification Title – This is the title that shows up in the push message in Android devices. iOS does not show this title on push messages
- Notification Text – This is the main body of the message. This is the text content that users see in the push notification.
If you send the above notification to your app, it will appear as follows in an Android device

Push showing title and message
- Notification name – It is just a dummy name used by Firebase to identify different messages
Sending test message
Suppose your app has thousands of users, and you made some changes in the notifications which you want to test. In such case, you won’t be sending data to all users for sure. In such a case, it is very handy to test the notifications on a test device.
Click Send Test Message in the notification section. You will be presented with the following popup

Enter your device token to send a test push
You need to find out your device’s **device_token **and enter that here. Click Send to send a test push to ONLY your device. So handy, right?
3B. TARGET SECTION
There are often cases where you want to send certain notifications to only iOS users, or only Android users, or with some other parameters. Target section is a great way to filter target users who will receive the push.
There are two major ways to filter users here.
- By user segment
- By topic
3B. 1. By user segment
Here you can filter users based on apps, user properties, language, country etc.
Filter by App

Filter users by app
You can select which app users should receive the notifications. To add both iOS and Android apps at once (let’s say), you can click **Target another app **and add other apps to the target.
Once you have selected the app, you can hit the “and " button on the right. You get a dropdown to select the next criterion from.

More filtering criteria for targets
Filter by Version
You can filter targets by the version of the app you are targeting. Essentially you can send different notifications to different versions. This is useful when you want old app users to upgrade to new versions. These versions are captured by Firebase automatically.

Filter by app version
Filter by language
You can filter your target users by language as well. The list of language is automatically created by Firebase based on the user demographic (based on user’s default region language)

Filter your target by language
You can see that Firebase gives you an approximate idea of how many users per language you have. Also, you can see the final number of users who will receive the notification in the highlighted blue box.
Filter by Country

Filter targets by Country
Similar to language, you can filter your target users by country as well. The list of countries is automatically created by Firebase based on the user demographic. Again, Firebase gives you an approximate idea of how many users exist per option.
Filter by User Properties
User properties are an intelligent way to provide custom properties in the filtering process. You can provide as many user properties as you want inside your app’s code.
E.g. If a user buys a certain product, you can assign a property productbought= product_name to the user. Then at the time of sending push, you can filter all such users to create a product-specific notification for them
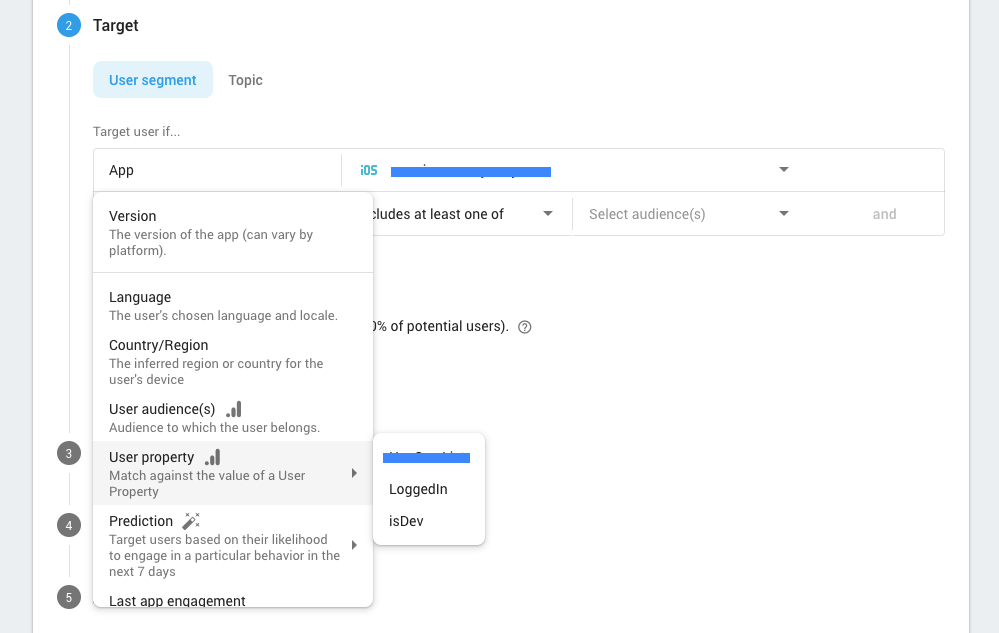
Filter by User Properties
Some meaningful user properties can be
- isLoggedIn
- isRegistered
- isPremiumUser
- isFreeUser
- isOldUser
- isReferredUser …. and so on
Filter by Last App Engagement
It is often very useful to send push notifications to users who have not used your app for quite some time. In such a case, you don’t need to create a separate userProperty. Firebase gives you an option to filter users by Last App Engagement

Filter users by last app engagement – wake up your users!
Similar to **Last App Engagement, **you also get a choice to filter users by First Open property, which is pretty much self-explanatory.
Note - You can combine more than one filtering criteria to arrive at the exact target users you are aiming for a particular notification.
3B. 2. By topic
In your app, you can subscribe your users automatically to certain channels based on their activity, or give them a choice to subscribe to certain topics. When sending push, you can simply select these topics and send the notifications. These topics work across multiple apps, so you don’t have to select multiple times.
E.g. If you are a news app, you might give your users a choice to subscribe to tech news, or fashion news, or political news – each attributed to a different “topic”. Depending on who subscribes to what, they will get relevant notifications, whether they are on iOS or Android
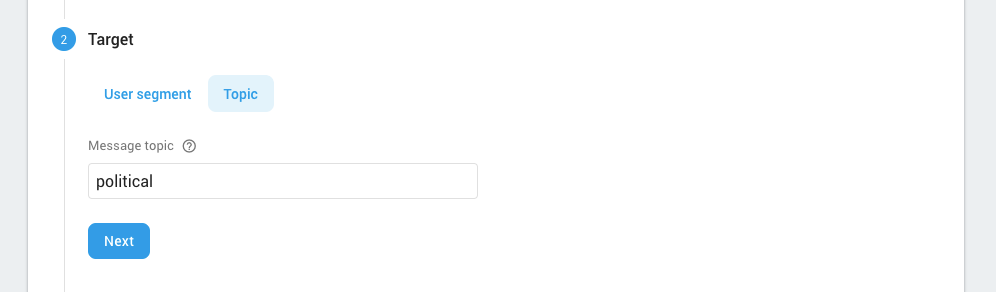
Filter your push simply by topics
Note that there is up to one day delay between new topic creation and when it becomes available as a target.
3C. SCHEDULING SECTION
It is important to send your notifications at the right time, when they can engage your users the most e.g. on weekends, in the evening when they come back from work etc.
Firebase provides a good number of options to schedule your notifications

Schedule your notifications as you want
- Send now – Send all notification immediately
- Schedule – Select from calendar
- Daily – Notifications will be sent daily at a custom time. You can specify the start and end date
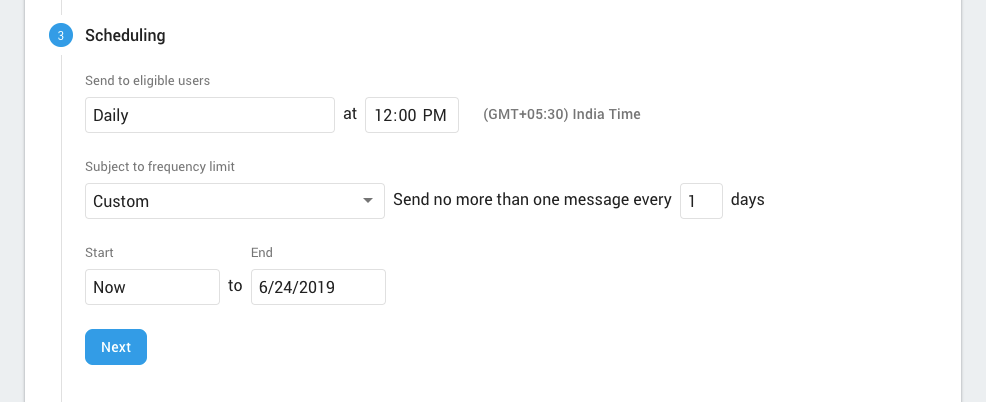
Schedule push with a daily schedule
- Custom schedule – You can also use custom schedule for notifications

Schedule push with a custom schedule in the week
3D. CONVERSION EVENT SECTION
Firebase already provides notifications Sent and Opened events. You can make use of these to estimate your campaign effectiveness. But sometimes you also want to check if certain activity happened via notification. E.g. You might want to if a user actually did the activity he/she was supposed to do after receiving the notification. For this purpose, you can use the Conversion events
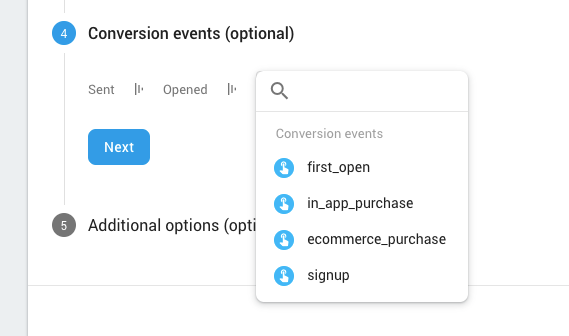
Enable conversion events for better campaign effectiveness estimation
You can combine conversion events with Analytics and ads to create an effective campaign to track what converts and what doesn’t
3E. ADDITIONAL OPTIONS SECTION
Firebase also provides you option to attach additional data in your push notifications. This data goes in a key-value pair manner. You can attach multiple such key-value pair to transfer more meaningful data via your notifications.

Implement additional options in your notification campaign
You can also change the following settings of your push notifications in this section
- Priority – Priority is an indication of how much of the user’s valuable attention should be consumed by this notification. Low-priority notifications may be hidden from the user in certain situations, while the user might be interrupted for a higher-priority notification.
E.g. If a device has a **gaming mode, **low-priority notifications may get hidden when the user is in gaming mode. - Sound – Whether or not your notifications should notify the user with sound
- Expires – This tells the system how long to retry sending a notification if the previous tries failed for some reason
4. Creating a notification experiment
Firebase has introduced a new way to implement A/B testing using notifications.
Essentially, in an experiment, you create different groups of users and try different things on them (by sending notifications). This gives you a good idea of how good a strategy works compared to others.
In the Notifications tab, click Create Experiment to compose a new experiment.
4a. Experiment Basics

Compose an experiment
Enter basic details of the experiment, select which app you want to perform the experiment on. Once again, you can filter your target audience by all the filters as described in previous sections.
Notice that you need to select the % of users you’ll be experimenting on. These users will be randomly chosen. Keep the percentage low so you don’t meet any surprises in the experiment.
4b. Variants
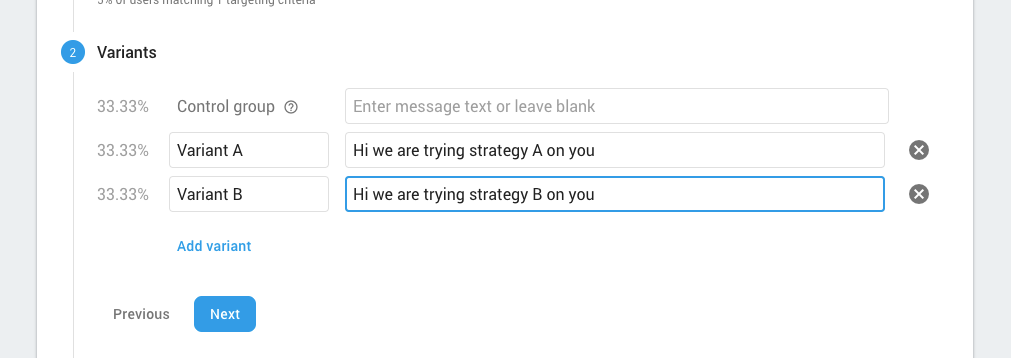
Create experiment variations
In the variant section, you define different push messages for different section. The control group is a subset of your users that experience normal app behavior. Other variants’ behavior is compared with the control group. You can add multiple variants
4c. Goal
In this section, you can define the goal of your experiment. This is the parameter which will be compared between Control group and other variants

Choose your goal for comparison purpose
There are various default goals available in Firebase.
4d. Message Options
This section is exactly same as the Additional Options section of a normal compose notification form.

Additional options for experiment messages
You can create additional key-value pairs here, define expiry or message, set priority and turn sound ON/OFF
Once you are done with setting up the experiment, click **Review. **It will show you an overview of the setup so you can review before starting the experiment. You can always go back and Edit the experiment. Once you are ready, you can start the experiment. The notifications will be sent as per the settings you selected in the experiment setup.

Review the experiment before starting it!
Conclusion
I know, I know, this was a long post. But Firebase push notifications deserve such a post to explain things in detail. It is such an awesome tool for developers. Imagine how life would have been if this tool wasn’t there to compose and send notifications!
So in summary, we learned how to compose notifications in Firebase console, along with various options of filtering target audience, scheduling, and other notification options. We also learned the new Experiment feature of Firebase, which allows you to setup an experiment using notifications and provides you a comparison to gauge the effectiveness of the campaign.
How this will prove useful to you!
**Stay tuned for more interesting app blogs! **
Next Steps
Now that you have learned how to send all kinds of push notifications using Firebase, you can also try
- Ionic 4 PayPal payment integration – for Apps and PWA
- Ionic 4 Stripe payment integration – for Apps and PWA
- Ionic 4 Apple Pay integration
- Twitter login in Ionic 4 with Firebase
- Facebook login in Ionic 4 with Firebase
- Geolocation in Ionic 4
- QR Code and scanners in Ionic 4 and
- Translations in Ionic 4
If you need a base to start your next Ionic 4 app, you can make your next awesome app using Ionic 4 Full App
Use Ionic 4 Full app for your next awesome app