How to install Flutter and create a simple Flutter app

Table of Contents
- How to install Flutter and create a simple Flutter app #CodeWithFlutter
- What is Flutter?
- What does Flutter do?
- What technology is Flutter built with?
- Why use Flutter?
- How to Install Flutter on Windows?
- Android Setup
- How to Install Flutter on MacOS?
- iOS Setup
- Android setup
- Set up the Android emulator
- More resources for Flutter
How to install Flutter and create a simple Flutter app #CodeWithFlutter
In this post, we’ll have an overview of Flutter, the latest buzz in app development market. Flutter is gaining popularity faster than any other framework. Some say it is Google’s answer to Facebook’s React Native, but that debate is for later. Let’s learn the basics of Flutter and how to start using it.
What is Flutter?
Flutter is Google’s portable UI toolkit for crafting high-quality native experiences for mobile, web and desktop in record time. Flutter works with existing code, is used by developers and organizations around the world, and is free and open source.

What does Flutter do?
For users, Flutter makes beautiful app UIs come to life.
For developers, Flutter lowers the bar to entry for building mobile apps. It speeds up the development of mobile apps and reduces the cost and complexity of app production across iOS and Android.
For designers, Flutter helps deliver the original design vision, without loss of fidelity or compromises. It also acts as a productive prototyping tool.
What technology is Flutter built with?
Flutter is built with C, C++, Dart, and Skia (a 2D rendering engine). See this architecture diagram for a better picture of the main components.
Why use Flutter?
- Develop for iOS and Android from a single codebase
- Do more with less code, even on a single OS, with a modern, expressive language and a declarative approach
- Experiment by changing code and reloading as your app runs (with hot reload)
- Fix crashes and continue debugging from where the app left off
- Benefit from a rich set of Material Design and Cupertino (iOS-flavor) widgets built using Flutter’s own framework
- Realize custom, beautiful, brand-driven designs, without the limitations of OEM widget sets
How to Install Flutter on Windows?
Minimum System Requirements
- Operating Systems: Windows 7 or later [64-bit]
- Disk Space: 400 MB
- Git for Windows
Get the Flutter SDK
- Download Latest Flutter SDK HERE
- Unzip the downloaded zip in
C:\flutter. - Locate
flutter_console.batinside theflutterdirectory and start it by double-clicking.
Update your path
If you wish to run Flutter commands in the regular Windows console, take these steps to add Flutter to the PATHenvironment variable:
- From the Start search bar, type ’env’ and select Edit environment variables for your account
- Under User variables check if there is an entry called Path :
- If the entry does exist, append the full path to
flutter\binusing;as a separator from existing values. - If the entry does not exist, create a new user variable named
Pathwith the full path toflutter\binas its value.
Note that you will have to close and reopen any existing console windows for these changes to take effect.
Run flutter doctor
From a console window which has the Flutter directory in the path (see above), run the following command to see if there are any platform dependencies you need to complete the setup:
C:\flutter>flutter doctor
This command checks your environment and displays a report of the status of your Flutter installation. Check the output carefully for other software you may need to install or further tasks to perform (shown in bold text).
For example:
**[-]** Android toolchain - develop for Android devices
• Android SDK at C:\Android\sdk
**✗ Android SDK is missing command line tools; download from**[**https://goo.gl/XxQghQ**](https://goo.gl/XxQghQ)
• Try re-installing or updating your Android SDK,
visit <https://flutter.dev/setup/#android-setup> for detailed instructions.
Android Setup
Flutter relies on a full installation of Android Studio to supply its Android platform dependencies. However, you can write your Flutter apps in a number of editors.
Install Android Studio
- Download and install Android Studio.
- Start Android Studio, and go through the ‘Android Studio Setup Wizard ‘. This installs the latest Android SDK, Android SDK Platform-Tools, and Android SDK Build-Tools, which are required by Flutter when developing for Android.
Set up your Android device
To prepare to run and test your Flutter app on an Android device, you’ll need an Android device running Android 4.1 (API level 16) or higher.
- Enable Developer options and USB debugging on your device. Detailed instructions are available in the Android documentation.
- Windows-only: Install the Google USB Driver
- Using a USB cable, plug your phone into your computer. If prompted on your device, authorize your computer to access your device.
- In the terminal, run the
flutter devicescommand to verify that Flutter recognizes your connected Android device.
By default, Flutter uses the version of the Android SDK where your adb tool is based. If you want Flutter to use a different installation of the Android SDK, you must set the ANDROID_HOME environment variable to that installation directory.
Install the Flutter and Dart plugins
- Start Android Studio.
- Open plugin preferences (File > Settings > Plugins).
- Select Browse repositories , select the Flutter plugin and click Install.
- Click Yes when prompted to install the Dart plugin.
- Click Restart when prompted.
How to Install Flutter on MacOS?
Minimum System Requirements
- Operating Systems : macOS [64-bit]
- Disk Space : 700 MB
- Git for macOS
Get the Flutter SDK
Download Latest Flutter SDK HERE
Extract the file in the desired location e.g.
$ cd ~/development $ unzip ~/Downloads/flutter_macos_v1.5.4-hotfix.2-stable.zip
Add the
fluttertool to your path. To do this, open your bash profile from your terminal (might need sudo)$ sudo vim ~/.bash_profile
Add your flutter path to the $PATH variable in bash_profile.
E.g. If you extracted flutter in your Applications folder, your path will be /Applications/flutter/bin . Add this to the existing $PATH variable by using : in between two paths. Once added, save and close the bash_profile . Run terminal again and check the $PATH by running
**$** echo $PATH
You should see your Flutter path added to the $PATH
- Run
flutter precachein the terminal.
Run flutter doctor
Run the following command to see if there are any dependencies you need to install to complete the setup (for verbose output, add the -v flag):
**$** flutter doctor
This command checks your environment and displays a report to the terminal window. The Dart SDK is bundled with Flutter; it is not necessary to install Dart separately. Check the output carefully for other software you may need to install or further tasks to perform (shown in bold text).
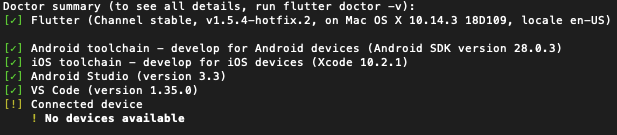
**For example: **If you haven’t used Flutter before, you might see an output like this by running flutter doctor

Flutter doctor output on a fresh system
You can see there are several things to be done to begin using Flutter in this Mac. To correct these issues, let’s run following commands
Fix license issue in Android studio
**$** flutter doctor --android-licenses
Fix iOS toolchain issues
( Install Xcode command line tools if you are on Mac OS Mojave)
**$** brew update


**$** brew install --HEAD usbmuxd


**$** brew link usbmuxd


**$** brew install --HEAD libimobiledevice


**$** brew install ideviceinstaller
Update iOS-deploy
**$** npm install -g ios-deploy
brew does not maintain it any longer, as flutter doctor suggests
Android Studio – Install Flutter and Dart plugins
- Start Android Studio.
- Open plugin preferences (Preferences > Plugins on macOS, File > Settings > Plugins on Windows).
- Select Browse repositories , select the Flutter plugin and click Install.
- Click Yes when prompted to install the Dart plugin.
- Click Restart when prompted.

Install Flutter and Dart plugin in Android Studio
Install VSCode Flutter Extension
Now all issues should be gone
We are GO flight!
iOS Setup
Install Xcode
To develop Flutter apps for iOS, you need a Mac with Xcode 9.0 or newer:
Install Xcode 9.0 or newer (via web download or the Mac App Store).
Configure the Xcode command-line tools to use the newly-installed version of Xcode by running the following from the command line:
$ sudo xcode-select –switch /Applications/Xcode.app/Contents/Developer
This is the correct path for most cases, when you want to use the latest version of Xcode. If you need to use a different version, specify that path instead.
Make sure the Xcode license agreement is signed by either opening Xcode once and confirming or running
sudo xcodebuild -licensefrom the command line.
With Xcode, you’ll be able to run Flutter apps on an iOS device or on the simulator.
Set up the iOS simulator
To prepare to run and test your Flutter app on the iOS simulator, follow these steps:
On your Mac, find the Simulator via Spotlight or by using the following command:
**$**open -a Simulator
Make sure your simulator is using a 64-bit device (iPhone 5s or later) by checking the settings in the simulator’s Hardware > Device menu.
Depending on your development machine’s screen size, simulated high-screen-density iOS devices may overflow your screen. Set the device scale under the Window > Scale menu in the simulator.
Create and run a simple Flutter app
To create your first Flutter app and test your setup, follow these steps:
Create a new Flutter app by running the following from the command line:
$ flutter create my_app
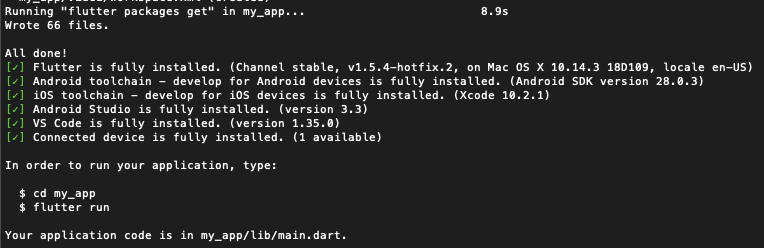
A successful creation will show something like this
A my_app directory is created, containing Flutter’s starter app.

Flutter app directory
CD into this directory:
**$** cd my_app
To launch the app in the Simulator, ensure that the Simulator is running and enter:
**$** flutter run

Your first Flutter iOS app is running in Simulator !! 👻
Deploy to iOS devices
To deploy your Flutter app to a physical iOS device, you’ll need some additional tools and an Apple account. You’ll also need to set up physical device deployment in Xcode.
Install homebrew.
Ensure that homebrew is up to date:
$ brew update
Install the tools for deploying Flutter apps to iOS devices by running the following commands:
$ brew install –HEAD usbmuxd $ brew link usbmuxd $ brew install –HEAD libimobiledevice $ brew install ideviceinstaller ios-deploy cocoapods $ pod setup
Android setup
Flutter relies on a full installation of Android Studio to supply its Android platform dependencies. However, you can write your Flutter apps in a number of editors; a later step will discuss that.
Install Android Studio
- Download and install Android Studio.
- Start Android Studio, and go through the ‘Android Studio Setup Wizard ‘. This installs the latest Android SDK, Android SDK Platform-Tools, and Android SDK Build-Tools, which are required by Flutter when developing for Android.
Set up your Android device
To prepare to run and test your Flutter app on an Android device, you’ll need an Android device running Android 4.1 (API level 16) or higher.
- Enable Developer options and USB debugging on your device. Detailed instructions are available in the Android documentation.
- Windows-only: Install the Google USB Driver
- Using a USB cable, plug your phone into your computer. If prompted on your device, authorize your computer to access your device.
- In the terminal, run the
flutter devicescommand to verify that Flutter recognizes your connected Android device. - Once ready, run
flutter runagain to run the app on Android device 😎
By default, Flutter uses the version of the Android SDK where your adb tool is based. If you want Flutter to use a different installation of the Android SDK, you must set the ANDROID_HOME environment variable to that installation directory.
Set up the Android emulator
To prepare to run and test your Flutter app on the Android emulator, follow these steps:
- Enable VM acceleration on your machine.
- Launch Android Studio > Tools > Android > AVD Manager and select Create Virtual Device. (The Android submenu is only present when inside an Android project.)
- Choose a device definition and select Next.
- Select one or more system images for the Android versions you want to emulate, and select Next. An x86 or x86_64 image is recommended.
- Under Emulated Performance, select Hardware – GLES 2.0 to enable hardware acceleration.
- Verify the AVD configuration is correct, and select Finish. For details on the above steps, see Managing AVDs.
- In Android Virtual Device Manager, click Run in the toolbar. The emulator starts up and displays the default canvas for your selected OS version and device.
More resources for Flutter
- Flutter Documentation
- Build Native Mobile Apps with Flutter | Udacity
- Flutter Community
- Flutter YouTube Channel
- Flutter Cookbook
- My GitHub Profile @ShivamGoyal1899
- Check out several free app starters on enappd.com
YaY..!! 👻 You’re almost done. Now, you are ready to design beautiful Android and iOS Apps with Flutter.
Originally post on enappd.com on June 12, 2019