How to implement Apple Pay in React Native Apps

Table of Contents
- How to implement Apple Pay in React Native Apps
- What is Apple Pay ? 🍎
- What is React-Native
- React Native and Payment Gateways
- Adding a card in Apple Pay
- Structure
- Step 1 – Get Apple Merchant ID and certificate
- Step 2 – Create a basic React Native app
- Step 3 – Install & setup Apple Pay payment package
- Step 4 – Build the app on iOS
- Step 5 – Troubleshooting and cautions
- Conclusion
How to implement Apple Pay in React Native Apps
In this post, you’ll learn how to implement Apple Pay functionality in React Native apps. We’ll also build the app in device / Emulator and test the full functionality.
_Complete source code of this tutorial is available in the _react-native-apple-pay Github repository
What is Apple Pay ? 🍎
Apple Pay is a mobile payment and digital wallet service by Apple Inc. that allows users to make payments in person, in iOS apps, and on the web. It is supported on the iPhone, Apple Watch, iPad, and Mac. It digitizes and can replace a credit or debit card chip and PIN transaction at a contactless-capable point-of-sale terminal. Apple Pay does not require Apple Pay-specific contactless payment terminals; it works with any merchant that accepts contactless payments. It supports authentication via passcode, touchID as well as face recognition.

This post is related to Apple Pay integration in React Native apps. Just like we integrate Stripe, PayPal etc payment gateways in our apps, we can integrate Apple Pay in the apps as well. Benefits of Apple Pay is
- Quick payment using just the phone
- Saving all your cards in the phone, and paying as you like
- Authentication managed by the phone itself
- Keeping your cards in Apple wallet also allows you to pay cashless on payment terminals
- You can attach Stripe, PayPal (Braintree) payment methods also via Apple Pay, using addons
What is React-Native
TLDR; – React Native (RN) apps are more “native” than webview apps made by Cordova / Ionic. But React Native is yet to release a stable (1.0.0_) version of the framework.
React Native is a JavaScript framework for writing natively rendering mobile applications. It’ is based on React, Facebook’s JavaScript library for building user interfaces, but instead of targeting the browser, it targets mobile platforms. Because most of the code you write can be shared between platforms, React Native makes it easy to simultaneously develop for both Android and iOS.
React Native applications render using real mobile UI components, not webviews, and will look and feel like any other native mobile application. React Native also exposes JavaScript interfaces for platform APIs, so your React Native apps can access platform features like the phone camera, or the user’s location. Facebook, Palantir, TaskRabbit etc are already using it in production for user-facing applications.
React Native and Payment Gateways
React Native can create a wide variety of apps, and hence a wide variety of payment gateways can be implemented in React Native apps. The popular ones are PayPal, Stripe, Razorpay, Braintree, in-app purchase etc.
Apple Pay can be integrated in websites as well as mobile apps. In this blog we’ll learn how to integrate Apple Pay in React Native apps.
Adding a card in Apple Pay
Before you can use Apple Pay in your apps, you need to have a card added in your Apple wallet. For development purpose, to test the demo flow, you don’t need to add a card. But to test the live payment mode of the app, you will need a card in your app. The process of this is not programmatic, but just for information purpose, you can add a card following this video

How to add a card in Apple wallet
Integrating Apple Pay in React Native apps is simple and straightforward. It uses the package react-native-payments which is popular by usage.
Structure
I will go ahead in step-by-step fashion so you can follow easily.
- Get Apple Merchant ID and certificate (only required for production app)
- Create a basic React Native app and set UI for payments
- Install & setup Apple Pay payment package
- Build the app on iOS
- Troubleshooting and cautions
Let’s start step-by-step
Step 1 – Get Apple Merchant ID and certificate
If you have done some iOS development, you are aware of Apple’s love for certificates. So, for Apple Pay as well, you need to get a Merchant ID and a Payment Processing Certificate from **Apple developer account **(you need to have an Apple developer account for this)
- **Merchant ID – **An identifier you register with Apple that uniquely identifies your business as a merchant, able to accept payments. This ID never expires, and can be used in multiple websites and iOS apps. See Create a merchant identifier for the setup steps.

Go to Identifiers in your Apple Developer account, and add new identifier

Select type as Merchant IDs
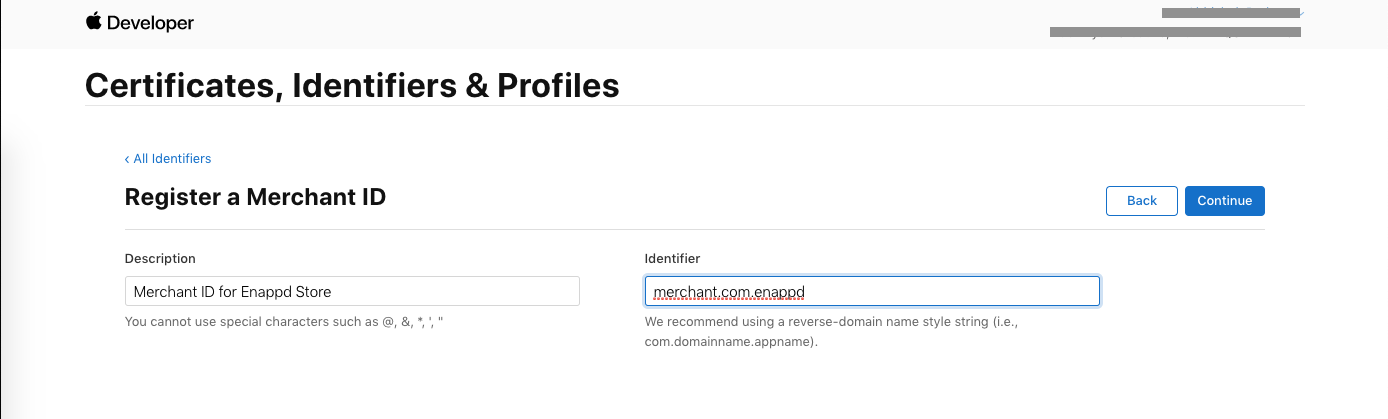
Provide a description and Merchant ID of your choice.
**2. Payment Processing Certificate – **A certificate associated with your merchant ID, used to secure transaction data. Apple Pay servers use the certificate’s public key to encrypt payment data. You (or your payment service provider) use the private key to decrypt the data to process payments. See Create a payment processing certificate for the setup steps.
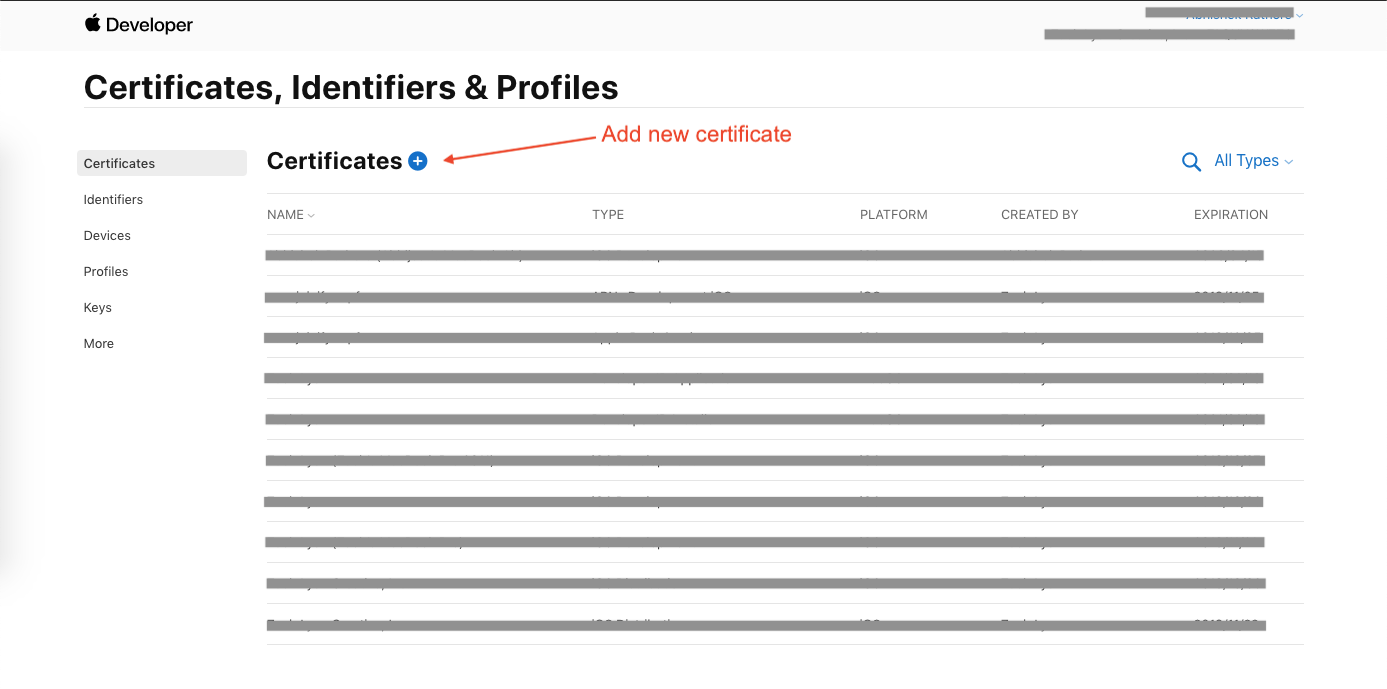
Add new certificate in Apple Developer account

Create new certificates for Apple Pay Processing
**3. Merchant identity certificate – ** A Transport Layer Security (TLS) certificate associated with your merchant ID, used to authenticate your sessions with the Apple Pay servers. The merchant identity certificate is only required for Apple Pay on the web ; it isn’t needed for apps. See Create a merchant identity certificate for the setup steps.
Step 2 – Create a basic React Native app
First, make sure you have all pre-requisites to create a react-native app as per the official documentation.
At the time of this post, I have React-Native version 0.60
Create a blank react-native app (Replace RNApplePay with your own name)
$ react-native init RNApplePay
This will create a basic React-native app which you can run in a device or simulator. Let’s run the app in iOS using
$ react-native run-ios
You’ll see the default start screen. Change the UI of this front page by changing App.js and the page will look like this

Homepage for Apple Pay React Native demo app
The UI here is not very complex, but if you still want to use this UI, you can find it in App.js file of the repository.
Step 3 – Install & setup Apple Pay payment package
3.1 Install the package
The package we will use for Apple Pay integration is react-native-payments . This provides functionality of both Apple Pay and Google Pay, but for this blog we’ll keep the discussion to Apple Pay itself.
Install the package using
$ yarn add react-native-payments
and link the library using (you don’t need to manually link libraries in React Native ≥0.60, but I do it anyway)
$ react-native link react-native-payments
Follow the next steps carefully, as it can get confusing
3.2 Assign Apple Pay in your iOS app via Apple Developer account
Your app ID should be associated with Apple Pay, only then you will see the entitlement in Xcode when building the app. To enable Apple Pay, go to your Apple developer account and create an identifier with your app’s bundle ID
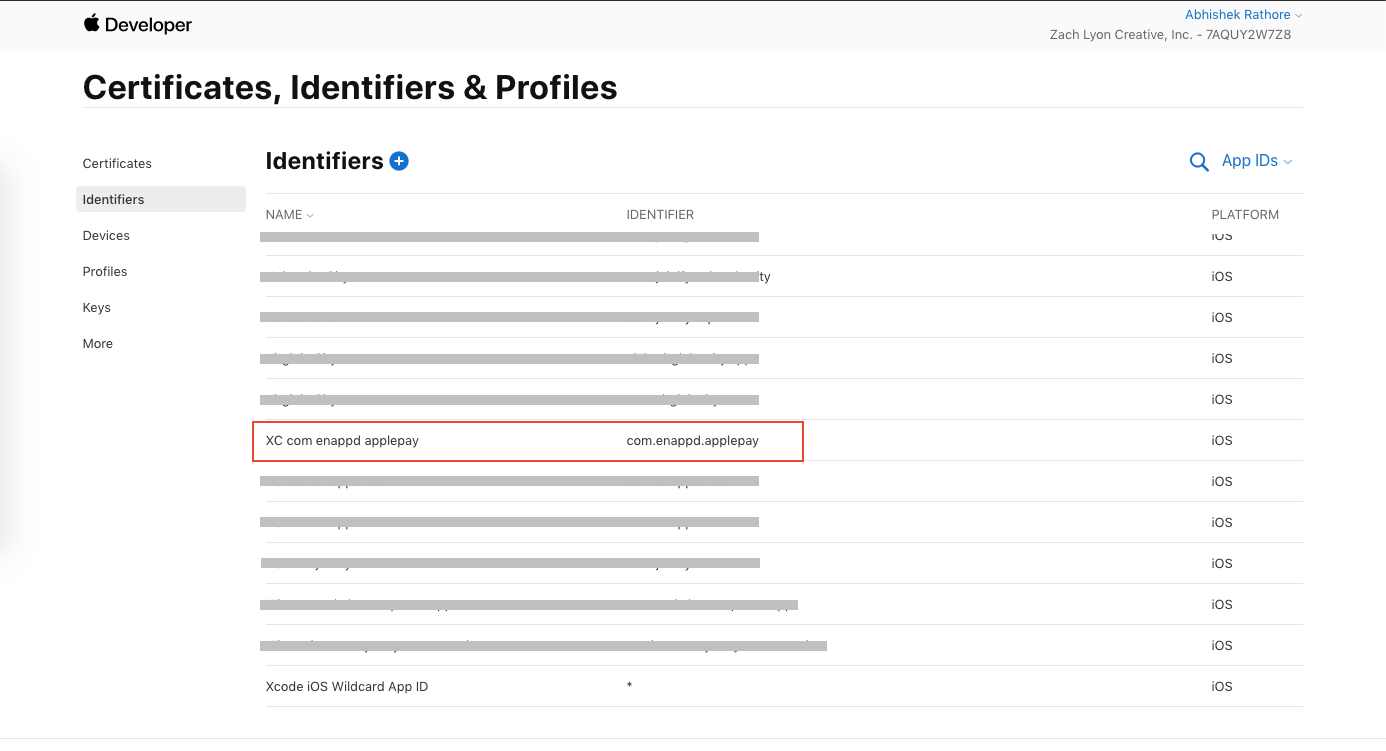
Create a new identifier for your app’s bundle ID e.g. com.enappd.applypay
Note : This bundle ID should be same as what you see in Xcode. Alternatively, you can change this in Xcode when building the app.
Click the created identifier, and enable Apple Pay in the app

Enable Apple Pay Payment in the app
3.3. Enable Apple Pay in your iOS app via Xcode
We already have a merchant ID and Apple Pay payment certificate from Step 1. To use Apple Pay in app, you need to enable Apple Pay in the app entitlements using Xcode.
Go to your project -> Capabilities -> Apple Pay, and turn the toggle ON.

Enable Apple Pay in Xcode
If you don’t see the Apple Pay capability in your Xcode capabilities tab, you will need to enable it from your Apple developer account (Step 3.2 above)
3.4 Import the payment library in your App.js
Next, we’ll import the payment library in our App.js (or any other page where you are implementing the payments. You can even import it globally).
Import using
const PaymentRequest = require('react-native-payments').PaymentRequest;
Now, we can use the PaymentRequest variable to create payment requests etc.
3.5 Initializing Payment request
Before creating a payment request, we need to understand the different parts of Payment request as accepted by the react-native-payments package
- displayItems – (Array of PKPaymentSummaryItem in swift). Items array is created in a way so that items’ price, delivery price and total price is included in the array in order. Our items array is as follows
- method_data – This contains important fields like merchant_id, supportedNetworks (‘visa’, ‘mastercard’, ‘amex’), country code and currency code
- Extra options – These define the requirement of shipping address, User name, email and phone number to be filled to complete the order. For our case the options are defined as
With these three objects, our Payment request can be created using
const paymentRequest = new PaymentRequest(METHOD_DATA, DETAILS, OPTIONS);
3.6 Check if payments are available
Before creating a payment request, it is ideal to check if the device or app has Apple Pay available. Check this with a simple method like this (paymentRequest variable comes from above step)
3.7 Create a payment request
Very similar to above, use following method to create a payment request on your button click
paymentRequest.show is the actual method creating a payment request. Once you get a response from show() , you can process the response for further authorization from your server, or connecting to the payment bank directly. For more details, check the **Processing Payments **section of the plugin’s documentation
Including all the code above, the App.js will look like this
Step 4 – Build the app on iOS
Let’s run the app on iOS using
$ react-native run-ios
Here’s the complete functionality working for me in the simulator

Complete Apple Pay functionality as per our code
For production environment
It is also important to test Apple Pay in your production environment. Real cards must be used in the production environment. Test cards will not work.
There are known differences when running Apple Pay on simulator and real device. Make sure you test Apple Pay on real device before going into production.
Step 5 – Troubleshooting and cautions
The whole process is very sensitive to exact steps to be followed, and any difference in steps or code can break the code. Here are some of the issues I faced during this blog
5.1 Cannot read property ‘createPaymentRequest’

This happens when the library is not properly linked to the iOS platform. I found a solution fromthis forum and added my two cents as well. Basically, there is a s.dependency "React" missing from the react-native-payments PodSpec file. Once it is added, you need to re-run pod install in the iOS project, and re-run the linking command.
5.2 Missing contact details
This is not really an error, but a requirement for payment completion. If we set requestPayerName , requestPayerPhone etc in the payment request, and there is none set already in the device, then the Apply Pay prompt shows you different errors, asking you to fill the required details

Payment process requesting Contact Details, and adding contact details flow
5.2 Requesting Shipping Address
Requesting a shipping address is done in three steps.
First, you’ll need to set requestShipping to true within PaymentOptions.
const OPTIONS = {
requestShipping: true
};
Second, you’ll need to include shippingOptions in your Payment Details.
const DETAILS = {
....
shippingOptions: [{
id: 'economy',
label: 'Economy Shipping',
amount: { currency: 'USD', value: '0.00' },
detail: 'Arrives in 3-5 days'
}],
....
};
Lastly, you’ll need to register event listeners for when a user selects a shippingAddress and/or a shippingOption. In the callback each event, you’ll need to provide new PaymentDetails that will update your PaymentRequest.
paymentRequest.addEventListener('shippingaddresschange', e => {
const updatedDetails = getUpdatedDetailsForShippingAddress(paymentRequest.shippingAddress;


  e.updateWith(updatedDetails);
});


paymentRequest.addEventListener('shippingoptionchange', e => {
const updatedDetails = getUpdatedDetailsForShippingOption(paymentRequest.shippingOption);


  e.updateWith(updatedDetails);
});
If a shipping address is not added in the device, the Payment will ask user to add a shipping address

Payment process requesting Shipping Address, and adding address flow
Conclusion
🎉 Congrats, you now know how to implement Apple Pay Payments in your react native apps. We have also tested the functionality in simulator. You can also fix different issues you’ll face during the implementation. For more details about the package, you can always visit the package documentation
_Complete source code of this tutorial is available in the _react-native-apple-pay Github repository