React Native Chat Application using Firebase & Hooks [ Part 1 ]
![React Native Chat Application using Firebase & Hooks [ Part 1 ]](https://cdn-images-1.medium.com/v2/resize:fit:1600/1*cDLLep-X9WKJ-vmaVhJGgg.png)
Table of Contents
- React Native Chat Application using Firebase & Hooks [ Part 1 ]
- Understanding how chat application works in a database approach
- Setting up React Native Application
- Setup Firebase Project (Optional)
- Setting up Firestore Database for Chat application
- Creating Password Screen
- Creating Chat Screen
- Conclusion
- Next Steps
React Native Chat Application using Firebase & Hooks [ Part 1 ]
In this tutorial, we will be building full-fledged chat application. We can share text, images, and videos through this chat application. In this part 1, we will build one-on-one chat application and in the upcoming part, multiple participants will be able to chat through the application.
First, make sure you have all pre-requisites to create a React-Native App as per the official documentation. If you are already done with that setup, skip this documentation and go on implementing the chat application.
There are two approaches to build Chat Application
- Database-based approach <- [ Part 1]
- Socket IO-based approach <- [Upcoming Part of this series]
Understanding how chat application works in a database approach
Before implementing the logic, you should know how messages are exchanged between two or more participants. Let’s understand this using the below diagram.

Chat app flow
“User 1 sends a message to User 2” – what does this mean?; This flow is little different than we think, User 1 will update messages to the Database and User 2 is subscribed to the updates that are done on the database. And further, it filter out the messages for itself (User 2). The same flow goes for User 1. This is the traditional Publisher-Subscriber pattern of Software architecture
Here UI will update in Realtime but is dependent on Database availability. If the Database fails at some point, messages will not be updated and cannot be seen on UI.
Now we are clear with the concept of Chat Application, so we can start setting up React Native application.
Setting up React Native Application
First, make sure you have all pre-requisites to create a react-native app as per the official documentation. Run the below command to create an RN project
// using react native CLI
$ react-native init ChatApp


// using npx
$ npx react-native init ChatApp
Once the project is ready, you will see the App structure below :-

Folder structure
We will be using React Hooks to implement the Chat app logic, as hooks make things easier and lighter. Create a folder Screens with two subfolders as PasswordScreen and ChatScreen _ (refer image above)** _**. In PasswordScreen folder, we have the JS file handling all the logic related to the Password. And in ChatScreen folder, all the logic related to Chat Screen.
To implement the chat app logic, we have to install several npm packages :
- React Native Gifted Chat
- Firebase
- React Navigation
- React Native Gesture Handler
- React Native Image Picker (you can read our blog on this)
- React Native Re-animated
- React Native UUID
- React Native Masked View
Run the below command to install those
$ npm install react-native-gifted-chat firebase @react-navigation/native @react-navigation/stack react-native-gesture-handler react-native-image-picker react-native-reanimated react-native-uuid @react-native-community/masked-view
Let’s start with the App.js logic
In App.js we implement the logic related to the Stack Navigator. Initially, Password screen will be loaded and if the correct password is entered, we will be navigated to the Chat screen.
As we are going to implement One on One chat, we will create two users with a predefined password. Before adding any data, you have to set up the firebase project and enable Cloud Firestore. Go through the below section, if you haven’t setup the firebase project.
Setup Firebase Project (Optional)
Go to Firebase and create your first project (or use an existing one). Your console should look like this

Your Firebase projects all in one place
Note – It’s really easy to create a Firebase project, but if you still face any issues, follow steps 1-4 of this blog.
Setting up Firestore Database for Chat application
Once you go to Firestore Database, you will see the option to + start collection. We need to create 2 collections 1) ChatMessages 2) ChatUsers.
ChatMessages
This collection will contain all the messages exchanged between two or more users. Either text, image, or videos. All shared/exchanged content will be saved in this collection as a document.
{
_id: "6f3c5e08-c255-4c08-b005-4527e46c50e1"
createdAt: 17 August 2022 at 22:05:44 UTC+5:30
text: "It was very good"
user {
_id: "second_user"
avatar: "https://placeimg.com/140/140/any"
}
}
Each message document will look like this. Above example is for Text message sent from second_user to first_user. Here, _id -> message doc Id, createdAt -> sent on, text -> text message, user -> sender info.
ChatUsers
This collection will only contain two users (for part 1). Each user will have a linked password. Password will be the Document ID for each user. If we want to add some other user, we just create a new document with a random password as ID.
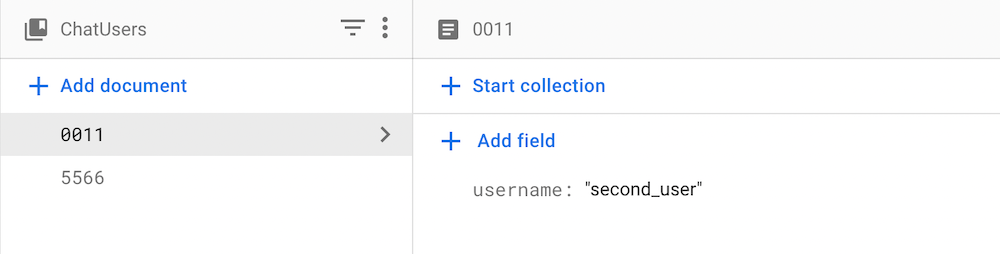
ChatUsers Collection
You can create passwords according to yourself and set a username for that user.
Thats it for the Cloud Firestore, Now we are good to take off and write some real code

Creating Password Screen
We will create a very simple UI with Password Input box and a Continue button to validate the password and move on to Chat Screen. The UI will look like the below screen.
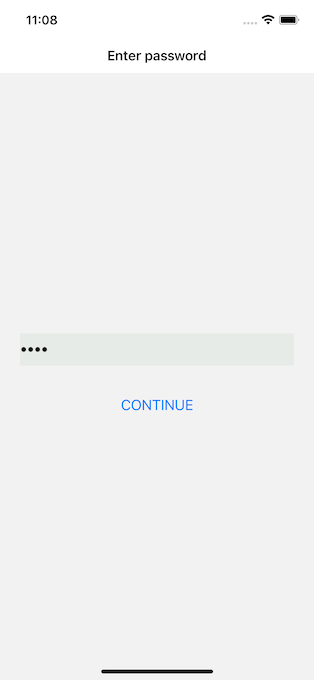
Enter Password Page
Below is the Code for PasswordScreen.js file
In the above code, for checkForPassword() method, we are getting data from ChatUsers Document according to entered password.
For example, if the user enters 0011 as the password and clicks on continue then we will query for ‘chatUsers/0011’ into the firestore database. And if there is any document, the user is navigated to the Chat screen and if there is no such document then we will show an incorrect password.
firebase.js file
In the above firebase.js file, we have initialized the firebase project using firebaseConfig. The app instance is a reference to the firebase project and the db instance is a reference to Cloud Firestore.
Now password screen is completed, we can move on to the Chat Screen that contains the logic of exchanging messages via Text, Images and Videos.
Creating Chat Screen
To create a chat screen, we will be using react-native-gifted-chat package. It will help to build and maintain the chat screen for different types of messages like text, images, videos, and audio. The chat screen will look like below screen: -

Chat Screen
Logout button will take us to the password screen and Media button will ask for the options (Camera, Photos, and Videos) to be shared through the chat screen. Below is the code for Chat Screen : -
Step 1 – Setting up Render function
The first step is to render the Gifted chat in the View. To render the chat screen, we want an array (state variable) that can store the messages which are exchanged between both users.[from Line 185 in above ChatScreen.js file]
<View style={{display: 'flex', height: '100%'}}>
<GiftedChat
messages={messages}
onSend={messages => onSend(messages)}
user={{
_id: route?.params?.username ? route.params.username: '1',
}}
renderMessageVideo={renderMessageVideo}
/>
</View>
Here messages -> State variable, onSend -> Method called when we click on send button, user -> Identity of the sender and renderMessageVideo -> Method used to render the video messages.
We have passed the route.params.username to the user attribute in GiftedChat component. **_route.params.username _**is the username of the logged in user. We have passed it through Password Screen (as shown below)
// PasswordScreen.js


navigation.navigate('chat', docSnap.data());
Here docSnap.data() is the information for the logged in user. As we have seen, the firestore database only has the username as the user identity.
Step 2– Sending messages to the User (Gifted chat component)
Gifted chat provides a prop onSend. That is invoked when someone clicks on send button in GiftedChat Component. Below is the code for onSend() method. [from Line 142 in above ChatScreen.js file]
const onSend = useCallback((messages = []) => {
setMessages(
previousMessages => GiftedChat.append(previousMessages, messages)
)
const { _id, createdAt, user} = messages[0]
addDoc(
collection(db, 'chatMessages'),
{
_id, createdAt,  text: messages[0].text,
user: {
...user,
avatar: 'https://placeimg.com/140/140/any'
}
}
);
}, [])
In onSend Callback, we performed 2 functions.
- Calling setMessages() method to show a new message in the Gifted chat component
- Updating message content in chatMessages collection
Step 3– Loading old messages in Chat Component (using onSnapshot)
Gifted chat view is loaded but we also have to show/load old messages which were exchanged between user 1 and user 2. To load those messages, we add a useEffectLayout method. [from Line 14 in above ChatScreen.js file]
useLayoutEffect(() => {
navigation.setOptions({
headerRight: () => (
<TouchableOpacity style={{marginRight: 10}}
onPress={gotoMedia}>
<Text>Media</Text>
</TouchableOpacity>
)
})


   const q = query(
collection(db, 'chatMessages'),
orderBy('createdAt', 'desc')
);
const unsubscribe = onSnapshot(q, (snapshot) =>
setMessages(snapshot.docs.map(doc => ({
_id: doc.data()._id,
createdAt: doc.data().createdAt.toDate(),
text: doc.data().text,
user: doc.data().user,
image: doc.data().image,
video: doc.data().video
}))
));
return () => {
unsubscribe();
};
}, [navigation]);
onSnapshot() method helps to subscribe to the collection change. For example onSnapshot() method is called over ChatMessages collection then whenever a document is added in ChatMessages collection, this method will be invoked.
So we added a logic, whenever a document is added in ChatMessage. We update message state variable using setMessages() method. And this messages state variable is further passed into the GiftedChat component.
Sharing Images and Videos in React native gifted chat
We have seen, how we can share Text messages by just updating into the database, and onSnapshot will capture that and load the message into the receiver Chat component. But for Images and Videos, it’s a little different.
If you are** _ sharing image_**, then below will be the format of the shared message
{
_id: "6f3c5e08-c255-4c08-b005-4527e46c50e1"
createdAt: 17 August 2022 at 22:05:44 UTC+5:30
image: "<https://picsum.photos/200/300>"
user {
_id: "second_user"
avatar: "https://placeimg.com/140/140/any"
}
}
And if you share the video then below will be the format for Shared message
{
_id: "6f3c5e08-c255-4c08-b005-4527e46c50e1"
createdAt: 17 August 2022 at 22:05:44 UTC+5:30
video: "<video_url>"
user {
_id: "second_user"
avatar: "https://placeimg.com/140/140/any"
}
In the case of Images and Videos, we will first upload the actual video and image to Firebase Storage. And firebase storage provides a link to that image/video. Further, that link will be used to show image/video in Gifted chat component.
**Media option
** The media option is provided using which we can upload either a Camera image, Library image, or a video. Below is the code to show those options using Action Sheet. [from Line 41 in above ChatScreen.js file]
ActionSheetIOS.showActionSheetWithOptions(
{
options: ["Cancel", "Camera", "Photos", "Video"],
cancelButtonIndex: 0
},
buttonIndex => {
if (buttonIndex == 1) {
// Camera button event
} else if (buttonIndex == 2) {
// Photo button event
} else if (buttonIndex == 3) {
// Video button event
}
})

Media option
**Uploading image and video to Firebase Storage
** The process of uploading the Camera image and Library image will be the same but uploading the video will be a little different. [ from Line 40 in above ChatScreen.js file]
const gotoMedia = () => {
ActionSheetIOS.showActionSheetWithOptions({
options: ["Cancel", "Camera", "Photos", "Video"],
cancelButtonIndex: 0
},
buttonIndex => {
if (buttonIndex == 2) {
launchImageLibrary().then((res) => {
if (!res.didCancel && !res.errorCode) {
uploadMediaToFirestore(res, 'image');
}
});
} else if (buttonIndex == 1) {
launchCamera().then((res) => {
if (!res.didCancel && !res.errorCode) {
uploadMediaToFirestore(res, 'image');
}
});
} else if (buttonIndex == 3) {
const options = {
title: 'Video Picker',
mediaType: 'video',
};
launchImageLibrary(options).then((res) => {
if (!res.didCancel && !res.errorCode) {
uploadMediaToFirestore(res, 'video');
}
});
}
})
}
Note :- Please follow the post install steps to complete the setup and use react native image picker in the app.
We are using react-native-image-picker to open the camera and select photos and videos. To open camera -> launchCamera() method, to open photo library -> launchImageLibrary() method and to open video library -> launchImageLibrary(options) method.
Once Image or Video is selected, we pass on the response to the uploadMediaToFirestore() method. Below is the code for the uploadMediaToFirestore() method [ from Line 73 in above ChatScreen.js file]
const uploadMediaToFirestore = async (res, type) => {
const uri = res.assets[0].uri;
const filename = uri.substring(uri.lastIndexOf('/') + 1);
const uploadUri =
Platform.OS === 'ios' ? uri.replace('file://', '') : uri;
const storage = getStorage(app);
const fileRef = ref(storage, filename);
const img = await fetch(uploadUri);
const bytes = await img.blob();
let metadata;
if (type == 'video') {
metadata = {
contentType: 'video/mp4',
};
} else {
metadata = {
contentType: 'image/jpeg',
};
}
uploadBytes(fileRef, bytes, metadata).then(async (uploadTask) => {
console.log('task', uploadTask)
getDownloadURL(uploadTask.ref).then((url) => {
if (type == 'video') {
setVideoData(url);
} else {
setImageData(url);
}
});
}).catch((err) => {
alert('Error while uploading Image!')
console.log(err);
});
}
First, we get the image/video path and change it into blob type. Further on the bases of the type argument, we pass on the metadata object to the upload bytes function. Once the image/video is uploaded, getDownloadURL() method is called to get the storage link.
The media(image/video) link is now updated to the message state variable and cloud firestore using setVideoData(url) and setImageData(url) methods. Below is the screenshot of shared Image and Video.

Shared media
Conclusion
Now we know how to create a Build a chat app with react-native-gifted-chat using firebase and Hooks. You can share messages in form of text, images, and videos. If you want to know more about any of the other feature implementations, please follow ->_ _enappd.com
Stay tuned !!
Next Steps
If you liked this blog, you will also find the following React Native blogs interesting and helpful. Feel free to ask any questions in the comment section
- Firebase – Integrate Firebase | Analytics | Push notifications | Firebase CRUD
- How To in React Native – Geolocation | Life cycle hooks | Image Picker | Redux implementation | Make API calls | Navigation | Translation | Barcode & QR code scan | Send & Read SMS | Google Vision | Pull to Refresh
- Payments – Apple Pay | Stripe payments
- Authentication – Google Login| Facebook login | Phone Auth | Twitter login
- Create Instagram / Whatsapp Story Feature in React Native
- React Native life cycle hooks | Implement Redux | Async actions with Redux
- Create Awesome Apps in React Native using Full App
If you need a base to start your next React Native app, you can make your next awesome app using React Native Full App
React Native Full App by Enappd