Integrating Firebase Push notification with React native iOS application

Table of Contents
- Integrating Firebase Push notification with React native iOS application.
- Step 1 – Setting up Firebase project (Optional)
- Step 2 – Setting up React native project
- Step 3 – Creating certificates and identifiers through the apple developer account
- Step 4 – Setting up XCode for Firebase push notification.
- Step 5 – Adding firebase push notification code in React Native application
- Step 6– Adding push notification code in Node JS server.
- Conclusion
- Next Steps
- React Native Full App
- Ionic React Full App with Capacitor
Integrating Firebase Push notification with React native iOS application.
In this article, we will talk about how we can integrate FCM (Firebase Cloud Messaging) with React Native iOS application. If you want to go through FCM and Android app integration then read this article.
Pre-requisite :- You should have Apple Developer Account to make push notifications work properly.
Let’s start with integrating firebase push notification, before going on to the code we have to set up a few things.
- Setting up the Firebase project
- Setting up React native project
- Creating certificates and identifiers through the apple developer account
- Setting up Xcode for Firebase Push Notification
- Adding firebase push notification code in React Native application
- Adding push notification code in Node JS server
Step 1 – Setting up Firebase project (Optional)
If you don’t know how to set up the firebase project. Please go through this article.
Step 2 – Setting up React native project
To get started, you will need a target mobile OS, whether you choose to go with iOS or Android or both. Please refer to React Native Official Documentation if you are setting up React Native development environment for the first time.
For Android
You will need SDK tools andAndroid Studio, especially to set up a developer environment.
For iOS
You only need Xcode installed on your macOS.
Other Setup
- Nodejs
- npm/yarn installed
- react-native-cli
Once those tools have been installed, run the following commands:
$ npm install -g react-native-cli
Now, let’s create a new React Native project, e.g. firebaseStarter
$ react-native init firebaseNotification
or create it using the below command
$ npx react-native init firebaseNotification
When the above command is done, open the main folder in your preferred editor. When we open the project in a code editor, its structure looks like this.

Folder Structure
To check if everything is working correctly and that our React Native app has been properly initialized, run the following command:
For IOS
$ react-native run-ios
// OR
$ npx react-native run-ios
For Android
$ react-native run-android
// OR
$ npx react-native run-android
Step 3 – Creating certificates and identifiers through the apple developer account
Goto Apple developer account, navigate to Certificates,ID & Profiles sections, and follow the below steps to configure the app for Firebase push notifications.
A) Create APN (Apple push notification) authentication key
Goto Keys and click on + to add the APN auth key.

Keys section
Select the Apple Push Notifications service (APNs) and give a name for the key. After clicking on continue, you will see a download option with a Key ID. The file can only be downloaded once, so download it and keep it safe.
Note :- The Key ID is also required to add it in Firebase Messaging console. If didn’t copied it, suffix of the download Key file is Key ID.
Now let’s upload this APN key file to Firebase, Goto to Firebase -> Project settings -> Cloud Messaging. Scroll down and select your firebase iOS application.

Cloud messaging settings
You will see the upload option and upload the key file (.p8) file. It will ask for the Key ID and Team ID. The key ID is the suffix of the Key file and the Team ID goto Membership Info tab.
B) Add Bundle Identifier for RN App
Goto Identifiers and click on + to add Bundle Identifiers.
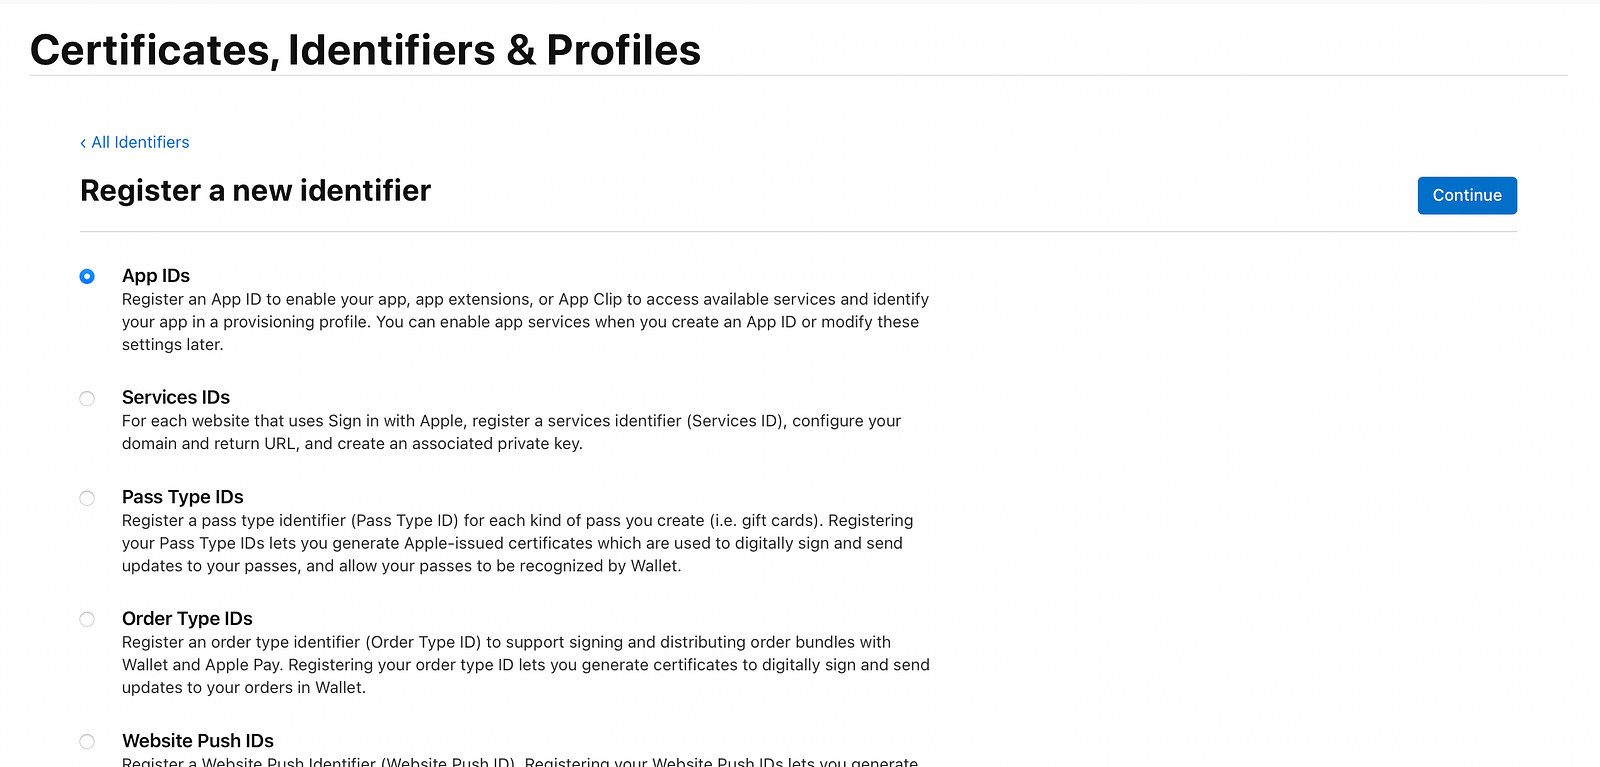
Add App ID
Select App IDs and click on Continue.
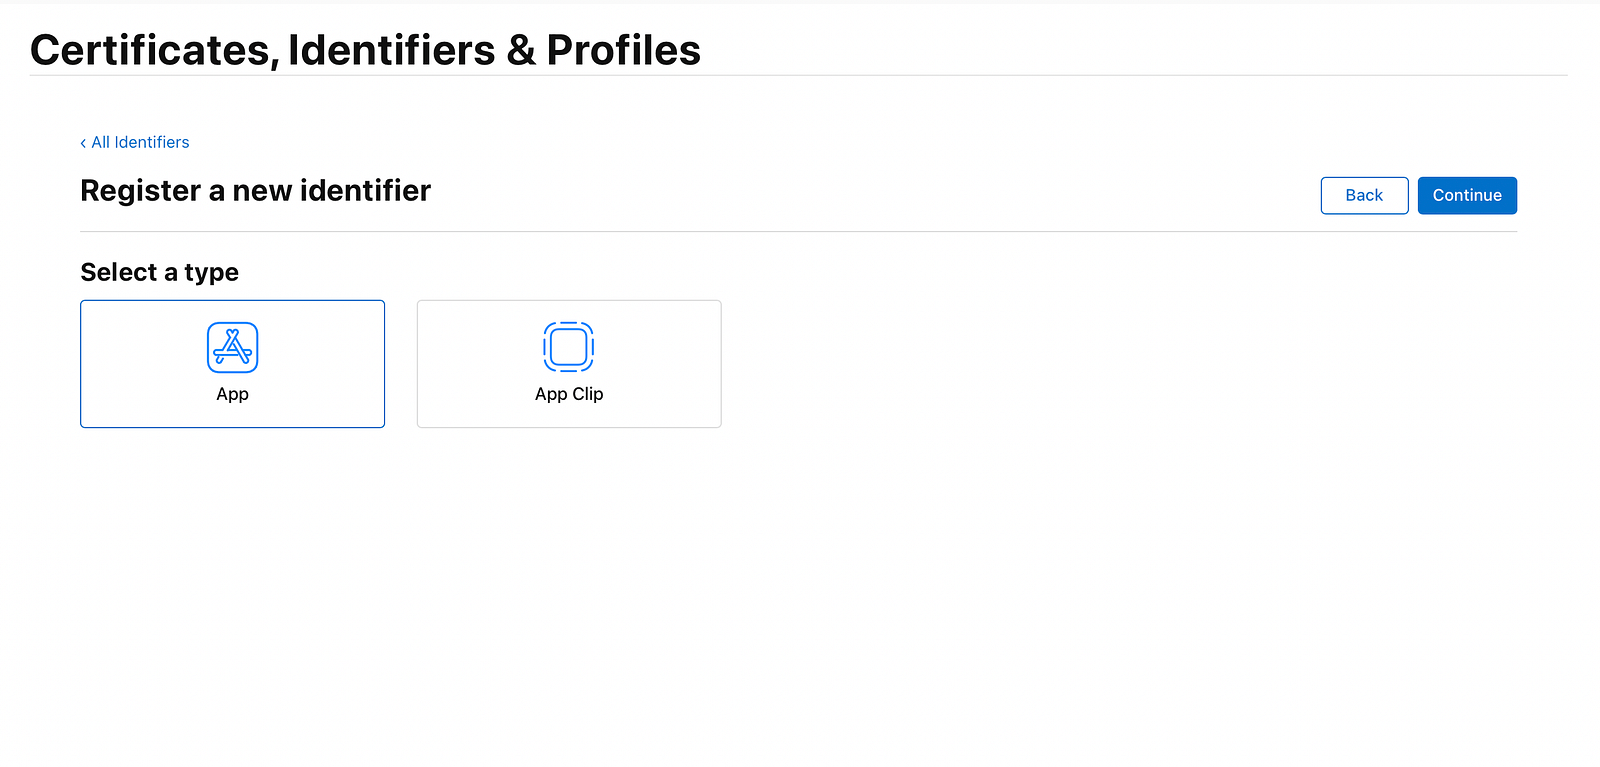
Click on the App option and click on continue.

Enter the description and Bundle ID used to build the application. Now scroll below to add Push Notifications capability to the Bundle Identifier.

Now click on continue and the Identifier is being created.
C) Add Provisioning Profile for Bundle ID
To add the Provisioning profile, go to Profiles and click on + to add a new profile.

Select iOS App Development and click on Continue.

Select the App ID, you will use for the RN application for firebase push notification and click on continue.
That’s it for setting up the Apple developer section. Let’s start and set up a few more things and finally code the logic for React native application.
Step 4 – Setting up XCode for Firebase push notification.
Open the project -> ios folder in Xcode. We have to set up two things to make firebase notification work for React native application.
A) Adding GoogleService-Info.plist file to iOS application
Note :- To download the GoogleService-Info.plist file, goto firebase project and open Project settings. Select your iOS application and download Google Services file.
Go to the project folder and select the App name. Right-click and select Add file to the app.
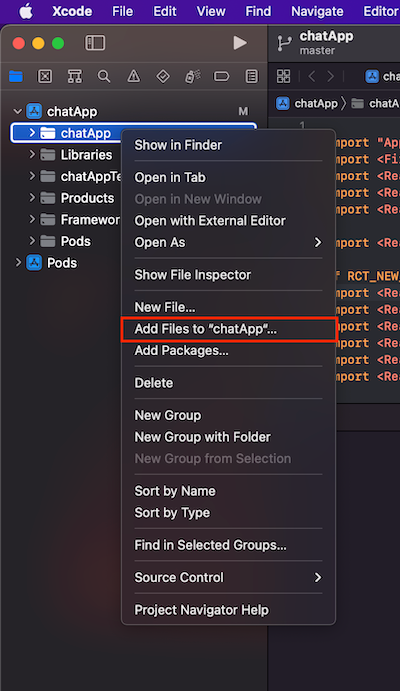
Now select the GoogleService-Info.plist file and click on upload. Once uploaded, you will see that file in the AppName subfolder.
B) Providing Push/Remote notification permissions using Xcode
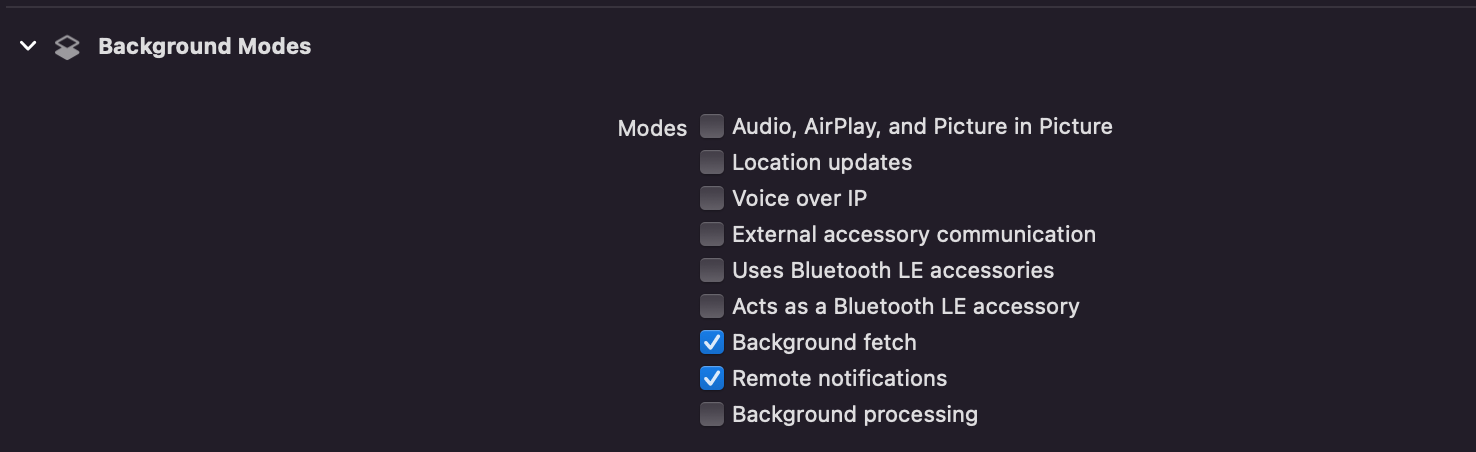
To provide permission, select the chatApp from the left menu. And go to Signing and Capabilities, there you will see + to add capability. Search for Push notifications, Background Modes and add them.
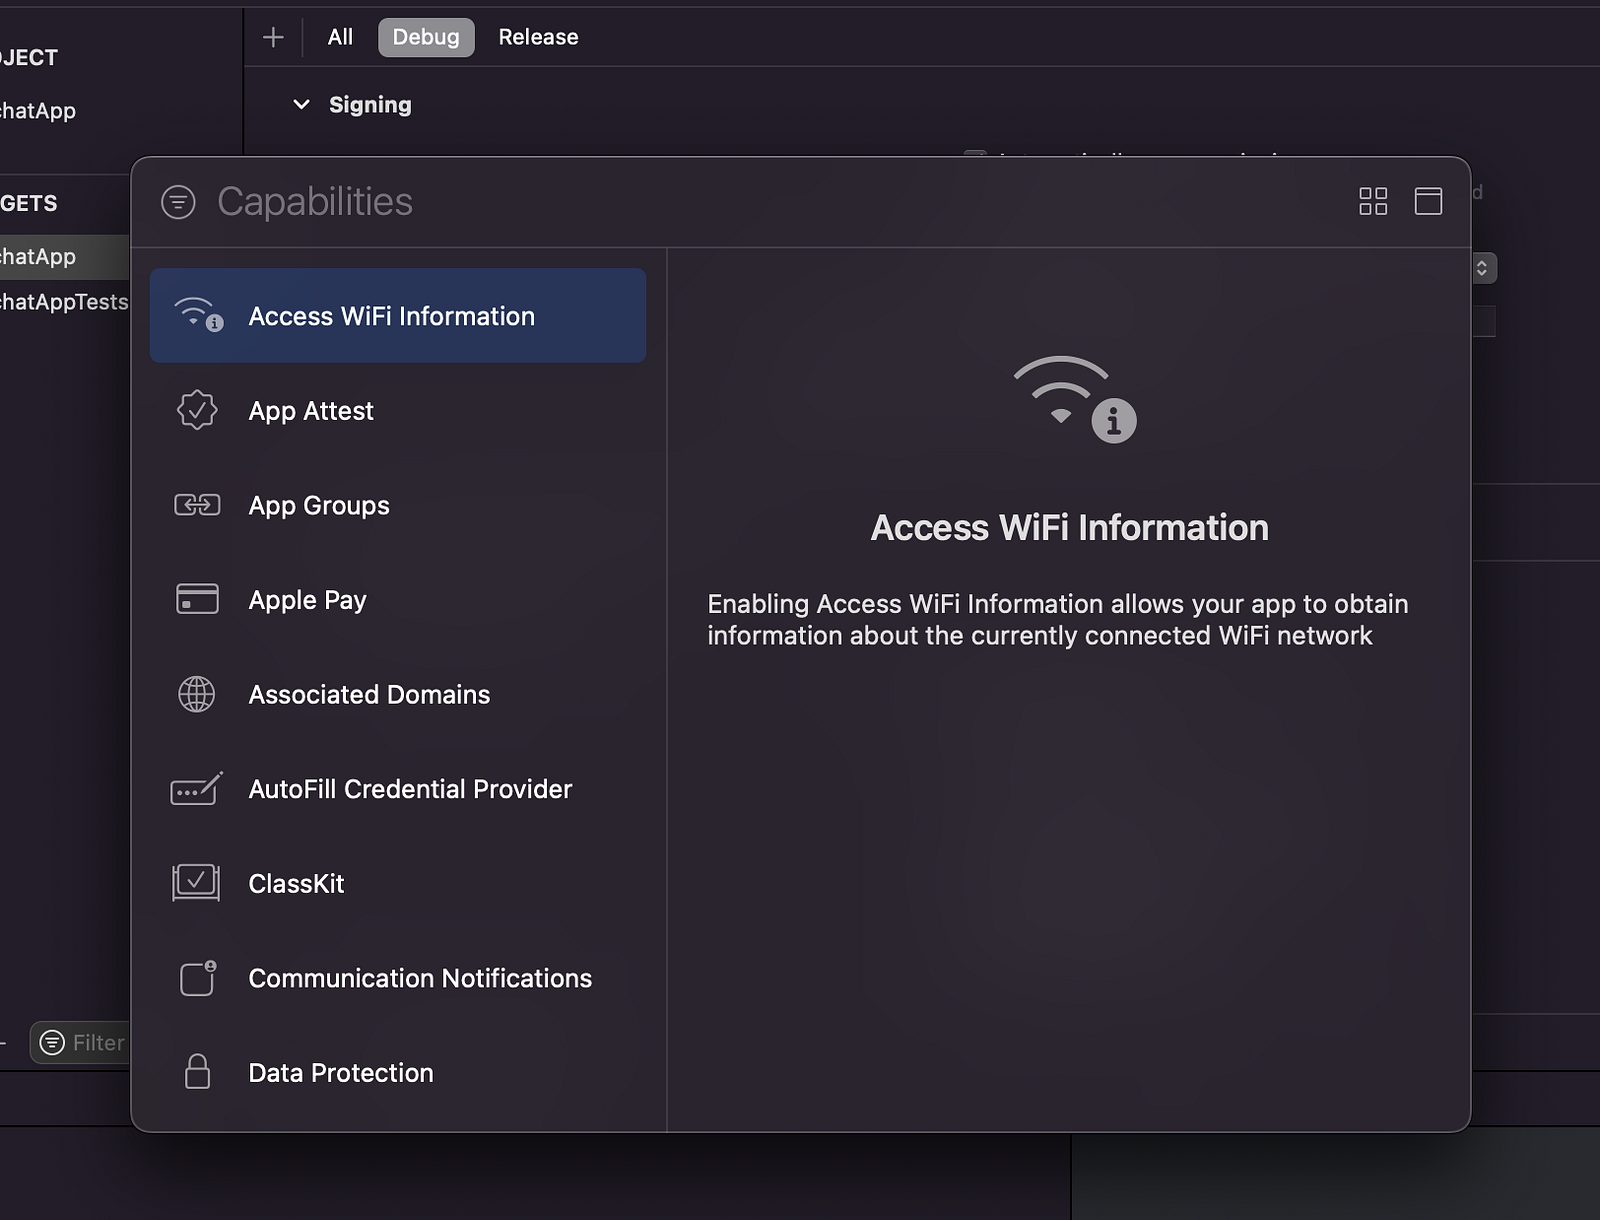
In background modes, you have to select background fetch and remote notification.
Now we are all set to write down some React Native code and get real-time notifications. To start with notifications, we also have to set up a backend Node JS server. If you don’t know how to set up a backend server, go to this blog.
Step 5 – Adding firebase push notification code in React Native application
To install react native messaging module to react native project, run the below command.
$ npm install @react-native-firebase/app


$ npm install @react-native-firebase/messaging
This package will look for the google service file (that we uploaded earlier) in iOS folder and initialize your firebase project. Before installing it for iOS platform, edit Podfile like below.
Goto ios/chatApp/AppDelegate.m and add the below code:-
// Add this function to set icon badge number to 0 when app is opened.


- (void)applicationDidBecomeActive:(UIApplication *)application
{
[UIApplication sharedApplication].applicationIconBadgeNumber = 0;
}


- (BOOL)application:(UIApplication *)application didFinishLaunchingWithOptions:(NSDictionary *)launchOptions
{
// Add the below line of code to initialize the firebase app
--> [FIRApp configure];


.....
.....
Now to install these packages for iOS platform, run the below command.
$ cd ios


// for x86 Mac
$ pod install


// for M1 mac (if pod install is causing error)
$ arch -x86_64 pod install
pod install will install the required packages for iOS. Now we can use these packages in our code to generate a push token and send the notification to the receiver.
To create a push notification token, use the below code.
import messaging from '@react-native-firebase/messaging';


const getFirebasePermissions = async () => {
messaging().requestPermission({
carPlay: false
}).then((authStatus) => {
const enabled =
authStatus === messaging.AuthorizationStatus.AUTHORIZED ||
authStatus === messaging.AuthorizationStatus.PROVISIONAL;
if (enabled) {
messaging().getAPNSToken().then(async (apnsToken) => {
const token = await messaging().getToken();


         // updating token to firestore or database
setPushToken(token);
})
}
}).catch((error) => {
console.log('error', error)
});
}
This token can be generated anywhere in the code and you can update this in firebase (or your own database). Later we will use this token in the node js server, to send the push notification to the receiver.
Now we will see, how we can send notifications using this token. For this, we have to move to server code. In our case, we will be using nodejs server.
Step 6– Adding push notification code in Node JS server.
Create a new push.js file in your node project. This file will only contain the push notification-related logic. To add the code, we have to install fcm-node the package.
$ npm install fcm-node
Now in index.js we will create a POST API, which will be called by react native app while sending the push notification.
In the above code, we have created sendChatNotification api. fcm-node uses the push notification token to send the notification to the receiver’s mobile. It’s the same token, we have generated using react native firebase messaging package and saved it into our database.
Now we look into the main logic used to send the notification (using a push token) to the receiver.
Above server key, you can get it from firebase -> project settings -> cloud messaging -> iOS app -> server key.

Once you trigger the API, you will get a notification on the receiver’s device.

Push Notification
Note – Push notification will not work in simulators. Only real devices will receive a firebase push notification.
Conclusion
This article answer’s the question “how to send firebase push notification in react native iOS application” and it also helps you to know “how to setup APN service in App store connect”. If you want to go through FCM and Android app integration then read this article. Now it’s time to integrate this awesome firebase push service for your application.
Keep reading 📖! Stay tuned.
Next Steps
If you liked this blog, you will also find the following **React Native **blogs interesting and helpful. Feel free to ask any questions in the comment section
- Firebase – Integrate Firebase | Analytics | Push notifications | Firebase CRUD
- How To in React Native – Geolocation | Life cycle hooks | Image Picker | Redux implementation | Make API calls | Navigation | Translation | Barcode & QR code scan | Send & Read SMS | Google Vision | Pull to Refresh
- Payments – Apple Pay | Stripe payments
- Authentication – Google Login| Facebook login | Phone Auth | Twitter login
- Create Instagram / Whatsapp Story Feature in React Native
- React Native life cycle hooks | Implement Redux | Async actions with Redux
- Create Awesome Apps in React Native using Full App
React Native Full App
If you need a base to start your next React Native app, you can make your next awesome app using React Native Full App
React Native Full App by Enappd
Ionic React Full App with Capacitor
If you need a base to start your next Ionic 5 React Capacitor app, you can make your next awesome app using Ionic 5 React Full App in Capacitor

Ionic 5 React Full App in Capacitor from Enappd