6 Important Plugins with Ionic React and Capacitor

In this tutorial, we will use 6 different plugins with Ionic React Application and Capacitor. Ionic React is one of the most innovative tech stacks that one can use. Most of the ionic applications are moving to the capacitor as it has most of the plugins pre-installed in it.
What are Plugins?
Plugins are the features/modules that can be used in Ionic applications, and these plugins can be helpful while interacting with device hardware or software. Most of the plugins used are written in JavaScript/Typescript itself and encapsulated inside the node_modules. Some of the Plugins that we will be covering are:-
- Network Plugin
- Status Bar Plugin
- Haptics Plugin
- Device Plugin
- Motion Plugin
- App Plugin

Yes, the above picture illustrates the situation correctly, as the Red cord is our mobile application and another Green cord is a native module. And when they are plugged together (via plugins) they provide access to a new native/hardware feature. We will be implementing these Plugins in our demo Ionic React application and will be talking about their application and uses.
What is Ionic ?
You probably already know about Ionic, but I’m putting it here just for the sake of beginners. Ionic is a hybrid mobile app development SDK. It provides tools and services for developing hybrid mobile apps using Web technologies like CSS, HTML5, and Sass. In other words — If you create Native apps in Android, you code in Java. If you create Native apps in iOS, you code in Obj-C or Swift. Both of these are powerful but complex languages. With Cordova (and Ionic) you can write a single piece of code for your app that can run on both iOS and Android (and windows!), that too with the simplicity of HTML, CSS, and JS.
It is important to note the contribution of Cordova/Capacitor in this. Ionic is only a UI wrapper made up of HTML, CSS and JS. So, by default, Ionic cannot run as an app in an iOS or Android device. Cordova/Capacitor is the build environment that containerizes (sort of) this Ionic web app and converts it into a device installable app, along with providing this app access to native APIs like Camera etc.
Capacitor — How is it different from Cordova ?
This section is relevant to only those who have been working with Ionic / Cordova for some time. Cordova has been the only choice available for Ionic app developers for quite some time. Cordova helps build Ionic web app into a device installable app.
Capacitor is very similar to Cordova, but with some key differences in the app workflow
Here are the differences between Cordova and Capacitor (You’ll appreciate these only if you have been using Cordova earlier, otherwise you can just skip this section)
- Capacitor considers each platform project a source asset instead of a build time asset. That means, Capacitor wants you to keep the platform source code in the repository, unlike Cordova which always assumes that you will generate the platform code on build time
- Because of the above, Capacitor does not use
config.xmlor a similar custom configuration for platform settings. Instead, configuration changes are made by editingAndroidManifest.xmlfor Android andInfo.plistfor Xcode - Capacitor does not “run on device” or emulate through the command line. Instead, such operations occur through the platform-specific IDE. So you cannot run an Ionic-capacitor app using a command like
ionic run ios. You will have to run iOS apps using Xcode, and Android apps using Android studio - Since platform code is not a source asset, you can directly change the native code using Xcode or Android Studio. This give more flexibility to developers
In essence, Capacitor is like a fresh, more flexible version of Cordova.
Let’s start with the Demo project :
Step — 1. Creating Ionic React Application with Capacitor
To create Ionic React Project, we will be needing @Ionic/cli installed in the PC/Mac. If you want to know more about Ionic you can go and read about that on Ionic Beginners Blog. We have used the following versions during this blog :
Build Environment
Node 12.14.1 (any 12.x version should work)
Ionic 5 (CLI 5.3.0)
Capacitor 2.0
React 16.13.x
Create a simple Ionic React app with Capacitor
Make sure you have the latest Ionic CLI. This will ensure you are using everything latest. Ensure the latest Ionic CLI installation using
$ npm install -g ionic@latest
Creating a basic Ionic-React app (check all options). Start a basic blank starter using
$ ionic start pluginApp blank --type=react --capacitor
--capacitortells the CLI to create a Capacitor integration, not Cordova!!--type=reacttells the CLI to create an Ionic React appblanktemplate gives a blank home page
Run the app in browser using (yes you guessed it right)
$ ionic serve
You’ll see an empty page open up. That’s fine, your app is running correctly. Now our demo application is ready and we can start integrating the plugin with the application.
Step — 2. Integrating Plugins with Ionic React Application
Keep In mind, that we will create separate folders for the implementation of each Plugin. And each folder would have the 3 files:-
- Container File (Includes most of the Logic of Implementation)
- View File (Includes View of the Page)
- CSS File (Includes styles of the Page)
Now we will start integrating the Plugins in Ionic React Application, starting with Network Plugin:-
1. Network Plugin
The Network API provides events for monitoring network status changes, along with querying the current state of the network. This plugin can help developers at many points like if we want to know whether the mobile application is connected to the Internet/Network or not, also it helps in implementing the Offline feature (If you want to know more about the Offline feature go to this Enappd Blog).
First, create a new Folder (Network) in the pages directory of the src folder, the folder structure should look like this:-
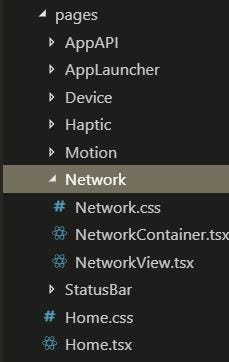
NetworkContainer will be a React Class Component and NetworkView will be React Functional Component. Now we will start with Containers logic:-
We have created the 2 state variables, 1) networkStatus which will get the value of "none" | "unknown" | "wifi" | "cellular" and 2) connectedWithInternet which will have the value as boolean (true or false).
Now, as soon as the component loads we will add the networkStatusChange listener [Line 17 in the above code], which will listen to the different status of the network connection in the mobile device. Now we will add View to the Networks Page.
In this view, we simply display the state variables [networkStatus - Line 20, connectedWithInternet - Line 23], which will change according to the listener added.
2. Status Bar Plugin
This plugin is one of the simplest plugins, that one can use. It is used to modify the Status Bar like to change the Style or change the Background or show or hide the status bar.
Now we will create those 3 files, StatusBarContainer, StatusBarView, and CSS file. Firstly we will look at the Container Logic:-
In this Code, we simply define the 3 function :- 1) hideStatusBar()- this will hide the status bar. 2) showStatusBar()- this will again show the status bar. 3) changeColor()- it will change the color (Dark/Light) of the status bar.
Now we will add View to the Page with 3 buttons in it, 1) To hide the Status Bar [Line 14 in below code]. 2) To show the Status Bar [Line 18 in below code] and 3) To toggle the color of the Status Bar [Line 22 in below code].
3. Device Plugin
This Plugin can be used to get the Device Info, most of the time we need this functionality in our application. This Plugin returns the device Info like below:-
{
    "diskFree": 12228108288,
    "appVersion": "1.0.2",
    "appBuild": "123",
    "appId": "com.capacitorjs.myapp",
    "appName": "MyApp",
    "operatingSystem": "ios",
    "osVersion": "11.2",
    "platform": "ios",
    "memUsed": 93851648,
    "diskTotal": 499054952448,
    "model": "iPhone",
    "manufacturer": "Apple",
    "uuid": "84AE7AA1-7000-4696-8A74-4FD588A4A5C7",
    "isVirtual":true
    }
Using this Plugin, we can also get the Battery Information of the Device and will get the response as :-
{
    "batteryLevel": -1,
    "isCharging": true
    }
Now we will look at the logic in DeviceContainer, In this, we will create the 3 state variables that will get the Device Info (mobileInfo), Battery Info (batteryInfo) and Language Info (languageInfo).
The above code will save the data (returned by the Plugin) in the state variable, which will be updated in the View of the App. Now we can look at View Code used in the App [Line 6 to Line 25 in the below code].
4. Motion Plugin
The Motion API tracks the accelerometer and device orientation (compass heading, etc.). This Plugin can be used to get the Acceleration coordinates and Rotation coordinates that can be used in the Application.
Now create the 3 files. i.e. MotionContainer, MotionView, and CSS file, We will look at the Container related Logic:-
In the above code, we will add the accel listener [Line 16 in above code] that will return the event object which will be of this format:-
acceleration { x: number; y: number; z: number;} accelerationIncludingGravity { x: number; y: number; z: number; rotationRate { alpha: number; beta: number; gamma: number;
And remember to remove the Listener, that we have added in ComponentDidMount() [Line 14 in above code]. We can remove the listener using removeAllListeners() method. Now we will look at the View file of this plugin
5. App Plugin
The App API handles high-level App states and events. For example, this API emits events when the app enters and leaves the foreground, handles deep links, opens other apps, and manages persisted plugin state.
In this example, we will deal with two things 1) Exit the Current app and 2) Open another app from the Current App. Now we will look at the AppContainer related logic:-
In the above code, two buttons are added 1) Exit App and 2) Open App (WhatsApp), to open any other application we just have to change the app URL used in App.openUrl({ url: ‘com.whatsapp’ }); [Line 19] and you can get this URL from google play application URL.
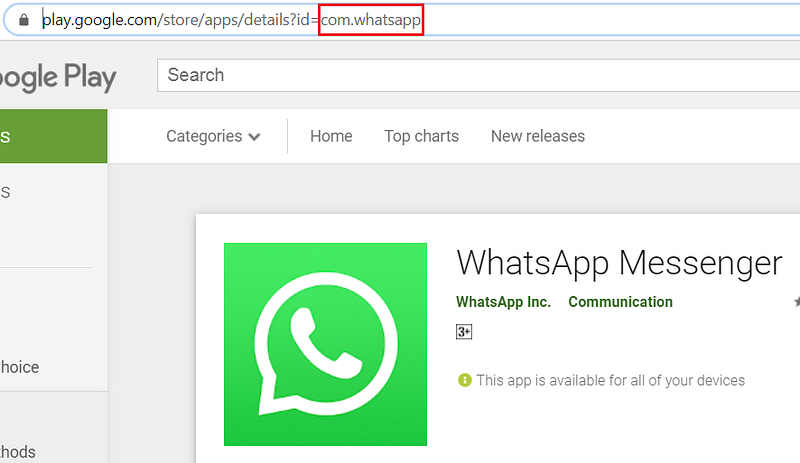
Now we will look at the View file code, that contains the Buttons.
1) Exit App :- exitApp() function call [Line 13]
2) One WhatsApp :- oneUrl() function call [Line 17]
6. Haptics Plugin
The Haptics API provides physical feedback to the user through touch or vibration. Many of the times these plugins are used in providing user gestures to the application users. Now we can have look at the HapticContainer Code
Haptic Plugin contains different Device bases gestures/Haptics. Vibrate() function [Line 14] vibrates the device. selectionStart() and selectionEnd() function [Line 18 and Line 23] start and ends the Text selection in the Device. impact() function [Line 28] creates a Device Haptic with different styles Heavy, Medium and Light.
The above code contains several methods to perform different functions defined in the Haptic Plugin. And HapticView code will look like this:-
As we have covered all of the Plugins, one of the most important step is left to add these pages to the routes in App.tsx file.
Now using the above Routes, we can navigate to any of the page. To use these routes you can add routerLink=”/pageRouter” (replace the pageRouter to the device or appApi etc.) to any of the IonComponents.
Conclusion
In this tutorial, we have implemented various plugins and also have seen their use and applications that developers can use. And if you want to know more about the features or the plugin you can go to Enappd Blog (You will get Blogs from beginner's level to the most complex level).
Next Steps
If you liked this blog, you will also find the following Ionic blogs interesting and helpful. Feel free to ask any questions in the comment section
- Ionic Payment Gateways — Stripe | PayPal | Apple Pay | RazorPay
- Ionic Charts with — Google Charts| HighCharts | d3.js | Chart.js
- Ionic Social Logins — Facebook | Google | Twitter
- Ionic Authentications — Via Email | Anonymous
- Ionic Features — Geolocation | QR Code reader| Pedometer
- Media in Ionic — Audio | Video | Image Picker | Image Cropper
- Ionic Essentials — Native Storage | Translations | RTL
- Ionic messaging — Firebase Push | Reading SMS
- Ionic with Firebase — Basics | Hosting and DB | Cloud functions
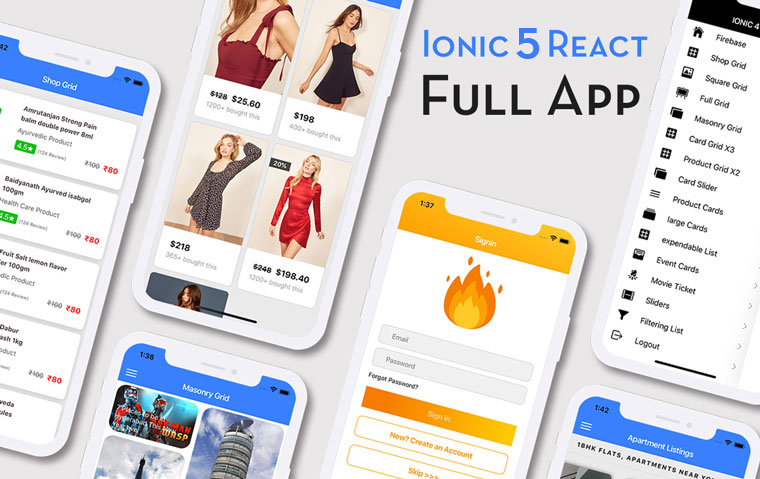
Ionic React Full App with Capacitor
If you need a base to start your next Ionic 5 React Capacitor app, you can make your next awesome app using Ionic 5 React Full App in Capacitor
Ionic Capacitor Full App (Angular)
If you need a base to start your next Angular Capacitor app, you can make your next awesome app using Capacitor Full App
Ionic Full App (Angular and Cordova)
If you need a base to start your next Ionic 5 app, you can make your next awesome app using Ionic 5 Full App


