How to translate in Ionic 5— Internationalization and Localization

In this post you’ll learn how to translate text in Ionic 5 apps and PWA. You will also learn how to get device specific language and convert your app’s text to the same language / locale.
We will also look at a popular sought after method of loading JSON files from servers instead of keeping them in local build. This is specially useful for mobile apps, as refreshing the build on user device is not possible at runtime.
Ionic has a variety of app types nowadays (Angular/React/Vue , Cordova/Capacitor). This post will explore the Ionic apps made in Angular Cordova, but the same process can apply in Angular Capacitor apps as well.
Translation in Apps — how is it done ?
Multi-language translation, OR internationalization is a growing need for every app that wants to target international customers. Till date, majority of apps have been developed in English, no surprise ! But with growing apps users, every app is now focusing on translating to local languages.
First we need to understand the steps involved in the process. Translations, thanks to Google, look very easy, but they are a bit involved in case of apps and websites, in our case Ionic 5 apps. There are 3 major steps in the translation process in an app —
- Translation Language — Detect the language you want to translate into. This can either be done automatically by detecting phone or browser’s language (Globalization), OR, can be done with user actions (say, by using a dropdown).
For our use case, we will detect device’s language using both Cordova Globalization plugin and Browser’s Internationalization API. - Prepare Language Text — There are two ways to do this
a. You need to have a pre-translated dictionary (or JSON file) in your app build which stores the translations of all your app’s text in the required translation languages, OR
b. You load language files from your server every time the app starts. This gives you the advantage of loading updated files, but costs you load time.
Creating the translation JSON files is mostly a manual process for smaller apps, but you can use online tools like this for quick translations, or like POEditor for more standardized workflow. - Translate — After the above two steps, you finally translate your app’s text to the intended language. We will use ngx-translate library for translating our texts as we are talking about only Angular Ionic apps in this post
Structure of the post
So the development outline of this blog will be
- Create a starter Ionic 5 tab app
- Prepare multiple language JSON files in assets
- Implement ngx-translate library to detect and translate AND Implement Cordova Globalization plugin or browser Internationalization API to detect device language
- Test translations on browser
- The Directive Gotcha
- Setup stand alone translations
- Load language files from a server
- Test translations on Android / iOS
We will translate English text in 2 languages — French and Spanish
Sounds pretty easy, right ? Well, let’s dive right into it.
Step 1— Create a basic Ionic Angular app
First you need to make sure you have the latest Ionic CLI. This will ensure you are using everything latest. Ensure latest Ionic CLI installation using
$ npm install -g ionic@latest
Here’s my environment for this blogpost
Ionic:
Ionic CLI                     : 6.10.1
Ionic Framework               : @ionic/angular 5.3.1
@angular-devkit/build-angular : 0.901.12
@angular-devkit/schematics    : 9.1.12
@angular/cli                  : 9.1.12
@ionic/angular-toolkit        : 2.3.0
Cordova:
Cordova CLI       : 9.0.0 (cordova-lib@9.0.1)
System:
Android SDK Tools : 26.1.1
NodeJS            : v12.14.0
npm               : 6.13.4
OS                : macOS Catalina
Xcode             : Xcode 11.5 Build version 11E608c
Creating a basic Ionic-Angular app. Start a basic tabs starter using
$ ionic start ionicTranslate tabs --type=angular --cordova
The --type=angular told the CLI to create an Angular app, and --cordova tells the CLI to integrate Cordova in the app.
Run the app in browser using
$ ionic serve
You won’t see much in the homepage created in the starter. I have modified pages ( tab1 and tab2) to align it to our translation functionality.
My tab pages look like this
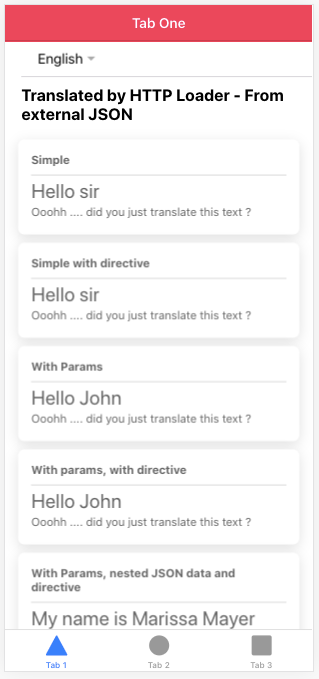
HTML and SCSS file code for the above UI, if you want to just get started
Step 2 — Prepare multiple language JSON files in assets
We will create these JSON files in src/assets/i18n folder. The assets folder remains in the root even after a production build, so the path does not break. We will create three JSON files en.json (English), fr.json (French) and es.json (Spanish).
Folder structure for i18n files
en.json
{
"TITLE": "Hello sir",
"TITLE_2": "Hello {{value}}",
"description": "Ooohh .... did you just translate this text ?",
"data": {
"name": "My name is {{name_value}}"}
}
fr.json
{
"TITLE": "Bonjour Monsieur",
"TITLE_2": "Bonjour {{value}}",
"description": "Ooohh .... vous venez de traduire ce texte?",
"data" :{
"name": "je m'appelle {{name_value}}"}
}
es.json
{
"TITLE": "Hola señor",
"TITLE_2": "Hola {{value}}",
"description": "Ooohh .... acabas de traducir este texto?",
"data": {
"name": "Me llamo {{name_value}}"}
}Note, the {{value}} and {{name_value}} are kind of variable/constants we can pass from our component. This can be used to
- Replace the variable with a user input or a value depending on the situation OR
- To give translations not supported by the library OR
- Keep a word constant across translations
STEP 3: Implement ngx-translate library and Cordova Globalization plugin
Cordova globalization plugin is used to detect device’s default language/locale. Unfortunately, this plugin is deprecated, but it is still supported by Ionic. Hence, you can opt to use it. However, the latest way of detecting the language / locale of the browser is by using browsers’s default Internationalization API.
Install Cordova globalization Plugin using
$ ionic cordova plugin add cordova-plugin-globalization
$ npm install @ionic-native/globalization
Install ngx-translate library
ngx-translate is the internationalization (i18n) library for Angular. Since our app has Angular under the hood, we can use this library for app as well as progressive web apps.
// Install core library
npm install --save @ngx-translate/core
// Install http loader
npm install @ngx-translate/http-loader --save
http-loader is used for loading the translation files (JSONs in our case) via Angular’s HttpClient module.
Note the versions of ngx-translate you should have as per your Angular version

Setup the translation library and http-loader
We need to define a function that loads the external JSON files to the app using http-loader. Add the following function to app.module.ts
export function HttpLoaderFactory(http: HttpClient) {
return new TranslateHttpLoader(http, "./assets/i18n/", ".json");
}
where we have provided the external path of our JSON files to the function.
We need to add the translation and http-loader modules in our root module app.module.ts. This is how the file looks after setup.
Pay attention to TranslateModule.forRoot() This is used in case of a Tabbed application, or general non lazy-loaded module. For a tab child, however, we will have to use TranslateModule.forChild() . We will see later how this will affect our functionality.
Setup the translate library in child component
Let’s say, we want to implement the translation in Tab1. As mentioned previously, src/app/tab1 folder contains all the files for this page. We will import the translationService in tab1.page.ts file using
import { TranslateService } from '@ngx-translate/core';The completed tab1.page.ts file will look like this
Let’s break down the code to understand a bit more
- On page load we check if we have default browser internationalization API by checking
window.Intl. We then get default browser language usingnavigator.language. We also set a fall back on Cordova globalization plugin (deprecated) and set a default language if neither browser nor Cordova plugin works. - Then we use
this._translate.use(this.language)to tell the translation service which language to translate to. If the app has just loaded, it should default to your browser’s default language ORen(english) - Important: Use
this._translate.get('TITLE').subscribe()function fromtranslateServiceto asynchronously fetch translations. Here,
-get()is the function to fetch translations.
-TITLEis the key to search for in the JSON files. If the data is in a nested JSON, then we use the dot notation to fetch e.g.data.name
-subscribeis used for asynchronous fetching (no need to use timeouts) changeLanguageis called from user action. This function will use the previous two steps to translate to the intended language
Step 4— Test translations on browser
Run the app on browser using ionic serve and test the translations using the dropdown. Here’s a GIF to show the functionality on browser
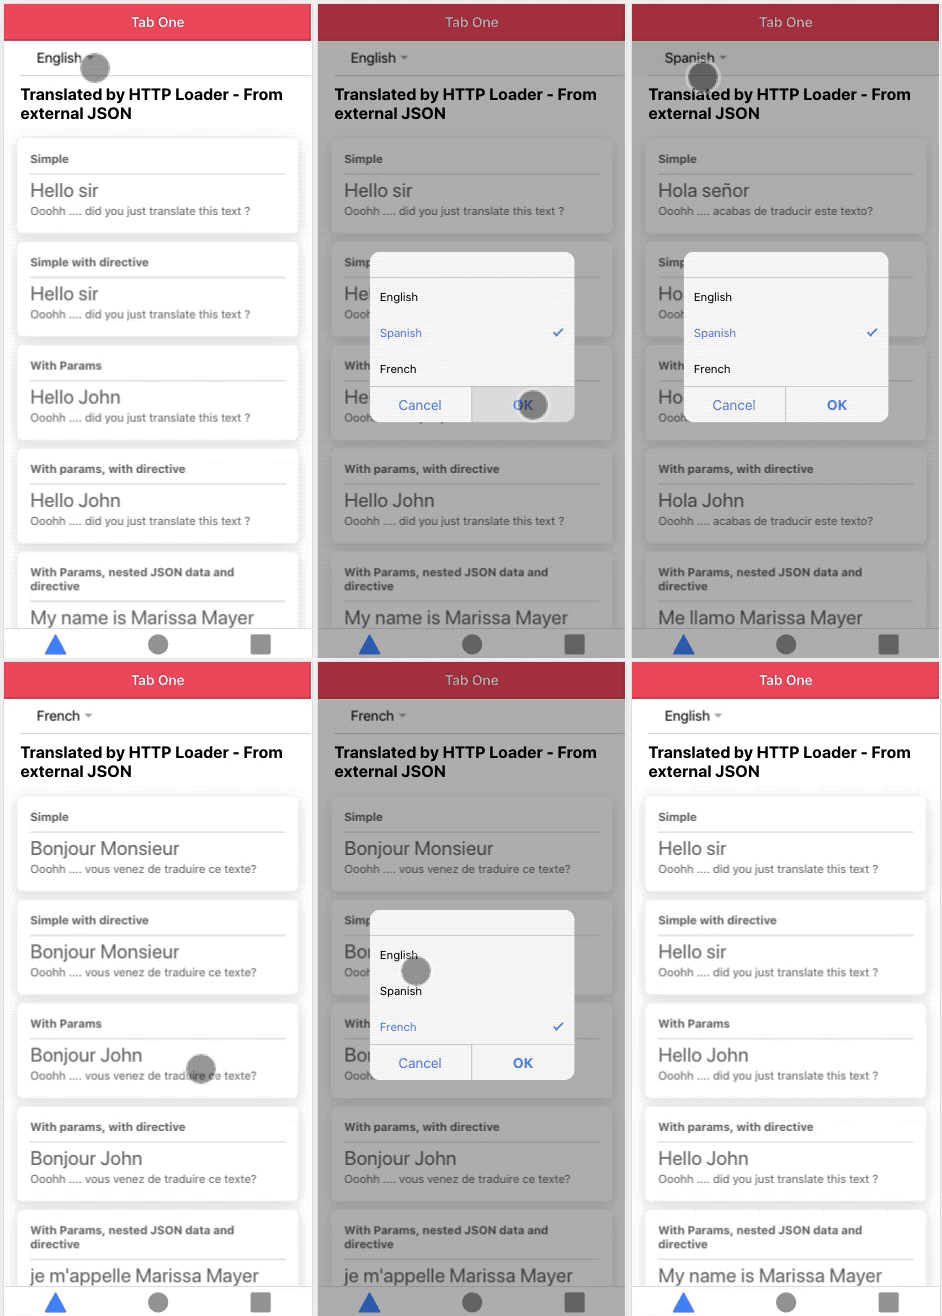
Notice that the text loads in English by default in my browser. You can change your browser language from browser settings and check if the initial text loads in your default language. For chrome, the settings can be found here
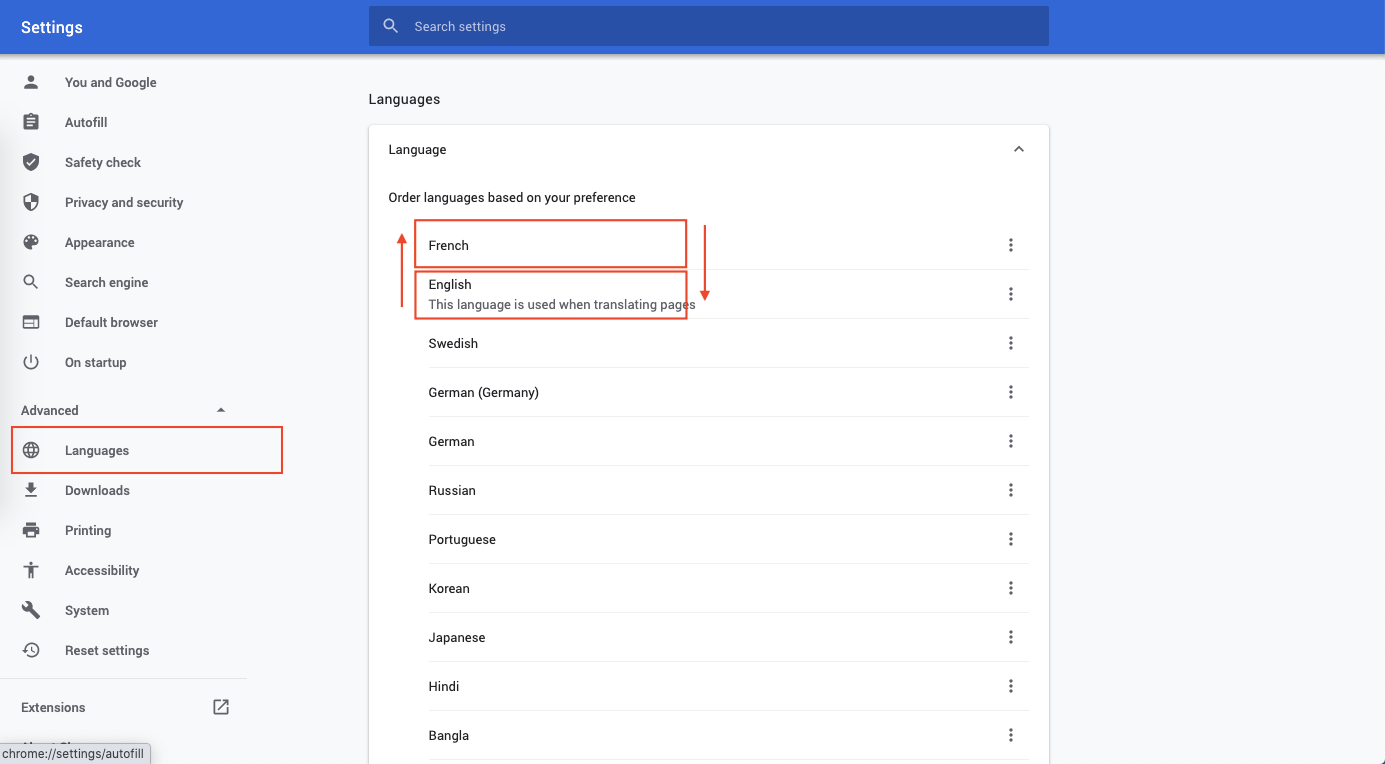
And now my text loads default in French …. Bonjour !!
Step 5 — The Directive GOTCHA 😎
If you have followed the above steps exactly, you might not get the exact result as shown in the above GIF.
You will realize that the translation works in places where you have used
this._translate.get('TITLE').subscribe((res: string) => {
this.title = res;
});
this._translate.get('description').subscribe((res: string) => {
this.description = res;
});
to get the translation, and shown it in the HTML using the local variable like this
<h1>{{ title }}</h1><p>{{ description }}</p>BUT, the translation does not work in places where you have used a directive like either of the following
<h1 translate>TITLE</h1><p [translate]="'description'"></p>
This is because in our Ionic 5 tab app, the tab pages are lazy-loaded. In lazy-loaded modules, you need to import the translation module in child modules as well for everything to work correctly.
Let’s go to our tab1.module.ts file, and import the translation and http-loader modules similar to our root module. But this time, we will use TranslateModule.forChild . The complete module file looks like the following
Now, if you run the app again, the directive translations will also work fine. 😎 😎 😎
directive method is preferred for bigger apps with lots of code, since this method results in smaller code size and no need of local variables.Step 6— Setup stand alone translations
The process of setting up separate language file in assets for each language is the standard way of translation in Angular. But sometimes it becomes a little cumbersome, especially when you don’t have that much data to translate.
In case you want to quickly translate in the component itself, so that there is no spill over on other components, you can declare the variables in the components itself instead of reading them from the JSON files from assets
Let’s do these changes in tab2, so it doesn’t affect the global translations in tab1
HTML and SCSS
Similar to tab1.page.html , just remove the usage of variable data from the HTML. You can keep the styling same
tab2.page.ts
Stays pretty much same as tab1.page.ts . Just add the following in the constructor
_translate.setTranslation('en', {
"TITLE": "Bye sir",
"TITLE_2": "Bye {{value}}",
"description": "Thanks for translating this text"
});
_translate.setTranslation('fr', {
"TITLE": "Au revoir Monsieur",
"TITLE_2": "Au revoir {{value}}",
"description": "Merci d'avoir traduit ce texte"
});_translate.setTranslation('es', {
"TITLE": "Adiós señor",
"TITLE_2": "Adiós {{value}}",
"description": "Gracias por traducir este texto"
});Here, you are defining the translations locally in your component itself. Also, to let angular know that these are standalone translations, you use isolate:true in your tab2.module.ts
....
TranslateModule.forChild({
loader: {
provide: TranslateLoader,
useFactory: HttpLoaderFactory,
deps: [HttpClient]
},
isolate: true
}),
....
Now run the app in browser and test translations. Your translations will be picked from the local component itself
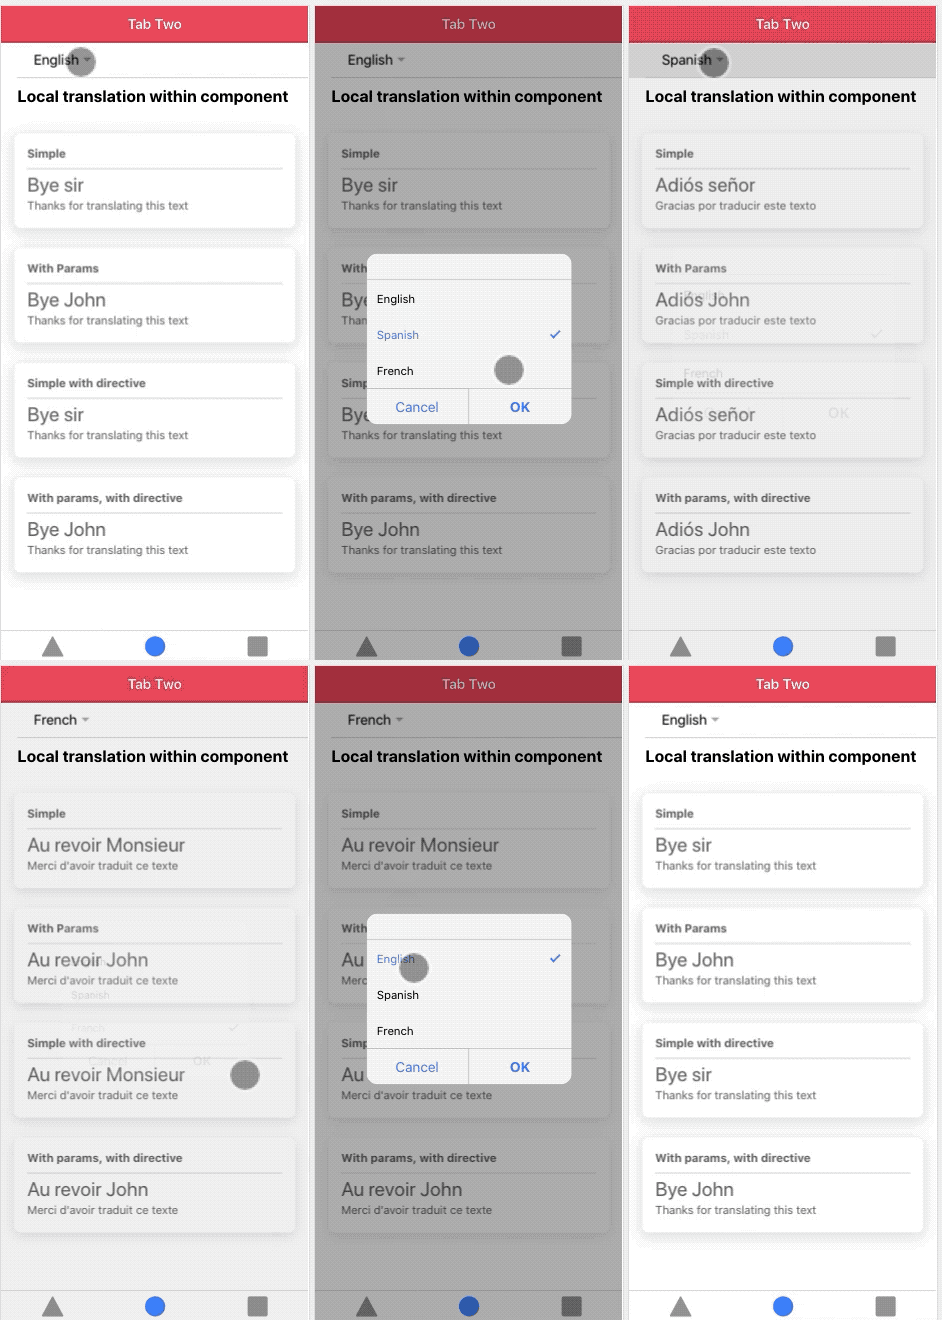
Notice, the directive method and variable also work well with the local definitions.
Step 7 — Load language files from server
This is a popular sought after feature for translation. In websites you can possibly keep updating the language files in the assets regularly. But when you are dealing with a mobile app, you cannot update the language file on user’s device, unless the app runs an update call every time the app starts.
Instead, the easier solution is to not keep language files locally, but load them from your server. These files on your server, in turn, could be created by some script using data from your database itself. This way as soon as you update the database, the server JSON file updates, and the updated data is fetched by the app next time the app launches.
Create Demo Node/Express Server
For demo purpose we will create a local Node Express server. Create a separate folder serverfor node server. To create Node JS script, we will run npm init in the working directory .
$ npm init
Above command will ask few basic questions and creates the package.json file in working directory. Now you can create the index.js file (All logic will be contained in index file because we’re making a simple server).
We have to install some of the libraries that will help in implementing node script. To install the libraries run the below command :-
$ npm install cors express
To know more about cors and express you can follow the links. You can also check official Ionic documentation on CORS which we believe is very good for understanding purpose.
Now we have all the basic requirements to start our node script.
Note — Check your project’s package.json file, it should contain the value stated below in scripts section. If it doesn’t, just add manually :-

Translation assets
You need to store your translation JSON files in a folder, say, assets/i18n on the server. In production scenario, these files can be manually updated, OR can be written by scripts which run when the database changes.
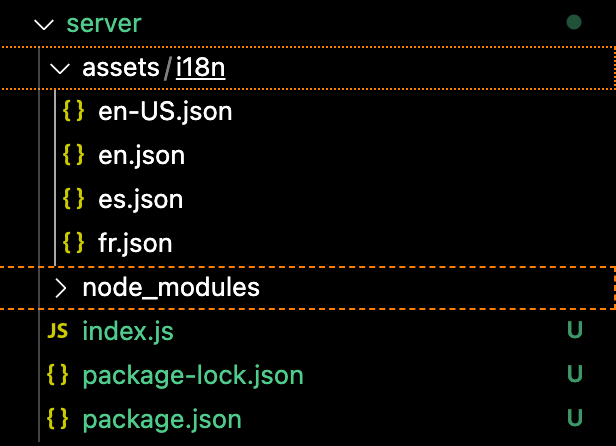
In your node server index.js you need to declare assets/i18n folder as static asset. Also you will need to set a Access-Control-Allow-Origin: ‘*’ header, so that your Ionic app (localhost:8100) can access resource from your server at , say, localhost:3000.
Here’s how your index.js should look
const express = require("express");
const app = express();
const path = require('path');
app.use(function (req, res, next) {
res.header("Access-Control-Allow-Origin", "*");
res.header("Access-Control-Allow-Headers", "Origin, X-Requested-With, Content-Type, Accept, authorization");
next();
});app.use('/assets', express.static(path.resolve(__dirname, 'assets')));app.listen(3000, () => {
console.log("Server Started at", process.env.PORT || 3000);
});Once setup, you can run the server with
$ npm start
Access server resource from Ionic app
This step is way easier than anyone can imagine. Instead of accessing the local resource at assets/i18n folder, you just need to access the resource via server URL. Make the following change in your .module.ts (I used Tab 3, a copy of Tab1, as the test page for this)
export function HttpLoaderFactory(http: HttpClient) {
return new TranslateHttpLoader(http, "http://localhost:3000/assets/i18n/", ".json");}
Instead of localhost:3000 you can use your server URL, if you have one deployed. Now you can test this setup by removing your local JSON files (at the app level) and loading files from the server. This will work as expected !
Note: You might not want to keep a JSON file on server which anyone can access. In that case, when you try to access the JSON file from Ionic app for translation — you must fetch the data from your DB, create a JSON file, put all the data inside it, and send it back as the API response. After this you can delete the created file. This, of course, can have performance issues if thousands of users are requesting these files every second. Optimize !
Step 8— Test translations in iOS/Android
To build the app on android, run the following commands one after another
$ ionic cordova platform add android
$ ionic cordova run android
The final command will run the app on either default emulator, or an android device attached to your system. Here’s the translation running on my android device
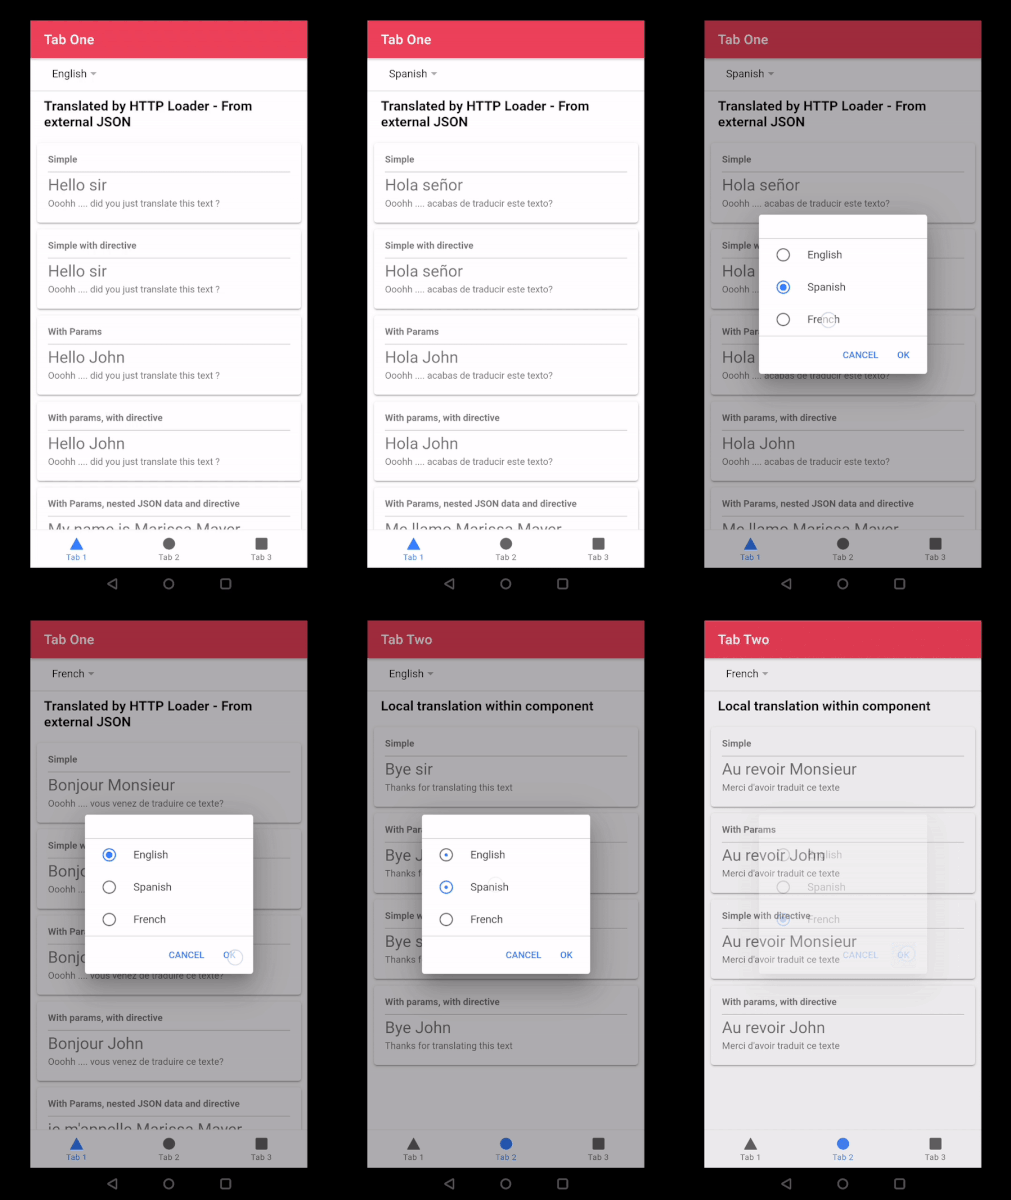
Interesting fact: In device, the language id may be different from browser. For me
- Device default language comes out to be en-US
- Browser’s default language comes out to be en
Hence, you need to be careful to detect all variations of a language. Accordingly, you’ll need to have JSON file named accordingly.
Conclusion
In this post we learnt how to detect device / browser language, create multiple language files, and implement translation using different methods in Ionic 5 apps. We also learnt how we can load language files from server instead of keeping them in local assets.
The only limitation of using the ngx-translate library is that you will need to define your language texts for your application beforehand. These will be stored as country code titled JSON files (i.e. en.json, jp.json, it.json etc) either in local assets or on server. You can’t dynamically generate the language translation for a word which is not in these files. If you require that type of functionality you’ll need to look into using the Google Translate API or something similar.


