


Build Offline Ionic Angular 5 Applications

In mobile apps, we have come across many conditions in which, the rendered data (from the server) is the same most of the time but is repeatedly fetched from the server. This data fetching every time from the server is useless and a huge waste of data bandwidth. Another similar situation where we can’t even access the app is — when we call the sever with no network/internet then there will be NO_INTERNET error in the App.
In such situations, we can customize the Ionic App, and manage the application when there is no internet. To do that we have to first recognize the status of the Network/Internet connection, and then perform online or offline logic.
Why do you need offline Performance?
Why do we need offline application performance ?? .. The Answer is to improve the user experience and maintain the state of the application properly, even with network fluctuations. As in today’s world, everything is dependent on the Internet and most applications won’t work if there is no Internet available. In some cases, it can, while in other cases we strictly need the Internet to perform some action. So the complete offline performance is dependent on your business logic. e.g If you have an online text editor it can let you type and edit after the initial loading of the document without any internet, but, for saving and other syncing features it will require internet.
Any drawbacks of Offline Performance?
With many advantages, offline performance brings many challenges for the developers. As this brings unexpected things to happen like no proper syncing of offline database and online database, it will lead the application to the dead state. And one of the major points, User is unpredictable and can take any action — such an unhandled case can cause an inconsistent app state, so keep in mind while giving offline privileges to the user.
How do Ionic 5 Applications works offline?
We will modify our Ionic application to have two major features, required for offline functionality:-
- Store the DB tables on the device's local storage:- We will store some of the users and necessary information in the local storage (LocalStorage API, or any browser database). It will help us to operate the application offline as we have that data stored in local storage. This will resolve some of the problems that are less dependent on the Server. If your application has a very small database, you can sync all data of the user to phone storage. However, if you have large data of individual users, you can store data only for that session. This logic can be different for different apps, and one has to design the business logic accordingly.
- Store API calls in local storage:- With data, we also store the APIs in local storage, we store APIs in such a way that it helps us recognize which API is completely served (i.e. response is received) and which one is left to be served. This helps us to make application flow more stable, as if there is no network available and we want to perform an HTTP POST request to our server then we store the API request in the local storage and will perform it later as soon as the network is available. e.g. Like syncing documents with an online database.
Implementing the Offline features in Ionic App :
We will assume that you are already familiar with simple Ionic Angular apps, if not — do check our other blogs to learn about its setup. We will start with an already set up Ionic Angular application — and ionic commands will be used directly in the project root directory.
Network detection plugin
The below command will install the packages and library required for network detection in the working Ionic project.
$ ionic cordova plugin add cordova-plugin-network-information
    $ npm install @ionic-native/network
Using this command we will detect whether we have the network connection or not.
Maintaining user data in the local storage table
Maintaining users' tables in local storage can give an illusion to the application - that the app is working in offline mode. So while login/registering, we will save the user's data in local storage and use that user's data everywhere we need in the application. Be sure not to store secure data like cards and passwords in the offline database.
Before that, we have to install the cordova-sqlite-storage plugin & @ionic/storage in our project.
$ ionic cordova plugin add cordova-sqlite-storage
    $ npm install --save @ionic/storage
The above command will install the storage plugin and package in the working project and now we have to Import [Line 14, Line 19] and Inject the SQLite and N/W information module [Line 31, Line 39] in app.module.ts
In app.module.ts, we have declared an APP_INITIALIZER which basically runs the load() function (shown below in code) defined in the InitUserProvider service file, during the initial load of the application (Before loading any components). This load() function will check if there is an existing user in the local storage (if any then set it as the loggedInUser). It will be dependent on network status, if the network exists — then the User will be fetched from the server. And if there is no network, then localUser will be saved as loggedInUser.
async load() {
    if (this.networkStatus) {
    const onlineUser = await this.api.getUserFromServer(this.userid)
    this.api.setLoggedInUser(onlineUser)
    }
    else {
    const localUser = await this.data.getStoredUserData();
    this.api.setLoggedInUser(localUser);
    }
    }
And during registering or login flow we can set the user in the local storage using the setUserData() function defined in DataService file (create data service file using the ionic generate service *path/filename*). You can add the below line in your existing login/register logic.
await this.data.setUserData(userData);
In the above line, userData is the user's data fetched from the server or any database. You must be wondering that we are fetching the data from the server then why is offline data saved here? Only at first login, we have to fetch the data from the server after that we simply use the local storage data, every time.
Here in DataService, we use the set and get methods of the storage module. This will store the data in key: value pairs in the local storage. We are done with storing the data and now we can get the Data when the app is offline. To check whether the app is offline or online, we will use the Network module. Below is the code for load() function that will run when the app is initialized:-
Here we first set the Network listener using checkInternetConnection method [Line 16] that will detect whether we have the network or not and on the basis of that we fetch the user's data from the server or from the local storage.
You can modify the above code according to your app structure, as this code will help you to work offline with the user table.
Maintaining API Storage database
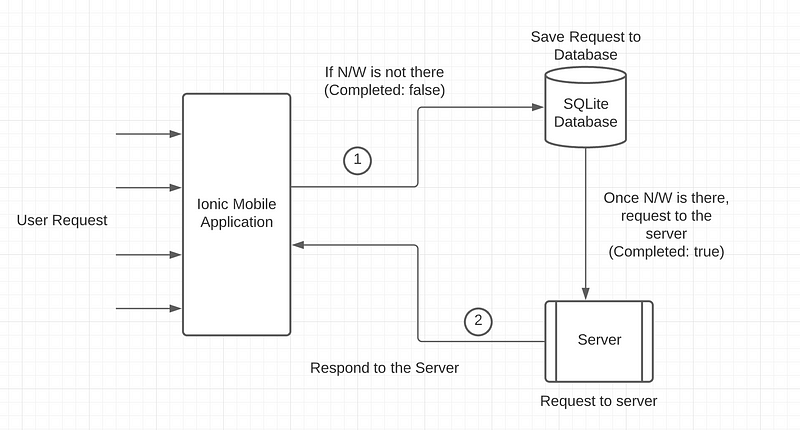
In this section, we will explore how can we store the API calls in the local storage. We will define a procedure that will help our application to work in an offline manner, this procedure will help us to save the API data(if there is no network/internet) and call it later when the network is available. Overall we have 2 flows:-
- The Application does not have the network/Internet:- In this flow, we will save the HTTP request(API — path and data) in the local storage and then make the HTTP request when network/Internet is available. And once the HTTP request is served, then we will set a completed flag to true. This procedure will help us to store the API and later call that when the network is available.
- Application has the Network/Internet:- This will be the normal flow in which we have the network/internet. We first save the HTTP request(API) in local storage and make the HTTP request and make its completed flag to true. Remember we always store the HTTP request in local storage anyway, network is available or not, this makes flow easier to code.
In the above 2 flows, the initial steps are the same but further, they are divided into 2 parts that will be decided on the basis of the availability of the network. We will implement this logic in a separate service file i.e. API-manager (to create the service file run the below command)
$ ionic generate service services/api-manager
Once the above command is executed the service file will be added to the project, Now we can start to code our main logic:-

Below is the code for the API-Manager (we will explain it later):-
In the above code, we store and make the HTTP request using the storeCallAndRespond() function [Line 96]. In this function, we simply store the API Request in a particular format mentioned below:-
const action: StoredRequest = {
    url: url,
    type: method,
    data: data ? data : null,
    time: new Date().getTime(),
    completed: false,
    response: null,
    header: header,
    id: Math.random().toString(36).replace(/[^a-z]+/g, '').substr(0,   5)
    };
This Action object contains the parameters that will be used in making HTTP requests like URL, method(type), completed flag, response (set the response when an HTTP request is served), headers, and the unique Id.
Now we can set the API request using storeRequest() method that is defined in API-manager itself :-
storeRequest(action) {
    this.storage.get(environment.REQ_STORAGE_KEY).
    then((storedOperation) => {
    let storedObj = JSON.parse(storedOperations);
    if (storedObj) {
    storedObj.push(action);
    } else {
    storedObj = [action];
    }
    return this.storage.set(environment.REQ_STORAGE_KEY, JSON.stringify(storedObj));
    });
    }
The above code will push the existing API request object (action) into the local storage DB. Till this point above two points have the same flow. Now onwards on the bases of network/internet availability, we will differentiate between the flow:- (further logic is contained inside the repeatRequest() method)
async repeatRequest(action) {
    return new Promise(async (resolve, reject) => {
    let response;
    if (!this.networkStatus) {    <-- No Internet
    // No Internet
    resolve(action.data);
    } else {                     <-- Internet is working
    // Internet is there
    if (action.type === 'GET') {
    response = await this.http.request(action.type, action.url,
    {headers: action.header}).toPromise();
    } else {
    response = await this.http.request(
    action.type,
    action.url,
    {body: action.data, headers: action.header}
    ).toPromise();}
    this.updateActionObject(action, response);
    resolve(response);
    }
    });
    }
In this flow, we will first check whether the network/internet is available or not [denoted in the above code using ←], and if we have the network — we will make the HTTP request using the action object and make that API stored Object’s(action) completed flag true and save the response in it.
And if the app doesn’t have the network then we will simply resolve the promise and continue the UI flow, This procedure will make no change in UI rendering and the end-user will not feel like there is no internet/network. After this, once the network is back the flow will call the checkForUnCompleteAPI() method [Line 1 in below Code] that will serve the uncalled(i.e. completed: false) HTTP request.
The above code will check for the API request array in local storage and if any, then passes it to the sendRequests() method that will make the uncompleted HTTP request using the action object:-
sendRequests(operations: StoredRequest[]) {let obs = [];
let oneObs;
for (let op of operations) {
if (!op.completed) {
if (op.type === 'GET') {
oneObs = this.http.request(op.type, op.url, {headers: op.header});
} else {
oneObs = this.http.request(op.type, op.url, {body: op.data, headers:
op.header});
}
console.log('Array res', oneObs);
obs.push(oneObs);
}
}
return forkJoin(obs);
}The above code will check for the completed flag for each API request, and if the completed flag is false then make an HTTP request using the stored action object.
This above-defined code (i.e. API-manager service) will be helpful when our UI is dependent on the API call but we do not have the network, then we store the API call in local storage with all its parameter and once the internet comes back then we try to make that HTTP request at that time.
How to modify HTTP requests in the existing App?
Now we will look at how we add this HTTP API logic to the existing application which earlier has direct API calls:-
Where you have API calls (i.e. HTTP calls) in your application, there instead of directly making that HTTP call we will pass the required parameters to the storeCallAndRespond() function like below:-
updateUser(id, userData): Promise <any> {
    return new Promise(async (resolve, reject) => {
    const response = await
    this.apiManager.storeCallAndRespond('PUT', `   `${this.url}/clients/${id}`, { Authorization: `JWT ${this.token}` },  userData);
    resolve(response);
    });
    }
We will pass the required HTTP options to the storeCallAndRespond() method [Below Code] defined under API-manager. There are 3 arguments that are passed to storeCallAndRespond() method :- 1) Request Method. 2) Request URL. 3) Request Header
storeCallAndRespond(method, url, header, data?): Promise <any> {
    return new Promise(async (resolve, reject) =>  {
    const action: StoredRequest = {
    url: url,
    type: method,
    data: data ? data : null,
    time: new Date().getTime(),
    completed: false,
    response: null,
    header: header,
    id: Math.random().toString(36).replace(/[^a-z]+/g,   '').substr(0, 5)
    };
    const Store = await this.storeRequest(action);
    this.repeatRequest(action).then((response) => {
    console.log('Response', response);
    resolve(response);
    })
    });
    }
Conclusion
In this tutorial, we have learned how we can covert our Ionic 5 application into an offline working application. So now you are ready to fit this feature in your existing or new application with ease. If you want to know more about different features and methods to handle any of the technology, just go to Enappd Blogs Section.
Next Steps
If you liked this blog, you will also find the following Ionic blogs interesting and helpful. Feel free to ask any questions in the comment section
- Ionic Payment Gateways — Stripe | PayPal | Apple Pay | RazorPay
- Ionic Charts with — Google Charts| HighCharts | d3.js | Chart.js
- Ionic Social Logins — Facebook | Google | Twitter
- Ionic Authentications — Via Email | Anonymous
- Ionic Features — Geolocation | QR Code reader| Pedometer
- Media in Ionic — Audio | Video | Image Picker | Image Cropper
- Ionic Essentials — Native Storage | Translations | RTL
- Ionic messaging — Firebase Push | Reading SMS
- Ionic with Firebase — Basics | Hosting and DB | Cloud functions
Ionic React Full App with Capacitor
If you need a base to start your next Ionic 5 React Capacitor app, you can make your next awesome app using Ionic 5 React Full App in Capacitor
Ionic Capacitor Full App (Angular)
If you need a base to start your next Angular Capacitor app, you can make your next awesome app using Capacitor Full App

Ionic Full App (Angular and Cordova)
If you need a base to start your next Ionic 5 app, you can make your next awesome app using Ionic 5 Full App

