Firebase Admin SDK setup and functions using Node JS

Table of Contents
- Firebase Admin SDK setup and functions using Node JS
- Firebase 🔥
- What is Firebase Admin SDK?
- What is Node JS?
- Firebase Admin SDK Setup – NodeJS
- Step 1:- Creating Firebase Project
- Step 2:- Creating Service Account to communicate with Firebase
- Step 3:- Creating Node JS script and implementing Admin SDK functions
- Conclusion
- Next Steps
- Ionic React Full App with Capacitor
- Ionic Capacitor Full App (Angular)
- Ionic Full App (Angular and Cordova)
Firebase Admin SDK setup and functions using Node JS
In this tutorial, we will be going through the Admin SDK of firebase. We will set up and use various functions in the Node JS script. Before going through any procedure or implementation, we briefly summarize what is Firebase, Firebase Admin SDK, and Node JS. Feel free to skip these sections, if you are already familiar with all of them.
Firebase 🔥
If you already know what is firebase – SKIP this section.
Firebase is a popular Backend-as-a-Service (BaaS) platform. It started as a YC11 startup and grew up into a next-generation app-development platform on Google Cloud Platform. It is getting popular by the day because of the ease of integration and the variety of functionalities available on it.
A lot of quick integrations are available with Firebase. Some of these are listed below:
- Real-time Database 🗄️
- FireStore Database 🗄️
- Email Authentication 📧
- Social logins📱
- In-app messages
- Push notifications
- Analytics 📊
- Crashlytics 💥
- Remote config
Firebase is quickly growing to become the most popular mobile app back-end platform.
What is Firebase Admin SDK?
Firebase is one the most used platform for various services like Databases and other services. If we want to extend these services, especially control them over a backend server, we can do it using Admin SDK that provides various more extended functionalities. The Admin SDK is a set of server libraries that lets you interact with Firebase from privileged environments to perform actions like:-
- Read and write Realtime Database data with full admin privileges.
- Programmatically send Firebase Cloud Messaging messages using a simple, alternative approach to the Firebase Cloud Messaging server protocols.
- Generate and verify Firebase Auth tokens.
- Access Google Cloud resources like** Cloud Storage buckets** and Cloud Firestore databases associated with your Firebase projects.
- Create your own simplified Admin console to do things like look up user data or change a user’s email address for authentication.
But to implement the Firebase Admin SDK, you must have a Server Side code in one of the below language environments:-
- Admin Node.js SDK – JavaScript/Node.js 10.10.0+
- Admin Java SDK – Java 7+ (recommend Java 8+)
Java 7 support is deprecated. - Admin Python SDK – Python 3.5+ (recommend Python 3.6+)
- Admin Go SDK – Go 1.11+
- Admin .NET SDK – .NET Framework 4.5+ or .Net Core 1.5+
We will only discuss the NodeJS environment, but others are also similar in implementation.
What is Node JS?
Node.js is an open-source, cross-platform, back-end JavaScript runtime environment that runs on the V8 engine and executes JavaScript code outside a web browser.
As an asynchronous event-driven JavaScript runtime, Node.js is designed to build scalable network applications.
In the context of this tutorial, we will use a simple script that will handle the Firebase Admin SDK functions. To integrate Firebase Admin SDK, we will be using firebase-admin package that contains all the functions present in Admin SDK.
We have talked about all the technologies involved and if you want to explore more about Firebase or Node JS you can go to Enappd Blogs.
Firebase Admin SDK Setup – NodeJS
We will now jump to some steps to be taken to implement Admin SDK.
- Creating Firebase Project.
- Creating Service Account to communicate with Firebase.
- Creating Node JS script and implementing Admin SDK functions.
So lets start implementing firebase admin function handlers using Node JS.

Are you ready..!!
Step 1:- Creating Firebase Project
Go to Firebase and create your first project (or use an existing one). Your console should look like this

Your Firebase projects all in one place
Note – It’s really easy to create a Firebase project, but if you still face any issues, follow steps 1-4 of this blog.
Step 2:- Creating Service Account to communicate with Firebase
Firebase uses service accounts to operate and manage services without sharing user credentials. When you create a Firebase project, you might notice that a number of service accounts are already available in your project (check the below images). You might also notice that new service accounts are added to your project when you add services or perform certain actions (for example, linking a Firebase product to BigQuery). Some of these service accounts are added directly by Firebase; others are added via the Google Cloud project associated with your Firebase project.
You can view all service accounts associated with your project in the Service accounts tab of your settings > Project Settings in the Firebase console.
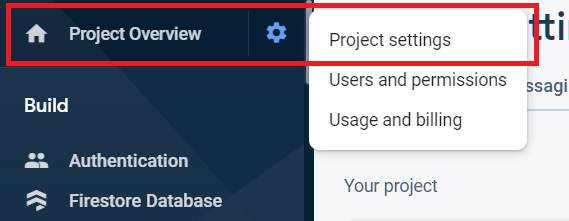
Project Settings
After selecting Project Settings you will see various options, you have to choose Service Accounts options.

Service Accounts

Service Account File
This will download the file named as
This service file will help Node JS to know about the firebase account using the above details. The file will be saved on the server-side (Node JS) and will be used to initialize the firebase-admin.
Now, this step is completed and we have the service account JSON file which will be used in Node JS.
Step 3:- Creating Node JS script and implementing Admin SDK functions
In this step, we will be going through few steps :
a) Creating Node JS script:-
To create a Node JS script, we will c reate an** index.js file** and run npm init in the working directory.
$ npm init
The above command will create the package.json file in the working directory. Now you can create the index.js file (All logic will be contained by the index file). Once you have run the above command, the project structure will look like this:-

Project Structure
Before implementing firebase-admin, we have to install some of the libraries that will help in implementing node script. To install the libraries run the below command:-
$ npm install _body-parser cors express firebase-admin_
To know more about body-parser, cors, express and firebase-admin you can follow the links.
Note – Check your project’s package.json file, it should contain the value stated below in the scripts section, else you can add it:-

package.json file
b) Implementing Firebase Admin SDK functions
To implement firebase Admin SDK functions, we need to add that JSON file (Service account JSON file) that we got from Firebase Console. Simply add the file to the project folder. Once you add the file, the folder structure will look like:-
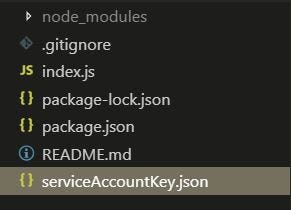
Project Structure
Now we will initialize several packages and further use them in node script, below is the script that uses generateSignInWithEmailLink() function of the firebase-admin SDK.
In the above code, we have only implemented the Email SignIn verification function , firebase-admin has various more functionalities like:-
- Password reset email link
const userEmail = 'user@example.com';


admin.auth()
.generatePasswordResetLink(userEmail, actionCodeSettings)
.then((link) => {
// Construct password reset email template, embed the link and    send
// using custom SMTP server.
// TODO
return sendCustomPasswordResetEmail(email, displayName, link);
})
.catch((error) => {
// Some error occurred.
});
2. Email Verification Link
const useremail = 'user@example.com';
admin.auth()
.generateEmailVerificationLink(useremail, actionCodeSettings)
.then((link) => {
// Construct email verification template, embed the link and send
// using custom SMTP server.
// TODO
return sendCustomVerificationEmail(useremail, displayName, link);
})
.catch((error) => {
// Some error occurred.
});
c) Using the Server Locally:-
Now our Node script is ready, so we can now call the Endpoint defined in the script using the below URL (Line 26 in Script above).
<http://localhost:3000/>VerificationLink
The above URL can be hit to send the Email SignIn Email to the desired user, If you are using an Angular App then you can simply add the below code in the button click or in any action listener:-
const sendEmail = await this.http.post('<http://localhost:3000/>VerificationLink', userData).toPromise();
You have to pass in the userData as the Body data, in our case userData is defined as:-
const userData = {
name: 'myName',
email: 'myName@app.com'
}
These are some basic functions that can be used in firebase-admin SDK, you can explore more on official firebase site and add more and more functionality to your app.
Conclusion
Now you have learned about Firebase admin SDK, you can explore more features for your app. It makes your app or database more customized from backend server. Specially when you desire some control of data from Admin side. If you want to explore any other feature, then you can visit Enappd Blogs.
Next Steps
If you liked this blog, you will also find the following Ionic blogs interesting and helpful. Feel free to ask any questions in the comment section
- Ionic Payment Gateways – Stripe | PayPal | Apple Pay | RazorPay
- Ionic Charts with – Google Charts| HighCharts | d3.js | Chart.js
- Ionic Social Logins – Facebook | Google | Twitter
- Ionic Authentications – Via Email | Anonymous
- Ionic Features – Geolocation | QR Code reader| Pedometer
- Media in Ionic – Audio | Video | Image Picker | Image Cropper
- Ionic Essentials – Native Storage | Translations | RTL
- Ionic messaging – Firebase Push | Reading SMS
- Ionic with Firebase – Basics | Hosting and DB | Cloud functions
Ionic React Full App with Capacitor
If you need a base to start your next Ionic 5 React Capacitor app, you can make your next awesome app using Ionic 5 React Full App in Capacitor

Ionic 5 React Full App in Capacitor from Enappd
Ionic Capacitor Full App (Angular)
If you need a base to start your next Angular Capacitor app , you can make your next awesome app using Capacitor Full App
Capacitor Full App with huge number of layouts and features
Ionic Full App (Angular and Cordova)
If you need a base to start your next Ionic 5 app, you can make your next awesome app using Ionic 5 Full App
Ionic Full App in Cordova, with huge number of layouts and features