How to create an Ionic 5 app - For beginners

Table of Contents
- How to create an Ionic 5 app – For beginners
- What is Ionic?
- What is Cordova?
- What is Capacitor ?
- Setting up an Ionic 5 app
- Creating an Ionic 5 app
- 1. Angular Cordova 😎
- 2. Angular Capacitor😎
- Advanced – Understanding app.module.ts
- Modifying the app
- Conclusion
- Next Steps
- Ionic React Full App with Capacitor
- Ionic Capacitor Full App (Angular)
- Ionic Full App (Angular and Cordova)
How to create an Ionic 5 app – For beginners
Hybrid apps have been the sensation in recent years and for a good reason. With their ease of development for web developers, powerful performance and versatile usage possibility – Hybrid apps beat Native apps at many frontiers. Ionic has been at the forefront of Hybrid app development for the last few years, and it is just getting better. With the release of the latest** Ionic 5 framework**, the overall stability of apps has gone up again.
We have been writing about complex topics in **Ionic 5 **for a while. In this blog post, we’ll read about the basic aspects of an **Ionic 5 **app and how to create one. As the ecosystem is changing and new CLI commands are coming up a lot has been changed in Ionic.
There are a few front-end frameworks which can be used in an Ionic application.😇
- Angular – Achieve the maximum potential possible on the Web Platform today, and take it further, via Web Workers and server-side rendering Angular puts you in control over scalability. Meet huge data requirements by building data models on RxJS, Immutable.js, or another push-model. You can read about this HERE
- React – React makes it painless to create interactive UIs. Design simple views for each state in your application, and React will efficiently update and render just the right components when your data changes. Declarative views make your code more predictable and easier to debug. You can read about this HERE
- Vue – Vue is a progressive framework for building user interfaces. Unlike other monolithic frameworks, Vue is designed from the ground up to be incrementally adoptable. You can read about this HERE
For now, the Angular and React are well stable in Ionic Community and widely used in the industry but the Ionic Vue is still on the path for the official release.
Regarding the build/runtime environment, Ionic now supports Cordova and Capacitor. While Cordova is the elder one, with larger community and stable builds, Capacitor is quickly climbing the ladder and is supported by a growing community as well.
What is Ionic?
Ionic is a complete open-source SDK for hybrid mobile app development created by Max Lynch, Ben Sperry, and Adam Bradley of Drifty Co. in 2013. Ionic provides tools and services for developing hybrid mobile apps using Web technologies like CSS, HTML5, and Sass. Apps can be built with these Web technologies and then distributed through native app stores to be installed on devices.
We can use Cordova or Capacitor to build these awesome apps and have native functionalities. With this, we get some amazing native plugins to use like Image cropper, Camera, and many more.
What is Cordova?
**Cordova (or Apache Cordova) **enables software programmers to build applications for mobile devices using CSS3, HTML5, and JavaScript instead of relying on platform-specific APIs like those in Android, iOS, or Windows Phone. It extends the features of HTML and JavaScript to work with the device. Cordova has been around for a long time, even before the Ionic started.
Ionic is actually another wrapper on top of Cordova. Cordova has the basic HTML/CSS/JS -> Native capabilities, while Ionic powers neater and powerful layouts and overall app management on top of Cordova
So, in other words – If you create Native apps in Android, you code in Java. If you create Native apps in iOS, you code in Obj-C or Swift. Both of these are powerful but complex languages. With Cordova (and Ionic) you can write a single piece of code for your app that can run on both iOS and Android (and windows!), that too with the simplicity of HTML, CSS, and JS.
Ionic started with AngularJS as the underlying framework, but now it has extended to Angular and even React !
What is Capacitor ?
Cordova helps build an Ionic web app into a device installable app. But there are some limitations of Cordova, which Capacitor tries to overcome with a new App workflow.
Capacitor is a cross-platform app runtime that makes it easy to build web apps that run natively on iOS, Android, Electron, and the web. Ionic people call these apps “Native Progressive Web Apps” and they represent the next evolution beyond Hybrid apps.
Capacitor is very similar to Cordova, but with some key differences in the app workflow
Here are the differences between Cordova and Capacitor
- Capacitor considers each platform project a source asset instead of a build time asset. That means Capacitor wants you to keep the platform source code in the repository, unlike Cordova which always assumes that you will generate the platform code on build time
- Because of the above, Capacitor does not use
config.xmlOR any similar custom configuration for platform settings. Instead, configuration changes are made by editingAndroidManifest.xmlfor Android andInfo.plistfor Xcode - Capacitor does not “run on device” or emulate through the command line. Instead, such operations occur through the platform-specific IDE. So you cannot run an Ionic-capacitor app using a command like
ionic run ios. You will have to run iOS apps using Xcode, and Android apps using Android studio - Since platform code is not a _source asset, _you can directly change the native code using Xcode or Android Studio. This gives more flexibility to developers
In essence, Capacitor is like a fresh, more flexible version of Cordova – built especially for Ionic kind of framework.
Setting up an Ionic 5 app
So what tools do you need for Ionic 5 app development? Well, here’s the list
- A computer (Duh ! ) 💻
- NodeJS framework installed – NodeJS is a server framework in JS( v10.15.03 at the time of this blog post, however, 12.x is also very stable now)
- NPM – Node package manager(v6.10.2 at the time of this blog post)
- Ionic CLI – The OS installed Command Line Tool for the application(v6.10.2 at the time of the blog post)
You also will need the latest browser for the development environment. To create production builds in Android and iOS, it would require Android Studio and XCode respectively.
Install node by downloading the compatible package from their website. NPM is installed along with node.js. NPM is used for any further installations. Make sure you install the LTS version of node, not the very latest. (LTS version of node is ~12.13.0 at the time of this post)
To verify the installations, run these commands in your terminal
$ node --version
$ npm --version
Install Ionic using
$ npm install -g @ionic/cli
And you are good to go. Check your environment information using
$ ionic info
This will display your runtime environment, something like following (Android SDK tools and XCode will require separate installations)

Development environment information
You can install the latest Android Studio from their website. XCode can be installed only on Apple systems.
Creating an Ionic 5 app
Once your development environment is set, creating an Ionic 5 app is as easy as running one command
$ ionic start
Now after you run the above command we got two options to choose between one is Angular and one is React.

Don’t worry about choosing any one of them we will go through both of them individually. (At first, we will go with Angular)
After that it will ask for the Project Name , you can give the name whatever you like and after that, it will ask for the layout you want to choose for your application it will give three options like blank, side menu and tabs.
After that, it will ask you for Integrating your application with Capacitor or not.

Now you can choose yes or no , we will go through both of them in the below tutorial. (At first, we will go with **No **option as it will integrate it with Cordova automatically)
Instead of the above step-by-step process, you can also just write a command for all of it. Here are few commands to show the variations possible
$ **ionic start** // simple interactive start command
$ **ionic start --list** //lists available starter templates
$ **ionic start myApp** //interactive start command with app name
$ **ionic start myApp blank** //interactive start with name and type
$ **ionic start myApp tabs** **--cordova //** start with angular cordova
$ **ionic start myApp tabs** **--capacitor //** start with angular capacitor
$ **ionic start myApp super** **--type=ionic-angular //** start with angular
$ **ionic start "My App" blank --type=react --capacitor**
That’s all it takes to create an Ionic app. Hit enter and it will install the basic app template right on your system
To run the app in the browser, run this in your project root directory
$ ionic serve
This will run the app in a development environment in your default browser. the URL will be localhost:8100
Development environment in Ionic does (can) not use Cordova. Cordova runs on devices only. So you cannot use the Ionic Native plugins on browser environment. Ionic development environment only uses the underlying Angular (or React) to run the app on browser
Let’s say you ran ionic start myApp sidemenu, you will get a Sidemenu template loaded in your chrome. To see it in a mobile format, right-click in the browser, and select Inspect Element . Switch the device mode by using the device icon.

First run on the browser, in device mode
So now that you have your Ionic app running in the browser, it’s time to understand the code structure, and then make some changes.
Angular stack for building an app and routing is used, so your app can fall in-line with the rest of the great Angular ecosystem.
Ionic provides @ionic/angular-toolkit, which builds and integrates with the official Angular CLI and provides features that are specific to @ionic/angular
1. Angular Cordova 😎
Using Cordova with Angular is one of the most common for building real-world applications. Now we will go through all the commands and app flow for using angular with ionic.
Code Structure
Ionic creates a default structure every time you create an app using ionic start . Let us understand the structure

The basic structure of the Ionic app
Plugins
The Plugins folder will contain the ionic native features/plugin which will help us to use mobile native features like camera, Image cropper, and many more.
$ ionic cordova plugin add <plugin-name>
You can use the above command to add a particular plugin in your project.
Platforms
The Platforms folder will have the android and iOS native/JAVA code which finally compiles during the build of the mobile application.
$ ionic cordova platform add <platform-name>
Here we can have **android **and **iOS **as the platform name in the above command.
Source Code
srcfolder contains the majority of the app’s code. All pages, services, components, and styling sits inside this. It will be similar to any Angular Project.
assetsfolder contains all static files of the project – Images, fonts, etc.
environmentsfolder can be used to define environment settings. by default, it has two files, one for dev and one for prod environment. These settings can be same or different depending on your dev vs prod configuration. E.g. You can define one server configuration for development while having another production server configuration for prod environment.
themefolder can be used to define styling variables. Ionic 5 uses CSS variables to define a variety of styling parameters like primary colors, font-sizes, font-family, and a lot more. You can use this folder to create global styling variables.

Example of Ionic styling variables
global.scss – defines global styling that should be applied for the whole app.
index.html – is the home HTML file that launches the app. After all, Ionic apps are built upon Webviews.
Inside the src folder, you have the default app files which contain global settings of the app
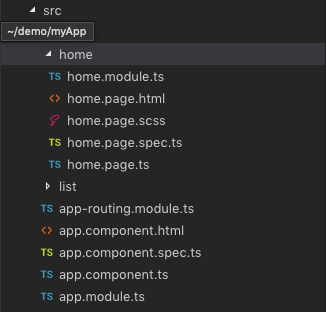
Folder structure inside src folder
app.routing.module.ts – Contains information related to page navigation
app.component.html – defines the parent HTML of the app. This contains a side menu in our example
app.component.ts – is the Javascript file for app.component.html . Generally, any code that needs to be run immediately after the app load is written in this file.
app.module.ts – is the “module” file for the parent module, or you can say for the whole app. It defines which modules are included in the app. It is a very important file when it comes to building a production build.

app.module.ts file initial structure
You can see the basic modules imported in the image above. Let us try to understand things here a bit more.
2. Angular Capacitor😎
Capacitor can be attached when you create a new Ionic app using
$ ionic start AppName sidemenu --capacitor
Capacitor can also be attached to an existing Ionic app. To attach Capacitor to your existing Ionic app, run
$ ionic integrations enable capacitor
This will attach Capacitor to your Ionic app. After this, you have to init the Capacitor app with
$ npx cap init
It will ask you the app name and ID. Give app name whatever you want. App ID is the domain identifier of your app (ex: com.example.app).
You need to build your app code and assets to copy them to individual platforms (Android and iOS). To build the code and assets, run
$ ionic build
Using Capacitor doesn’t change much, only the app flow and commands change – even we can use most of the Cordova plugins in Capacitor by using **npm install **command.
Platforms
We can add a platform or the android and iOS native/JAVA compilation code using the below command
// Add android platform
$ **npx cap add <android or ios>**


// Copy all changes to Android platform
$ **npx cap sync**
It adds the android platform to your current project and copies any web assets to your current project and if you want to copy only web assets, Which is faster you can run below command
$ **npx cap copy**
Important : Before each
npx cap syncornpx cap copycommand, if there has been any code change, you need to make sure you runionic buildcommand
Here in Capacitor, we can add an androidor iOSplatform in our project.
To build the app from Android Studio, open the editor using
// Open the project in Android studio or xcode accordingly
$ **npx cap open <android or ios>**
To build the app in iOS, you will have to create platform first, and them cd into the platform folder and run following command to install all dependencies
$ pod install
Once Pods are installed, you can open the app in Xcode and run in your device or simulator.
Rest of the source code structure remains same in Angular Cordova and Angular Capacitor. Even some Cordova plugins can be used in Capacitor because Capacitor doesn’t have its own for now. Read more about using Cordova plugins in Capacitor here.
Advanced – Understanding app.module.ts
declarations
In the declarations section, we need to include all components , directives, and pipes we create as part of our application. If you don’t include them here, you’ll get an error when you try to use them in your application because Angular won’t be able to recognize them in your code.
imports
In the imports section, we see that the IonicModule is imported and that sets the root app component.
IonicModule contains all the components, directives, and services from the Ionic framework and by importing the module here we make these available to our app.
AppRoutingModule is also imported here. You can import other Angular Modules here that you might want to use in your app.
bootstrap
In the bootstrap section, we configure which components are created at the launch of the application.
Usually, you’ll only find one component in this array. In this case, that is the AppComponent , which is Ionic’s root component, which is responsible for loading our MyApp Component.
If you have a look at index.html , you’ll see that <app-root>, the selector for IonicApp , is included in the <body>. At the start of the application, Angular will create an instance of the root component and insert it in the place of the <app-root> element.
<!-- Ionic's root component and where the app will load -->
<app-root></app-root>
entryComponents
In the entryComponents section, we define any component that is required to be loaded along with this module. This is the case for all Page components since these are all loaded through the Navigation Controller.
Components that are loaded declaratively (i.e. are referenced in another component’s template) don’t need to be included in the entryComponents array.
There can be some duplication where we have to define our Page components in both the declarations and the entryComponents sections. The reason for having this separate entryComponents section is so that Angular can compile a bundle for the app that will only include the components that are actually used within the app.
Loading of modules dynamically is useful when you want a smaller first deploy bundle and Lazy Load the modules/pages which will come in later. You can read more about lazy loading here.
providers
In the providers section, we can register services for dependency injection. When you register a service in the App Module, it can be used in all the components in your app. But you can always define a service locally for a page if it is not being used globally.
Modifying the app
So we have a basic template. We understand the structure and now we want to modify the app as per our liking. Make sure the ionic serve the process is running in the terminal.
Let’s modify the Homepage of the app, which resides in src/app/home folder.
Go to home.page.html and change the code to following
<ion-header>
<ion-toolbar>
<ion-buttons slot="start">
<ion-menu-button></ion-menu-button>
</ion-buttons>
<ion-title>
**Hello World**
</ion-title>
</ion-toolbar>
</ion-header>


<ion-content>
<ion-card class="welcome-card">
<ion-img src="/assets/shapes.svg"></ion-img>
<ion-card-header>
<ion-card-subtitle>**I am just getting started** </ion-card-subtitle>
<ion-card-title>**Welcome to My World** </ion-card-title>
</ion-card-header>
<ion-card-content>
<p>**I can modify my app as I like, muhahahahaha !** </p>
</ion-card-content>
</ion-card>
</ion-content>
Save your file. As soon as you save the file, you will see the app recompiling in the terminal. Your app in the browser will auto-update to show this

Make your first modification in Ionic 5 app
You have successfully modified an Ionic app. Now you can proceed with adding more pages, more logics, images, texts, and so on. Make it a featured app!
Adding a new page / service / module / component
Adding a new page or component is very systematic in Ionic. You can use the Ionic CLI command
$ ionic generate
and it will ask you the questions to create new code

Generate new page, component, etc in Ionic is very easy
Or you can use direct CLI command to do it in one step
$ ionic g page "My new page"
Using this command, Ionic will create the required files for the module. E.g. for a page, it will create HTML, SCSS, routing (angular route) , spec (test), module (angular module), and Page(angular component) files.
Conclusion
This blog was a basic warmup write-up for Ionic 5 beginners. You can read more about advanced components, UI layouts, and plugins in HERE
Next Steps
If you liked this blog, you will also find the following Ionic blogs interesting and helpful. Feel free to ask any questions in the comment section
- Ionic Payment Gateways – Stripe | PayPal | Apple Pay | RazorPay
- Ionic Charts with – Google Charts| HighCharts | d3.js | Chart.js
- Ionic Social Logins – Facebook | Google | Twitter
- Ionic Authentications – Via Email | Anonymous
- Ionic Features – Geolocation | QR Code reader| Pedometer
- Media in Ionic – Audio | Video | Image Picker | Image Cropper
- Ionic Essentials – Native Storage | Translations | RTL
- Ionic messaging – Firebase Push | Reading SMS
- Ionic with Firebase – Basics | Hosting and DB | Cloud functions
Ionic React Full App with Capacitor
If you need a base to start your next Ionic 5 React Capacitor app, you can make your next awesome app using Ionic 5 React Full App in Capacitor

Ionic 5 React Full App in Capacitor from Enappd
Ionic Capacitor Full App (Angular)
If you need a base to start your next Angular Capacitor app , you can make your next awesome app using Capacitor Full App

Capacitor Full App with huge number of layouts and features
Ionic Full App (Angular and Cordova)
If you need a base to start your next Ionic 5 app, you can make your next awesome app using Ionic 5 Full App

Ionic Full App in Cordova, with huge number of layouts and features