Integrating Ionic Vue Application with Firebase - Firestore CRUD operations

Table of Contents
- Integrating Ionic Vue Application with Firebase – Firestore CRUD operations
- What is Ionic?
- Capacitor – How is it different from Cordova?
- What is Vue?
- Firebase 🔥
- Connect the Ionic Vue app with Firebase
- Conclusion
- Next Steps
- Ionic React Full App with Capacitor
- Ionic Capacitor Full App (Angular)
- Ionic Full App (Angular and Cordova)
Integrating Ionic Vue Application with Firebase – Firestore CRUD operations
In this tutorial, we will learn how we can integrate the Ionic Vue application with Firebase firestore and use basic database operations. Firebase is one of the best options to opt for when dealing with a small number of users (for unpaid versions). You can add a lot of things using Firebase like push notifications, database providers, authentication methods, Firebase functions, and many more.
What is Ionic?
Ionic is a complete open-source SDK for hybrid mobile app development created by Max Lynch, Ben Sperry, and Adam Bradley of Drifty Co. in 2013. Ionic provides tools and services for developing hybrid mobile apps using Web technologies like CSS, HTML5, and Sass. Apps can be built with these Web technologies and then distributed through native app stores to be installed on devices.
We can use Cordova or Capacitor to build these awesome apps and have native functionalities. With this, we get some amazing native plugins to use like Image cropper, Camera, and many more.
Capacitor – How is it different from Cordova?
This section is relevant to only those who have been working with Ionic / Cordova for some time. Cordova has been the only choice available for Ionic app developers for quite some time. Cordova helps build an Ionic web app into a device installable app.
Capacitor is very similar to Cordova, but with some key differences in the app workflow
Here are the differences between Cordova and Capacitor (You’ll appreciate these only if you have been using Cordova earlier, otherwise you can just skip)
- Capacitor considers each platform project a source asset instead of a build time asset. That means Capacitor wants you to keep the platform source code in the repository, unlike Cordova which always assumes that you will generate the platform code on build time
- Because of the above, Capacitor does not use
config.xmla similar custom configuration for platform settings. Instead, configuration changes are made by editingAndroidManifest.xmlfor Android andInfo.plistfor Xcode - Capacitor does not “run on device” or emulate through the command line. Instead, such operations occur through the platform-specific IDE. So you cannot run an Ionic-capacitor app using a command like
ionic run ios. You will have to run iOS apps using Xcode, and Android apps using Android studio - Since platform code is not a _source asset, _you can directly change the native code using Xcode or Android Studio. This gives more flexibility to developers
In essence, Capacitor is like a fresh, more flexible version of Cordova.
What is Vue?
Vue is a progressive framework for building user interfaces. Unlike other monolithic frameworks, Vue is designed from the ground up to be incrementally adoptable. The core library is focused on the view layer only, and is easy to pick up and integrate with other libraries or existing projects. On the other hand, Vue is also perfectly capable of powering sophisticated Single-Page Applications when used in combination with modern tooling and supporting libraries. (If you want to know more about Ionic Vue then read Introduction to Ionic Vue Blog)
Firebase 🔥
If you already know what is firebase – SKIP this section.
Firebase is a popular Backend-as-a-Service (BaaS) platform. It started as a YC11 startup and grew up into a next-generation app-development platform on Google Cloud Platform. It is getting popular by the day because of the ease of integration and the variety of functionalities available on it.
A lot of quick integrations are available with Firebase. Some of these are listed below:
- Real-time Database 🗄️
- Firestore Database
- Email Authentication 📧
- Social logins📱
- In-app messages
- Push notifications
- Analytics 📊
- Crashlytics 💥
- Remote config
Firebase is quickly growing to become the most popular mobile app back-end platform. And now we got an easy way to handle the firebase project by using the emulator. You can be running a firebase project in the localhost rather than spending bucks on creating a cloud instance, It makes the work easy and clean. And If you want to know more about Firebase Emulator you can to Firebase Emulator Blog.
Connect the Ionic Vue app with Firebase
In this section, we will go through three steps :
- Set up the firebase project from the firebase console
- Create Ionic VueProject (integrate it with the firebase)
- At last, perform the CRUD operation in Cloud Firestore.
Step – 1. Setting up firebase project:-
Firstly we have to create a new Firebase project in firebase Console, then just click on** _ Add Project_** and enter project details.
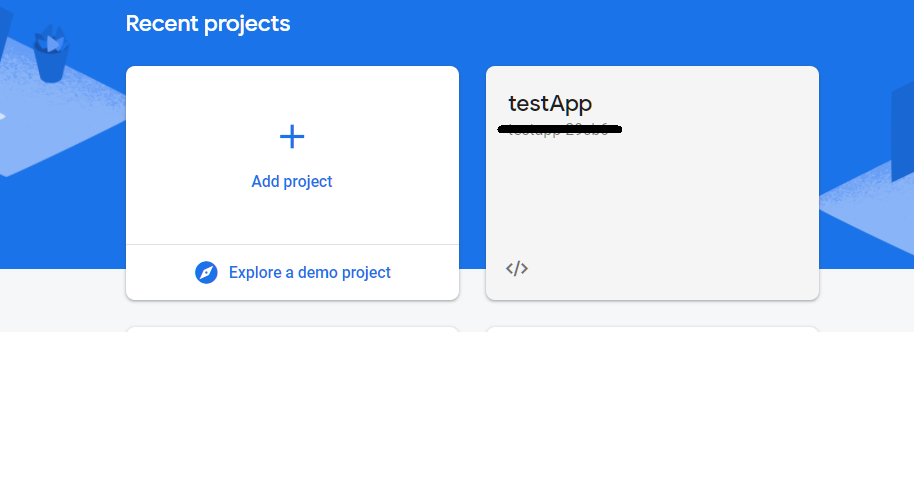
Firebase Console
Now once the firebase project is created then go to cloud firestore and create a firestore database. And keep in mind you should create the firestore database in test mode (Test mode enables the read, write, update and delete permission for everybody)

Now we are ready to integrate the Firebase with the Ionic Vue, But we have to copy the Firebase Project Config so that we can use that in the Vue Project. To copy the config just go to _ project settings_ and copy the firebase project. (We just want project Id)

2. Creating a new Ionic Vue Project and Integrating it with the Firebase project
You can get the completed source code of the Ionic Vue Application HERE. And before Integrating we have to create a new Ionic Vue Project, To create a new Ionic project follow the below steps:-
To create an Ionic Vue project, you have to follow the same steps as for Ionic react or angular. But keep in mind that you have the latest version of Ionic-cli as Vue is updated in the newer version (Ionic-cli V6.12.2 – At the time of blog). You can update ionic-cli using the below command:-
$ npm install -g @ionic/cli
Once the update is complete, Now we can create a new Ionic + Vue application. To create you can run the below command:-
$ ionic start firebaseVue blank --type vue
The above command contains the name of the project after that you can pass template types like ‘blank’, ’tabs’ to choose the layout of the Ionic Vue project. And at last, we have given vue as the** type of framework** to use. The command will take some time to create the project, and after that, a new project will be created in the working directory. We are done with creating a new Ionic Vue project, and now we will integrate it with Firebase.
To integrate Ionic Vue with firebase, we have to install firebase in our project using the below command :
npm install firebase
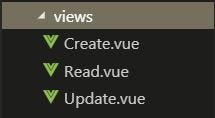
Once the firebase is installed in Ionic Vue Project, we have to create the firebase-service.ts file in the src directory of the Vue Project. src folder structure will look like this:-

firebase-service.ts will contain all of the logic related to firebase like initialization of the firebase project, query related logic. First, we will look at the initialization of the Firebase project in the Ionic Vue project.
In the above code, we first import the installed firebase by using the import statement in firebase-service.ts
import firebase from "firebase/app";


import "firebase/firestore";
Now we will use the firebase instance to initialize the firebase project using its initializeApp() method. To initialize the firebase project, we have to use the projectID (which we have copied from Firebase Config).
You will also need Firebase CLI to use some of the Firebase commands. If you want to know more about how to install firebase/cli you can go here and check the requirements for your OS.
You must be logged in to Firebase. (If not use the firebase login command to login into your terminal, this command will work after installing firebase/cli)
_const_ db = firebase.initializeApp({
    projectId: '**Your firebase projectID**'
    }).firestore();
Now DB instance is created, we will use this DB instance to use the collections and docs in the cloud firestore. firebase-service.ts exports the function that contains the sub-functions which perform the query-related logic. We have taken the example of READING the data from firestore collection. We will explain more in the next section.
_const_ readFromFirebase = async (_collectionName_) _= >_ {
    _const_ FirebaseCollection = db.collection(collectionName);
    _const_ querySnapshot = await FirebaseCollection.get();
    _const_ result = querySnapshot.docs.map((_doc_ : _any_) _= >_ {
    return {...doc.data()}
    });
    return result;
    };
In this code, db.collection(collectionName) will create a instance of the collection/table. And we will use that instance to read the data from the table using get() method of the instance.
3. Adding CRUD operation using Cloud Firestore
We have added the firebase-service.ts file to the Vue project and initialized the firebase project. Now we will create the views using which we will perform the CRUD operations.
- Create Operation:-
To perform the CREATE operation, we will build a simple UI that will take the input as the username and password. The given input will be saved into the **users **collection in the cloud firestore. We will use the Create.vue file to perform the Create Operation.
Once you create the Create.vue file, we will add the UI and related Logic in the file. In the below code, we call the firebase-service **createOperation() method [Line 68 in below code] ** with the User Object. The code is given as below, we will explain the firbase CRUD part later :
Above code UI will render like:-
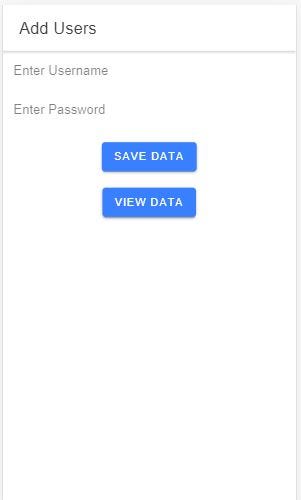
In the above code, we have created the two input fields (for username and password) and two buttons (for Saving Data and getting the List of Users). To perform the Create Operation, we have defined createOperation()
async createOperation() {
    _const_ userObject = {
    username: this.username,
    password: this.password
    }
    _console_.log('Data', this.username, this.password);
    _const_ UsersData = await firebaseService().createOperation('Users',
    userObject);
    },
simply call the create operation() function defined in firebase-service.ts file (Created earlier in the blog) with collectionName and userData as the argument [Line 68 in above code]. And in reading Operation (View Data Button) [Line 29 in above code] navigate to** Read.vue**
2. Read Operation:-
To perform the Read operation, add the Read.vue file and show the list of users with update and delete buttons. Below is the Code for Read.vue file which consists of the UI rendering and Read Operation related Logic.
The above Code will render UI like this:-

The above code consists of created() method [Line 36 in above code] which is called as soon as the Read.vue page is loaded into the DOM. So in this method, we will call the firebase-service’s method to GET/READ all the users in the Users collection.
created() {
    _const_ usersList = firebaseService().readOperation('Users');
    usersList.then((_data_ : _any_) _= >_ {
    this.usersList = data;
    })
    }
Now we can render the list of users (i.e. this.usersList) using the ion-list, and will use the “v-for " prop [Line 10 in above code] to render it.
<ion-list>
    <ion-item v-for="(item, index) in usersList" :key="index">
    {{ item.username }}
    <ion-button slot="end" @click="updateOperation(item,    index)">update</ion-button>
    <ion-button slot="end" @click="deleteOperation(item,  index)">Delete</ion-button>
    </ion-item>
    </ion-list>
3. Delete and Update Operation:-
And for delete operation, will call the deleteOperation() method (defined in firebase-service.ts) and pass in the collectionName and users username as the arguments.
deleteOperation(_item_ : _any_ , _index_ : _any_) {
    _console_.log(item);
    this.usersList.splice(index, 1);
    firebaseService().deleteOperation('Users', item.username);
    }
For Update Operation method [Line 50 in read.vue file] , we just navigate to the Update.Vue page with users’ username as the **params [passing {id: data.username}] ** using the router capability.
async updateOperation(_item_ : _any_ , _index_ : _any_) {
    _const_ data: _any_ = await firebaseService().findIdForDoc('Users',   item.username);
    this.$router.push({name: 'Update', params: {id: data.username}})
    }
4. Update Operation:-
To perform the update operation, we just create Update.vue file. And will add the updated page UI and query-related logic to it. Below is the code for the Update.Vue file.
The above code will render like this :-

We have passed the user’s username from the Read.vue file [Line 54 in read.vue file] , And will get that in Update.Vue file using the props option. Now we can refer username as this.id in the entire code.
props: ['id']
Now to perform the update operation we define the updateOperation() method. And inside this function will call the updateOperation() method (defined in firebase-service file) and pass in the collectionName and updated user data as the argument.
async updateOperation() {
    _const_ updated = await firebaseService().updateOperation('Users',   this.usersData);
    this.router.push('/read');
    }
Now we are done with all of the CRUD operations performed in Firebase collections. But to make this code work we have to change the router file defined in router/index.ts
The above code will handle all the routes present in the Ionic Vue application, you can change your index.ts file to this code. We have defined many firebase-service.ts functions on different pages. Below is the complete code for the** firebase-service.ts** file.
Conclusion
In this tutorial, we have learned how to integrate the Ionic Vue application with Firebase cloud Firestore and along with it learned about a few basics of the Ionic Vue App. You can get the Source Code of this Ionic Vue Application HERE. And if you want to know more about any of the technology or feature you can visit Enappd Blogs.
Next Steps
If you liked this blog, you will also find the following Ionic blogs interesting and helpful. Feel free to ask any questions in the comment section
- Ionic Payment Gateways – Stripe | PayPal | Apple Pay | RazorPay
- Ionic Charts with – Google Charts| HighCharts | d3.js | Chart.js
- Ionic Social Logins – Facebook | Google | Twitter
- Ionic Authentications – Via Email | Anonymous
- Ionic Features – Geolocation | QR Code reader| Pedometer
- Media in Ionic – Audio | Video | Image Picker | Image Cropper
- Ionic Essentials – Native Storage | Translations | RTL
- Ionic messaging – Firebase Push | Reading SMS
- Ionic with Firebase – Basics | Hosting and DB | Cloud functions
Ionic React Full App with Capacitor
If you need a base to start your next Ionic 5 React Capacitor app, you can make your next awesome app using Ionic 5 React Full App in Capacitor

Ionic 5 React Full App in Capacitor from Enappd
Ionic Capacitor Full App (Angular)
If you need a base to start your next Angular Capacitor app , you can make your next awesome app using Capacitor Full App
Capacitor Full App with huge number of layouts and features
Ionic Full App (Angular and Cordova)
If you need a base to start your next Ionic 5 app, you can make your next awesome app using Ionic 5 Full App

Ionic Full App in Cordova, with huge number of layouts and features