Location Selection in AGM maps based on Ionic 5 Angular App

Table of Contents
- Location Selection in AGM maps based on Ionic 5 Angular App
- Step 1 – Create Ionic Angular App
- Step 2– Install Plugins (AGM)
- Step 3– Build the logic with AGM functions
- Step 4 – Building the Code in Android Application and demonstrating it.
- Conclusion
- Next Steps
- Ionic React Full App with Capacitor
- Ionic Capacitor Full App (Angular)
- Ionic Full App (Angular and Cordova)
Location Selection in AGM maps based on Ionic 5 Angular App
In this tutorial, we will be going through the complete solution for handling the location selection in the Ionic 5 Angular application. When you think of any taxi booking application like Uber – these applications have the auto-complete location feature – that will suggest you the address when you type one or more characters.
The other way we can do this is to select the location directly from the map by dragging the map under a center location pin. You can also drag the location pin to the particular location. That will select the location for you and make your work easy. We will be learning a whole bunch of things in this tutorial, which is great … !! isn’t it

Yes, its great…!!
In order to implement these features we should follow some steps:-
- Create a new Ionic 5 Angular Project:- (To do this you can go to Ionic beginners blog)
- Installing necessary plugins and packages:- (Like Agm-maps and more)
- Implementing Location selection features
- Building the Code in Android Application and demonstrating it.
Step 1 – Create Ionic Angular App
We will assume you can set up an Ionic Angular project given in step 1 – using our other blogs.
Step 2– Install Plugins (AGM)
We jump to 2nd step of installing necessary plugins and packages – We need the AGM map package to be installed in the application to do that run the below command:-
$ npm i @agm/core
    $ npm i agm-direction
The agm-direction package will help to make the path between the selected origin and destination. And agm/core will handle all kinds of the map and location-related work.
Step 3– Build the logic with AGM functions
Once the packages are installed we have to Import [agm/core - Line 13, agm-direction - Line 14] and Inject [AgmCoreModule - Line 28, AgmDirectionModule - Line 32] these modules in** app.module.ts**
Once we import the packages in app.module.ts , their functionalities can be used anywhere in the application. We can start to implement our main logic of handling the location.
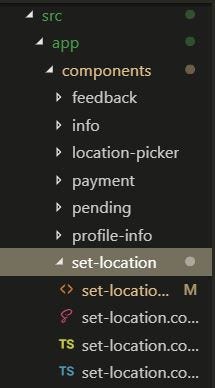
To implement this, we will build a separate component named SetLocationComponent. It will contain all our location-based logic in one place. It will be helpful for you to understand and use that in your pre-build application as well. So let’s start and create our new Component, to do that run the below command:-
$ ionic generate component components/setlocation
The above command will add the SetLocation Component in the components directory like below:-
Now we will design the SetLocation component in such a way that we have the autocomplete search bar on top and the map covering the rest of the area that can help us to set the location manually (i.e. by dragging the map to the location pin or dragging the pin to the location). To do that we have to edit the HTML file of the set location component.
The above contains the search bar [Line 4 in above code] for auto-complete location and an agm-map [Line 25 in above code] with a location-pin icon [Line 29 in above code] at the center with a set location button [Line 43 in above code] that will finally choose the location input. And you can add the below CSS to the HTML code:-
Now the set location component will look like:-
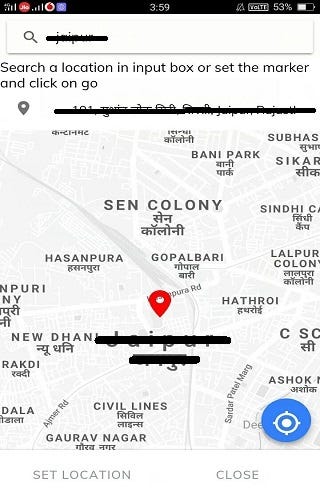
Set Location Component
Now we will complete the autocomplete feature of the component. For this, we will add the (ionInput) method in the search bar that will be called after the change in input.
<ion-searchbar class="background-transparent"[(ngModel)]="searchItem" [showCancelButton]="true"(ionInput)="searchOnChange()" (ionCancel)="dismiss()" selected="true" autofocus></ion-searchbar>
We will define the searchOnChange() function in set-location.component.ts file :-
async searchOnChange() {
    if (this.searchItem) {
    _const_ predictions = await      this.util.getGooglePlaceAutoCompleteList(this.searchItem,this.country, this.bounds);
    this.autocompleteItems = [];
    this.__zone.run(() _= >_ {
    if (predictions !== null) {
    predictions.forEach((_prediction_) _= >_ {
    this.autocompleteItems.push(prediction.description);
    });
    }
    });
    }}
the getGooglePlaceAutoCompleteList() function will be defined under util service which we have defined separately (You can see the function code below). In this function, we pass the searching word, country, and city bounds. For city bounds, you can use coordinates of north, east, west, and south that should define the rectangle bound of a city or region. And this function will return the predicted address array, so addresses will be only in that square region for which you have given the bound.
async getGooglePlaceAutoCompleteList(_searchText_ , _country_ , _city_bounds_?) {
    _const_ service = new window['google'].maps.places.AutocompleteService();
    _let_ pred;
    _const_ latLngBounds = city_bounds;
    await new Promise((_resolve_ , _reject_) _= >_   {service.getPlacePredictions({
    input: searchText,
    componentRestrictions: { country },
    bounds: latLngBounds,
    strictBounds: true,
    types: ['establishment', 'geocode']
    }, (_predictions_) _= >_ {
    pred = predictions;
    resolve(true);
    });
    });
    return pred;
    }
getPlacePredictions() will take the search text, componentRestrictions/country code, bounds (Rectangular bound coordinates) as the input and return the predictions based on search text as an array.
Further, you can use this predicted array to show a list of options, User can select one of them and we will use _ reverse geocoding [geocoder.geocode({address}, callback) - below code] _to change the address in latitude and longitude. And for that, we will use the below code:-
getLatLan(_address_ : _string_): Observable<_any_ > {
    _const_ geocoder = new google.maps.Geocoder();
    return Observable.create(_observer_ _= >_ {
    geocoder.geocode({ address }, _function_(_results_ , _status_) {
    if (status === google.maps.GeocoderStatus.OK) {
    observer.next(results[0].geometry.location);
    observer.complete();
    } else {
    observer.next({ err: true });
    observer.complete();
    }
    });
    });
    }
The input given to _getLatLan() function _[in above code]_ _ is the selected address string by the user and using the selected address string we will get the location object containing lat and lng in it. Now we will set this lat, lng to the agm-map lat, lng.
chooseItem(_address_) {
    this.rideService.getLatLan(address).subscribe(_result_ _= >_ {
    if (result) {
    this.__zone.run(() _= >_ {
    this.autocompleteItems.length = 0;
    this.lat = result.lat();
    this.lng = result.lng();
    if (this.rideService.locationType === 'destination') {
    this.rideService.destination = { lat: result.lat(), lng:
    result.lng() };
    this.rideService.destinationAddress = address;
    }
    if (this.rideService.locationType === 'pickup') {
    this.rideService.originAddress = address;
    this.rideService.origin = { lat: result.lat(), lng:       result.lng() };
    }
    });
    }
    }, _error_ _= >_ _console_.log(error),
    () _= >_ _console_.log(`${this.rideService.locationType} selected`)
    );
    }
This chooseItem() function [in above code] will be called when the user clicks on the desired address string and then the string will be passed in reverse geocoder and that will return the lat and lng.
** Finally, we have completed this feature. one more feature, to select the location by the map is left. We will show the demo after the completion of that.**
We have placed the location [Line 29 in set-location.component.ts] pin in the center of the agm-map and now we want a function that should return the center coordinates. And the location pin is static and when we move the map, the center coordinates are returned [returned by centerChanged() function] and our purpose is achieved.
<agm-map (centerChange)="centerChanged($event)" [latitude]="lat" [longitude]="lng" [zoom]="14" [zoomControl]="false"></agm-map>
(centerChange)=“centerChanged($event)” function will return the center coordinates of the map (i.e. the location that the location pin is pointing to)
async centerChanged(_coords_ : LatLngLiteral) {
    this.centerLatitude = coords.lat;
    this.centerLongitude = coords.lng;
    _const_ address = await
    this.util.getGeoCodedAddress(this.centerLatitude,    this.centerLongitude);
    this.showingAddress = address.formatted_address;
    }
In the above function, we simply take on the center latitude and center longitude and find the address using geocoder (input = latitude, longitude and output = address string).
We will show the returned address string [Line 52 in the above code] pointing to the location pin, as the user drags the map to a specific location.
We can also achieve this behavior by dragging the marker in place of a map, So to do that we simply have to attach the dragEnd() method to it, This function will return the latitude and longitude of the location of the marker.
<agm-map [latitude]="lat" [longitude]="lng" [zoom]="14">


<agm-marker [latitude]="lat" [longitude]="lng" [markerDraggable]="true" (dragEnd)="markerDragEnd(m, $event)">


</agm-map>
we can define the markerDragEnd() function, in ts file :-
async markerDragEnd(_m_ : Marker, _$event_ : MouseEvent) {
    if ($event.coords && $event.coords.lat && $event.coords.lng) {
    this.rideService.setAddress({ lat: $event.coords.lat, lng:   $event.coords.lng }, this.rideService.locationType);
    }
    }
Hence our complete flow of location selection is done, And now with this, our tutorial comes to an end….!!

Step 4 – Building the Code in Android Application and demonstrating it.
To build the application on your Android Device you have to run the below commands:-
$ ionic cordova platform add android
    $ ionic cordova run android
Below is the demonstration video for another application. The same can be implemented using the above code.

Video Demonstration
Conclusion
So in this tutorial, we have learned about how we can select a location based on autocomplete or select it manually from the map itself. Now you are all set to add this feature to your application and make the user experience easier and more convenient. If you want to know more about other features you can go to our Blog Section.
Next Steps
If you liked this blog, you will also find the following Ionic blogs interesting and helpful. Feel free to ask any questions in the comment section
- Ionic Payment Gateways – Stripe | PayPal | Apple Pay | RazorPay
- Ionic Charts with – Google Charts| HighCharts | d3.js | Chart.js
- Ionic Social Logins – Facebook | Google | Twitter
- Ionic Authentications – Via Email | Anonymous
- Ionic Features – Geolocation | QR Code reader| Pedometer
- Media in Ionic – Audio | Video | Image Picker | Image Cropper
- Ionic Essentials – Native Storage | Translations | RTL
- Ionic messaging – Firebase Push | Reading SMS
- Ionic with Firebase – Basics | Hosting and DB | Cloud functions
Ionic React Full App with Capacitor
If you need a base to start your next Ionic 5 React Capacitor app, you can make your next awesome app using Ionic 5 React Full App in Capacitor

Ionic 5 React Full App in Capacitor from Enappd
Ionic Capacitor Full App (Angular)
If you need a base to start your next Angular Capacitor app , you can make your next awesome app using Capacitor Full App
Capacitor Full App with huge number of layouts and features
Ionic Full App (Angular and Cordova)
If you need a base to start your next Ionic 5 app, you can make your next awesome app using Ionic 5 Full App
Ionic Full App in Cordova, with huge number of layouts and features