Integrating Google Sheets with Firebase Realtime Database

In this tutorial, we will learn how to integrate Google sheets with Firebase Realtime Database. We will go through bidirectional integration: -
- When you update Google Sheet, Firebase Realtime DB will be updated automatically.
- When you update Firebase Realtime DB, Goggle Sheets will be updated automatically (We will need firebase functions to implement this integration).
Now here is the question… why do we need Google sheets to update Firebase realtime database or vice versa?
In many of the mobile/web-apps with a Firebase back-end, situation arises where your application has no option to update the database, like adding new data. The only way you can update the database is either by having an admin panel, OR updating database directly. Both of these are time consuming and costly endeavors. This is where Google sheet comes into the picture and acts as a tool to update the database. Below is one example that will make it clear -
- Adding Data to Database through Google Sheets :-
There is a quiz application and you are using firebase realtime database to update the quiz data. If you want to add some more questions to the database, you have to manually enter those into the database. As an alternative, Google sheets can help add more questions to the Database. - Updating Google Sheets from Realtime Database :-
In the same quiz game you need to get feedbacks and results of players. Checking database manually is a difficult task. Again, you can make an admin panel to check data but that takes time and cost. So to make it easy we can update sheets based on database update (firebase functions will be used to get updates in realtime database).
Post Structure
To implement both methods, we will follow below simple steps :-
- Setup Firebase project and setup realtime database. Also, populating data into realtime database
- Creating a Google sheet and writing sheet scripts in to the Sheets platform.
- Creating a Google service account, enabling Google sheets and getting service account JSON file.
- Enabling Firebase functions and Integrating Google API (for sheets) into Firebase functions.
- Providing permissions to the Google sheets and testing it.
Ok let’s start writing some real damm code.

Step 1 — Setup Firebase realtime database
(If you know how to setup firebase, you can skip this section)
Setting up a new Firebase project is covered in step 2 of this Blog.
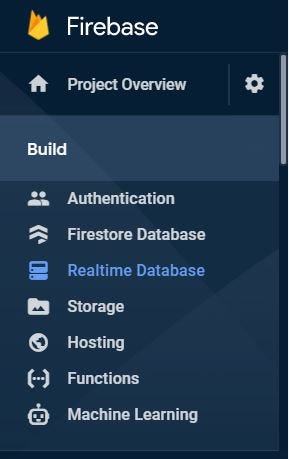
After Setting up the Firebase project you can enable realtime database by going into realtime database tab :-
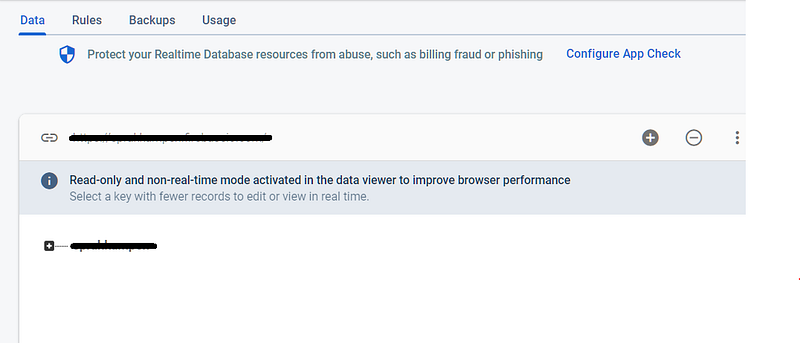
Once you enable the Realtime Database, you can see the below screen with empty database.
Now to test, we have to import some data to the Database. There is an import JSON option in the tab, which can help import JSON data into it.
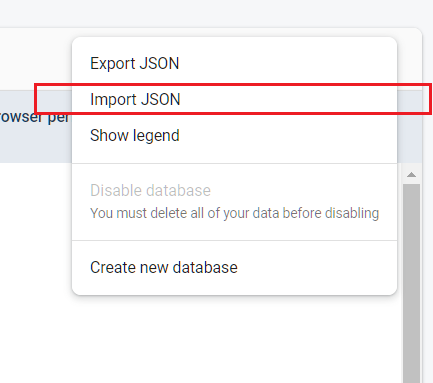
If you don’t already have the data in your database, you can import it using above option.
Step 2 — Create Google sheet and write Sheet scripts
We will start with a fresh Sheet and later will add some data to it. And check whether it got reflected in Realtime database or not. To create the Google sheet 1) Login with your Google account 2) Go to Google Sheets and create a new sheet. You probably already know that 😁

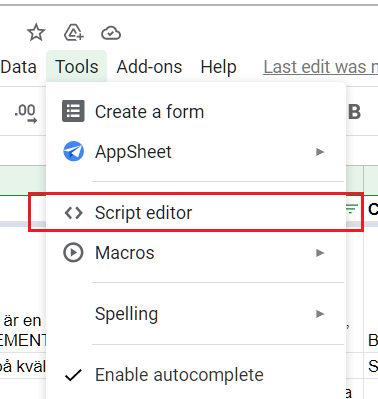
After creating new sheet, we have to link the Realtime Database with the Google Sheet. Google Sheet itself provides an option to add some code to the Sheet. To add the Code, go to Tools → Script editor. Check the below screenshot for that :-
In Script editor, you will see empty script. Before adding any code to it, we have to enable appsscript.json file from the settings, shown in below settings page.
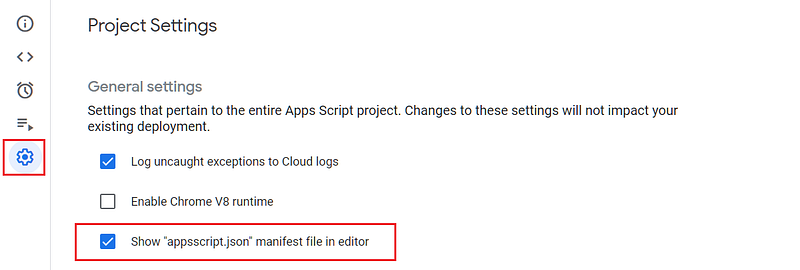
After enabling this option, you will find appsscript.json file in you code editor. This file is same as package.json file which maintains dependencies in your javascript project. Now you have to replace your appsscript.json code with the below code.
Now we will add some code to the Code.gs file, which will handle all the logic for getting the sheet data and adding it into the Firebase realtime database. We will divide the implementation under various functions. Below is the code for Code.gs file.
In the above code
- Replace spreadsheetID with your sheet Id, you can find it in sheet URL itself, like https://docs.google.com/spreadsheets/d/****this_is_spreadsheet_ID****/edit#gid=0
- Replace Firebase URL with the your realtime database URL mentioned in the below screenshot

- Replace
your_collection_namewith the collection name you want to save that data with in Google Sheets. Once you are done with above replacements, let’s run the code by selecting a specific method.
Note :- Before running the code, add some rows in the Google Sheet.
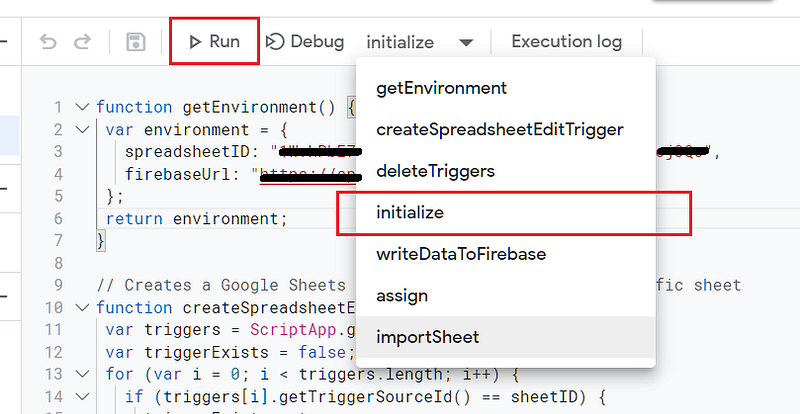
So you have to run the Code.gs file and select the initialize method. This will do everything for you. It will read all the rows from the Sheets and put that into the firebase realtime DB.
After running the code, you might get some permissions issue. So you can just go with flow and enable all the required things asked. Once execution of the code completes, you can check the realtime database for the entries. (And fun part is, it effects the Realtime database instantly)
This completes the first part i.e. Updating Google sheet changes in Realtime database.
Step 3 :- Create Service account & enable Google Sheets
To implement the second flow (i.e. Saving database changes to the Google Sheets), we need a Google Cloud project with a service account. In this section we will cover how to create a Google Cloud project, get a service account, create a key for the service account and enable Google Sheets for the project.
1. Creating Google Cloud Project
To create a project go to Google Cloud console and click on projects tab, then you can create a new project from there or choose an existing one.

2. Creating a service account and generating the key
After creating a project, we have to create a service account and enable the key for the service account. This key will be provided in the from of a JSON file that we will use later in the firebase functions.
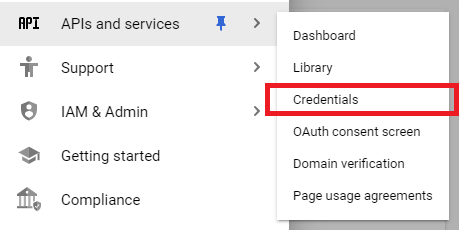
Go to API and Services → Credentials → Create Credentials → Service account
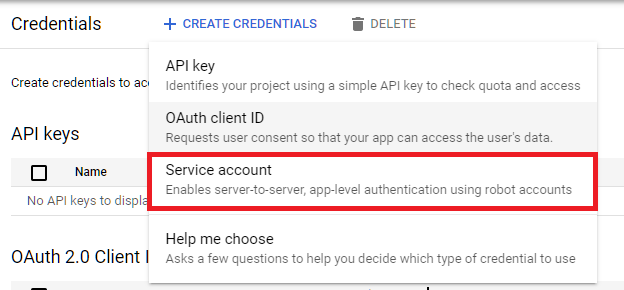
You will be required to fill some of the information regarding the service account you are creating. Just go with flow and fill all the required details in the form.
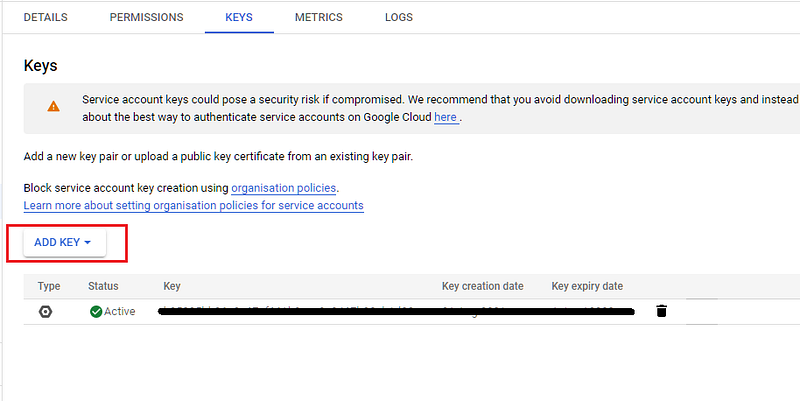
After setting up the service account, select the Keys tab in the service account and add a key to the account. This will prompt for the JSON file option and you can download and save it (Later it will be used in the Firebase functions implementation).
We have the required JSON file, now the Firebase functions can be implemented and we can add the logic for getting updates for particular collection and save them into the sheets.
Step 4 :- Integrating Google Sheets API in Firebase functions
Before going through this step, if you want to setup or know more about the Firebase cloud functions, you can go and check this Cloud Functions Blog. Remember, to implement Firebase function in production, you have to enable Billing on that project.
Once you are done with setup, we can start writing some logic in firebase functions. Below is the structure for the firebase functions module :-
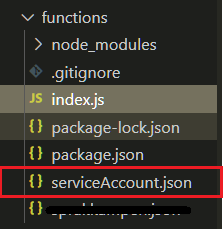
In the above folder structure, service account JSON file is added to base project structure. And all the logic related to the sheets and database will be added to index.js file.
Before adding the logic to the index.js file, you have to install googleapis package.
$ npm i googleapis
Once package is installed you can add the below code to the index.js file.
In the above code, JWT is used to authenticate the user before doing any update into the sheets. This authentication will take place using the service account JSON file.
functions.database.ref(‘/your_collection_name’) — This provides the reference for the collection and to get the updates, update() method is used in the code. (update() method will provide the complete data from the collection including the updated part).
await sheets.spreadsheets.values.update({
auth: jwtClient,
spreadsheetId: spreadsheetId,
range: `A1:B${feedbacks.length}`,  // update this range of cells
valueInputOption: 'RAW',
requestBody: {
values: feedbacks,
majorDimension: 'ROWS'
}
}, {})
The above code will check for authentication, the required spreadsheetId, range up to which you want to save data in the sheet and the request body (containing the database updated data). Finally it updates the data into the sheet. But before testing we have to provide permission to the service account in the required spreadsheet.
Step 5 — Provide permissions to Google Sheet & Test
To provide the permissions to the service account, you just have to share the spreadsheet with the service account client email. Now where will you find your client email ? Client Id can be taken from service Account JSON file or Google cloud project settings. (It will be in below defined format)
service_account_name@google_cloud_project-any_number.iam.gserviceaccount.com
Now share the spreadsheet with this client email. There will be an option to share the spreadsheet on left top corner in Google Sheet.

After clicking, it will ask for mail id. Just enter/paste the client email to that and it will be shared to the service account. Now we are all set to check the results.
Question — When will the sheet be updated ? Does it update automatically ?
Google Sheet will be updated as soon as the selected collection updates. For example — Once a user updates the feedback in the quiz app, it will be updated in the Google Sheet instantly. 😲
Conclusion
In this tutorial, we learnt how to manage Firebase realtime database using Google sheet. Many of the time we want to have a dashboard to update the data into our application, but due to some constraints we were not able to do so. Using Google sheets with Firebase can be a great option in such situations. This is especially relevant for Mobile apps made with Ionic and React Native, where Firebase database is a popular choice with users.
If you want to know more about Ionic, React Native or Firebase features, you can visit Enappd blogs.
Next Steps
If you liked this blog, you will also find the following blogs interesting and helpful. Feel free to ask any questions in the comment section
Ionic Capacitor
- Basic — Geolocation | Barcode & QR code | Facebook Login (Angular) | Facebook Login (React) | Icon and Splash | Camera & Photo Gallery
- Advanced — AdMob | Local Notifications | Google Login | Twitter Login | Games using Phaser | Play music | Push Notifications
Ionic Cordova
- Taxi Booking App example with Ionic, Node, Express and MySQL
- Ionic Payment Gateways — Stripe with Firebase | Stripe with NodeJS | PayPal | Apple Pay | RazorPay
- Ionic Charts with — Google Charts| HighCharts | d3.js | Chart.js
- Ionic Authentications — Via Email | Anonymous | Facebook | Google | Twitter
- Ionic Features — Geolocation| QR Code reader | Pedometer| Signature Pad | Background Geolocation
- Media in Ionic — Audio | Video | Image Picker | Image Cropper
- Ionic Essentials — Native Storage | Translations | RTL | Sentry Error Monitoring
- Ionic messaging — Firebase Push | Reading SMS | Local Notifications
- Ionic with Firebase — Basics | Hosting and DB | Cloud functions | Deploy App to Firebase | Firebase simulator
- Unit Testing in Ionic — Part 1 | Mocks & Spies| Async Testing
Ionic React Full App with Capacitor
If you need a base to start your next Ionic 5 React Capacitor app, you can make your next awesome app using Ionic 5 React Full App in Capacitor
Ionic Capacitor Full App (Angular)
If you need a base to start your next Angular Capacitor app, you can make your next awesome app using Capacitor Full App

Ionic Full App (Angular and Cordova)
If you need a base to start your next Ionic 5 app, you can make your next awesome app using Ionic 5 Full App


