Ionic App with NodeJS, Express, MySQL, Sequelize — Taxi App [Part 3]

This is the concluding part for this series, where we will look at the Ionic 5 App integration with the Node JS server and the MySQL database. We will be learning how to make HTTP requests from the Ionic Application. There is a lot to be done in front-end logic to make a real-life Taxi App — which we are going to skip for the sake of brevity here. So let's start and go with the flow.
Creating Ionic Application
This step might be familiar to most of you, If not, you can follow the below steps to create an Ionic Application. OR for complete details, you can go to our beginners' blog.
ionic start taxiApp blank
This will create a new project in the working directory of your System and you can start/run the application with the below command
ionic serve
Integration with Backend Server
In this part, we will be looking at connecting the Ionic application with the backend server — which we have been building in previous blogs of this series. But before that, we have to build some UI system to interact with user actions. Here we will take an example of a Register/Login System.
Register System
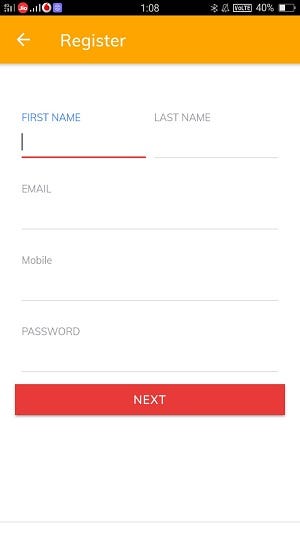
In this section we will build UI for the register flow, And will take required inputs from the user like username, email, password, mobile number, etc. You can modify your requirement according to the table structure/database model.
This above code will help in creating the UI for the register page with different inputs.
CSS code:-

Now the major logic of our register system resides on page.ts file and will go through it, don’t worry about some the lines as they are part of the big Taxi App, just look at the forms and registerUser function only —
In this, we have used the Angular Reactive forms, Which helps us in Validating our input data using custom or predefined validators. And maintains the integrity of the database (Avoiding entering wrong data into the database).
this.api.signUp(this.userForm.value).then(res => {
... this.api.getUser().subscribe((user: any) => {
... // Save JWT token here this.util.goToNew('/home');
// move to home page once authenticated
});
})The above piece of code is calling signUp function which we have created in the API Service file (api.service.ts). That signUp function uses HTTPClient Service of Angular to call the backend APIs. You can see the code below how we send the userInfo to the register API endpoints (/clients/register).
async signUp(user) {
const userInfo =   {
'username': user['email'],
'email': user['email'],
'name': `${user['first_name']} ${user['last_name']}`,
'phone': user['phone'],
'password': user['password'],
'type': 'client',
'stripeId': user['stripeId']
};
...
return    this.http.post(`${this.url}/clients/register`,userInfo).toPromise();
}
we made the HTTP POST request to the server by providing the userInfo into the body, Here this.url is http://localhost:8100 OR it can be your remote Server Address also, you can always set that in your environment files.
Once you start the Node/Express server using npm start ( node index) your API will be activated. When you call the above API — it will send data into the Users relation of the Database (checkout the register API we created in the previous part of this series to know more).
In the codes above, you can also notice an API endpoint to get user profile which returns saved user information to App, so you can manage your user sessions. Also, we save some JWT tokens locally using localStorage — so to authenticate our API calls, this is needed as we have set JWT auth in previous blogs.
Login System
For the Login procedure of the Ionic Application, we have to input the email and password. We create a similar set of HTML templates using Ionic Tags and connect it with JS files.
UI for Login System
In this we have used two input fields (Email and Password) of the User, The Node server will verify and send the response.
UI CSS

This above code will add the styles to the Login Page, Now the most important part the Logic of the Login System in login.page.ts
It contains the complete code for calling server and verifying that USER exists or not, If yes setting user values globally. The important part of the code is explained below in this snippet.
this.api.logIn(this.user.email, this.user.password).subscribe(res => {
this.userProvider.setToken(res['token']); // Saving JWT Token
 this.api.getUser().subscribe((responseUser: any) => {
this.userProvider.setLoggedInUser(responseUser); // Saving user Info locally in a Service
  this.util.goToNew('/home');
// Moving to Home page on successful login
}); }
This code passes the entered input (Email and Password) to the logIn function, which defined in API service in the project. API Service has some code as shown below, which makes HTTP POST request and passes email, password in the body.
logIn(username: string, password: string): Observable<any> {return this.http.post(`${this.url}/clients/login`, { username, password });}
This code will work if you have started the server already and this.url is properly set to point to the Local OR Remote Server. Once again go back to our previous blogs to understand what the login API is accepting on the Server-side and how it is returning a JWT token in response.
Conclusion :
In this series of tutorials, we have learned about an important concept IONIC FRAMEWORK + NodeJS + MySQL + SEQUELIZE, Which many times proved a Stable Tech stack to work on. Now you are fully prepared to make your own application with great features and UI. The taxi code has a lot of features and plugin — obviously, it can take months to develop a fully working app. If you want to save your time and get an Application Template or starter you can visit our website Enappd.com


