Ionic App with NodeJS, Express, MySQL, Sequelize — Taxi App [Part 2]

In the previous part of this series, we have discussed the initial setup of MySQL and Node JS with Sequelize. Now in this part, we will be talking more about the MySQL queries using sequelize and using them in Express Endpoints.
We will write a few APIs that will interact with database models and perform basic CRUD (Create, Read, Update, and Delete) operations on it. We will take a scenario of the Login System, where we make a record of a user in our Users Model and later query the Users Model.
Lets Dive in and start to code

Before continuing we will learn about Route Endpoints, As in our express code, we will make some Endpoints to access our code and make a separate route file to have a cleaner directory structure. Making the Separate Routes Directory is very helpful in case of a bigger project — as it will divide our server code based on various models we are using in the application.
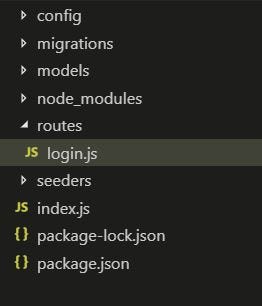
In our project, we will make the routes and import this in the index.js, for that we have to create a routes folder in our project folder

Now add a file named login.js that will contains all the APIs related to the login feature (you can also have routes names based on Models like user.js), This type of folder structure will also help us in debugging and keeping our code based on features. In index.js adding a route like this
Here we simply import our login route from the routes folder, we don’t need to add a .js extension while importing. As we are importing something, we will definitely be adding an export statement in the login.js — we will jump to it later
const loginRouter = require('./routes/login')And use this as a route middleware like this —
app.use('/login', loginRouter);This means if any request comes to the server with /login route it will be passed to the login.js, Then login.js handles the request and respond to it.
Let's write APIs in the login.js the file where we access the Users Database, Make an entry in the database, and read entries. Before starting we need to understand a few things :
- We have already created the User Table in the previous part of this series, if you haven’t gone through it then run the below command to create User Model in the database.
npx sequelize-cli model:generate --name User --attributes firstName:string,lastName:string,email:string2. Once the User Table is created how can we Access it, How can we access the complete Database?
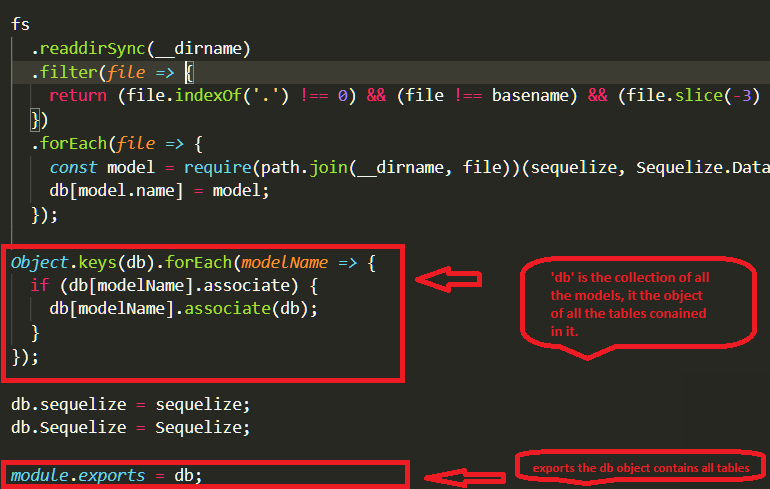
const db = require('../models/index')const {User} = db;In this db is the database reference returned by modes/index.js, you can check the below code (it was automatically added by the sequelize-cli we used in our previous part of this series)

So we simply destructure the User model from it and apply different operations on it like create, find, and update. Now we will proceed with Endpoint codes
First, we have to install some more libraries
npm i bcrypt passport passport-jwt passport-local jsonwebtoken
bcrypt — bcrypt is a password-hashing function designed by Niels Provos and David Mazières, based on the Blowfish cipher and presented at USENIX in 1999.[1] Besides incorporating a salt to protect against rainbow table attacks, bcrypt is an adaptive function
passport — Passport is authentication middleware for Node.js. Extremely flexible and modular, Passport can be unobtrusively dropped into any Express-based web application. Please read more about the passport for a comprehensive set of strategies supporting authentication using a username and password, Facebook, Twitter, and more.
jsonwebtoken — JSON Web Tokens are an open, industry-standard RFC 7519 method for representing claims securely between two parties. JWT.IO allows you to decode, verify, and generate JWT.
We are using passport with JWT strategy, you can read more about this strategy here
We will go through each API in the above code one by one now.
Passport Authentication with JWT
We are not going to explain the passport js workflow with JWT here — that is something that requires a blog in itself. If you are familiar with NodeJS middleware, it is a similar middleware which deals with a lot of authentication strategies for routes.
There is one strategyclientLocal which we made for Login, JWT has no role to play before login. Only at the end of login you get a JWT token— which we can use for a passport.autheticate() function later.
passport.authenticate(['adminJWT','driverJWT'])
This kind of function we will use to have some JWT strategy to authenticate our API calls, in the code above there are 2 different JWT strategies used.In our Taxi app also we have 3 strategies : adminJWT clientJWT driverJWT — these strategies are helpful to have different access to different Apps — User, Driver, and Admin App. If you just have a Single login process — better to use only 1 JWT strategy.
Register API
In register API, we first check if there any document with the email ID that the already exists, If not we go on and create a new document in the User model.
User.findOne({ where: { email: req.body.username }, raw: false })findOne — This method matches the condition in the particular model — if it finds the row (with the condition) returns the document, if not returns null.
User.create({ email: req.body.username, password: hash, name: req.body.name,phone: req.body.phone })create — This method helps to create a new document in the User model and auto allocate the id to the newly entered data.
These methods return Promise, So we use the .then() function to get the data.
Login API
Profile API
findOne method returns the document with id: req.params.id, if there is no doc with this id it returns null
We can run the above script using the below command:-
node index
But for now, running this command only runs the script but nothing can be done by that unless we make HTTP requests using the Ionic App or the Postman (API testing software). For that stay tuned and read the next part of the series.

Conclusion
In this part of the tutorial, we have learned how to write SQL query using sequelize in node JS script and learned about findOne and create a query of SQL, Now in the next and last part of the tutorial, we will learn about how to connect this node JS script with the Ionic application and write HTTP request.


