Ionic 5 Vue Capacitor app — Internationalization and Localization

In this post, you’ll learn how to translate text in Ionic 5 apps, specifically Vue App. You will also learn how to get device-specific language and convert your app’s text to the same language/locale.
Ionic has a variety of app types nowadays (Angular/React/Vue, Cordova/Capacitor). This post will explore the Ionic apps made in Vue Capacitor. For the Ionic Vue code, you can go through this REPO.
Translation in Apps — how is it done?
Multi-language translation OR internationalization is a growing need for any app that wants to target international customers. To date, the majority of apps have been developed in English, no surprise! But with growing apps users, every app is now focusing on translating to local languages.
First, we need to understand the steps involved in the process. Translations, thanks to Google, look very easy, but they are a bit involved in the case of apps and websites, in our case Ionic 5 apps. There are 3 major steps in the translation process in an app —
- Translation Language — Detect the language you want to translate into. This can either be done automatically by detecting the phone or browser’s language settings(Globalization) OR, can be done with user actions (say, by using a dropdown menu to choose language).
For our use case, we will detect the device’s language using both Device plugin. - Prepare Language Text — There are two ways to do this
i) You need to have a pre-translated dictionary (or JSON file) in your app build which stores the translations of all your app’s text in the required translation languages, OR
ii)You load language files from your server every time the app starts. This gives you the advantage of loading updated files, but costs you load time.
Creating the translation JSON files is mostly a manual process for smaller apps, but you can use online tools like this for quick translations, or like POEditor for a more standardized workflow. - Translate — After the above two steps, you finally translate your app’s text to the intended language. We will use vue-i18n library for translating our texts.
Developing the Vue App
So the development outline of this blog will be :
- Create a starter Ionic 5 Vue Tab template app
- Prepare multiple language JSON objects in the globalization file.
- Implement vue-i18n library to detect and translate AND Implement Device plugin to detect device language
- The Directive Gotcha!
We will translate English text into 2 languages — French and Spanish
Sounds pretty easy, right? Well, let’s dive right into it.
Step 1 — Create a basic Ionic Vue app
First, you need to make sure you have the latest Ionic CLI. This will ensure you are using everything latest. Ensure the latest Ionic CLI installation using
$ npm install -g ionic@latest
Creating a basic Ionic-Vue app. Start a basic tabs starter using
$ ionic start ionicTranslate tabs --type=vue --capacitor
The --type=vue told the CLI to create a Vue app, and --capacitor tells the CLI to integrate Capacitor in the app.
Run the app in the browser using
$ ionic serve
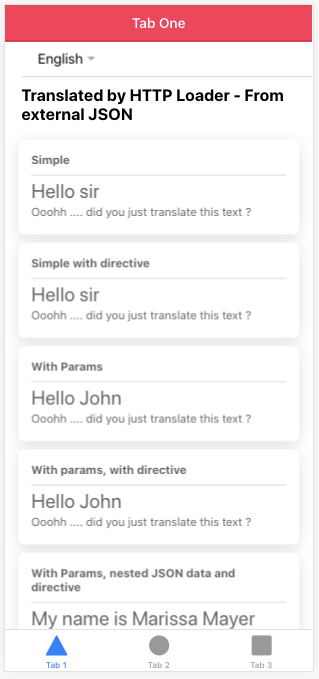
You won’t see much on the homepage created in the starter. I have modified pages ( tab1 and tab2) to align them to our translation functionality.
My tab pages look like this

HTML and SCSS file code for the above UI, if you want to just get started.
Step 2 — Prepare multiple language JSON Object in globalization file
We will create these JSON files in src/data the folder. We will create three JSON objects en (English), fr (French) and es (Spanish) in a single file. But generally you can store different translations in different files (like en.json). If you want to add a new translation, you just have to add a new file having a specific translation. Like Adding a Chinese translation — Create a file/(new object )with name zh.json/(zh:{ }) and add translated sentences to it.
language objects for i18n file (we made a single file)
en object
en: {
    title: 'Hello sir',
    TITLE_2: 'Hello {value}',
    description: 'Ooohh .... did you just translate this text ?',
    data: {
    name: 'My name is {name_value}'
    }
    },
fr object
fr: {
    title: "Bonjour Monsieur",
    TITLE_2: "Bonjour {value}",
    description : "Ooohh .... vous venez de traduire ce texte?",
    data: {
    name: "je m'appelle {name_value}"
    }
    }
es object
es: {
    title: 'Hola señor',
    TITLE_2: 'Hola {value}',
    description: 'Ooohh .... acabas de traducir este texto?',
    data: {
    name: 'Me llamo {name_value}'
    }
},Note, the {value} and {name_value} are kind of variable/constants we can pass from our Vue component. This can be used to
- Replace the variable with user input or a value depending on the situation OR
- To give translations not supported by the library OR
- Keep a word un-translated across translations
Below is the complete globalization file that will be used for translation:-
STEP 3: Implement Vue-i18n library and Device plugin
The device plugin is used to detect the device’s default language/locale. Unfortunately, this plugin is deprecated, but it is still supported by Ionic. Hence, you can opt to use it.
Install Device Plugin using
$ npm install @capacitor/core
    $ npm install @capacitor/device
    $ npx cap sync
Install Vue-i18n library
Vue-i18n is the internationalization (i18n) library for Vue. Since our app has Vue under the hood, we can use this library for the app.
// Install core library
    $ npm i vue-i18n --save
Setup the translation library
We need to initialize the translation library in main.ts file, using the createI18n() setup method:-
const i18n = createI18n({
    locale: 'en', // set locale
    fallbackLocale: 'en', // set fallback locale
    messages: globalizationList, // set locale messages
    })
In the above setup function, 1) locale attribute is used to define the current language for the application e.g ‘en’ for English And 2) fallbackLocale attribute is used to set the default or fallback language for the application. (if no language is passed then the app will fall back to the given option). And 3) messages attribute contains the translation object (i.e. we have created above).
Once we have set up the translation configuration, then we have to use/include this setup in our Vue application. Below is the code using which we can include it in the application:-
const app = createApp(App)
    .use(IonicVue)
    .use(router).use(i18n);
USE method [Line 36 and Line 37] will provide the initial configuration to the complete application, and we can use the i18n variable in the application using $ literal. Below is the complete code for the main.ts file:-
Now we will get the default language of the device and set it to the i18n locale using $i18n.locale variable, after setting $i18n.locale = language, we can change the language for the complete application. To get the default language we have to use the Device plugin. To get the language code, we can use getLanguageCode() method. It will return a two-character language code, that will later be used to set into the i18n locale.
const device: DevicePlugin = Device;
    device.getLanguageCode().then((res) => {
    console.log('Default lang', res.value);
    if (res.value.includes('-')) {
    const language = res.value.split('-')[0];
    this.$i18n.locale = language;
    } else {
    this.$i18n.locale = res.value;
    }
    })
The above code will return the two-digit code, using which we will set the default language. The above code should be added to the App.vue component, as soon as the component is loaded we will run this method, this can be achieved using the mounted() method in the Vue component. Below is the App.vue code :-
Now we will add a logic to Tab1 page using which we have to switch between the languages. Below is the code for Tab1.ts file, we have defined the changeLanguage() method [Line 36], In which we set/change the locale for the complete application. Here $i18n is the global variable that contains a locale attribute. Below is the TS file code:-
Note :- we use $ to denote the global variable in Vue Applications.
Step 4— The Directive GOTCHA 😎
There are several ways using which we can perform the translation in the HTML, 1) Using String literals 2) Using Vue directives, and 3) Using Vue directives with arguments.
Below is the representation for using a string literal.
<h1>{{ $t("title") }}</h1><p>{{ $t("description") }}</p>BUT, the translation will work smoothly when using directives in place of literal, where you just have to use a v-t directive like below:-
<h1 v-t="'title'"></h1>
<p v-t="'description'"></p>
And we have to pass the variable into it, you can use args attribute stated below :-
<h1 v-t="{ path: 'TITLE_2', args: { value: 'John' } }">TITLE</h1><p v-t="'description'"></p>
Conclusion
In this post, we learned how to detect device/browser language, create multiple language JSON objects, and implement translation using different methods in Ionic 5 apps. We also learned how we can switch between different languages using language code. And if you want to go through the code then you can check this REPO.
Ionic Capacitor
- Basic — Geolocation | Barcode & QR code | Facebook Login (Angular) | Facebook Login (React) | Icon and Splash | Camera & Photo Gallery | Debugging with browser|Theming in Ionic apps
- Advanced — AdMob | Local Notifications | Google Login | Twitter Login | Games using Phaser | Play music | Push Notifications
Ionic Cordova
- Taxi Booking App example with Ionic, Node, Express and MySQL
- Ionic Payment Gateways — Stripe with Firebase | Stripe with NodeJS | PayPal | Apple Pay | RazorPay
- Ionic Charts with — Google Charts| HighCharts | d3.js | Chart.js
- Ionic Authentications — Via Email | Anonymous | Facebook | Google | Twitter | Via Phone
- Ionic Features — Geolocation| QR Code reader | Pedometer| Signature Pad | Background Geolocation
- Media in Ionic — Audio | Video | Image Picker | Image Cropper
- Ionic Essentials — Debugging with browser| Native Storage | Translations | RTL | Sentry Error Monitoring | Social sharing
- Ionic messaging — Firebase Push | Reading SMS | Local Notifications
- Ionic with Firebase — Basics | Hosting and DB | Cloud functions | Deploy App to Firebase | Firebase simulator
- Unit Testing in Ionic — Part 1 | Mocks & Spies| Async Testing
Ionic React Full App with Capacitor
If you need a base to start your next Ionic 5 React Capacitor app, you can make your next awesome app using Ionic 5 React Full App in Capacitor

Ionic Capacitor Full App (Angular)
If you need a base to start your next Angular Capacitor app, you can make your next awesome app using Capacitor Full App

Ionic Full App (Angular and Cordova)
If you need a base to start your next Ionic 5 app, you can make your next awesome app using Ionic 5 Full App


